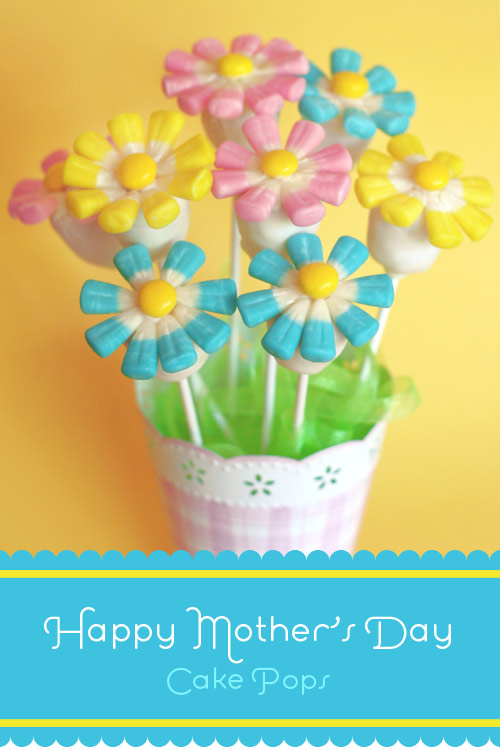
Mother’s Day is next Sunday, so I thought this was as good a time as any to experiment with some Flower Cake Pops. And, I had a bunch of leftover Bunny Candy Corn to get rid of, too. In addition to bunny ears, they make great pastel petals don’t you think.

I’m going to pretend that all of you that made the bunny pops still have these handy, too. You’ll need 8-10 pieces for each flower.
Make your cake pops following the basic cake pop instructions, but instead of shaping the pops into balls, make them more oval-shaped with one end flat so you can glue the flower parts on. Also, if you don’t want to make the entire recipe into flowers, you can divide the baked cake into fourths and freeze the unwanted sections for later use. Yay!
12 cake pops = 1/4 9 X 13 cake
24 cake pops = 1/2 9 X13 cake
36 cake pops = 3/4 9 X 13 cake
48 cake pops = One 9 X 13 cake
Man… I’m good at math.
Make sure you divide the frosting appropriately also.
Dip the pops in the color candy melts you want for your base. I used white here because it blended in with the white part of the candy corn and camouflaged the gaps a little.
Once dipped, let the cake pops dry standing up in a styrofoam block![]() .
.
When dry, dip the flat tops back in some of the melted candy coating. This will act as the glue. The coating should be starting to cool off so it takes less time to dry when you attach the pieces.
Now for the balancing act.
Lightly grip the cake pop in your left hand, so your thumb and forefinger can act as a ledge for the candy corn to rest on when you attach them to the top of the pop. If you can do this without letting your hands touch the sides of the cake pop… even better because your body heat can start to melt the sides if you’re not careful. It helps a little to let the lollipop stick rest on your leg if you are sitting down.
I know. I know. Sounds like a lot of work. But, I had come this far and they were for… you know… the person who gave birth to me.
Hold them in place long enough for the pieces to set/dry in place and not slide down the side of the pop… which will happen if you remove your hand too soon. Did I mention that this was an experiment? Anyway, when attached, place a tiny bit of candy coating in the center and attach the yellow candies to finish off the flower. Right about here, I realized how happy I was that I decided to only make a dozen of these.
Another method is instead of dipping the top of the pop in candy melts is to apply one petal at a time by dipping the bottom of the candy corn in some of the melted candy coating![]() and then glue it to the top. Wait a minute. Did you get all that? Because I think my head is going to explode.
and then glue it to the top. Wait a minute. Did you get all that? Because I think my head is going to explode.
I wish I had a picture to show you all of this, but my hands were kinda busy.

It’s a good idea to get all your pieces ready before you start any glueing. The centers in this case were yellow mint candies from The Fresh Market. (But m&ms would work, too.) And, if you’re like most of the population, and don’t have extra bunny corn laying around, you can try using licorice pastels![]() and licorice buttons
and licorice buttons![]() or check out the nearest candy aisle and get creative.
or check out the nearest candy aisle and get creative.

These licorice candies give more of a wildflower look, but still pretty. I like them (also from the Fresh Market) because their shapes are a little more irregular. You can also get Good & Plenty brand licorice candies in this color pink. They are just a little bit fatter and more uniform in shape.
When all the flowers are made, you can arrange them in a small heavy basket or vase (The heavier, the better, so it doesn’t tip over) with at least 2-inch thick styrofoam in the bottom. Also if you decide to transport, keep the flowers from touching each other. The petals can be knocked off easily if they fall into each other.
Gosh, It sounds like I’ve given you plenty of reasons not to try these. Hopefully the finished product makes up for it.
And, don’t worry. I already have an easier flower design in mind for the future. One not influenced by left-over candy pieces : )
Here are some other Mother’s Day ideas:
Flower Cupcakes
Mom Tattoo Cupcake