Did I mention that I stink at piping! If I haven’t, let me say it now. I stink at piping!
My niece had her 1st birthday the other day and I wanted to make a little cake just for her. I decided to try my hand at piping a basketweave design. But, I guess I should have practiced first because it didn’t come out exactly like I had hoped. I started by piping all the vertical stripes. Big mistake. Then I piped all the short horizontal stripes. This wouldn’t have looked so bad if I could have at least made my lines straight. But, since I stink at piping, this is what you get.
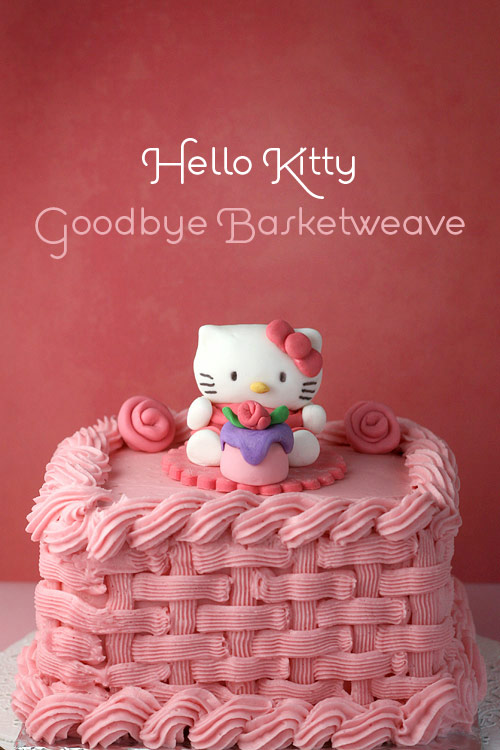
See those horizontal stripes, they should look like they’re tucked under the vertical ones. (I’ll show you the right way in a bit).
But, if we just look at it from above, it looks pretty good. Almost straight, even.
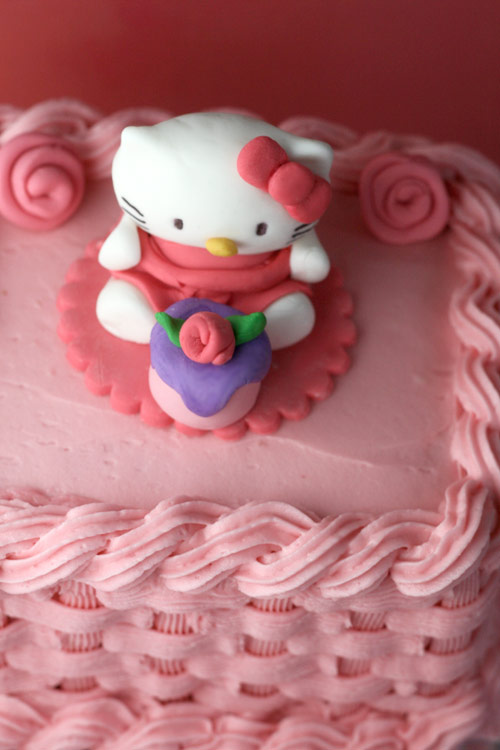
I do love the little Hello Kitty topper I made though.
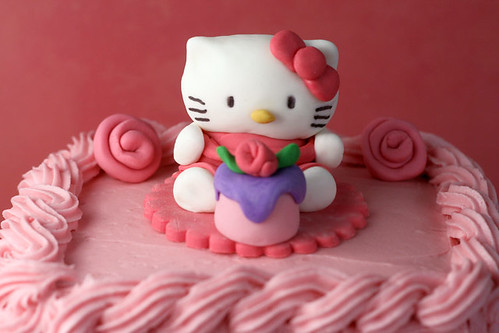
It was molded from rolled fondant![]() that was tinted with different icing colors
that was tinted with different icing colors![]() . The whiskers and eyes were drawn with an edible ink pen
. The whiskers and eyes were drawn with an edible ink pen![]() .
.
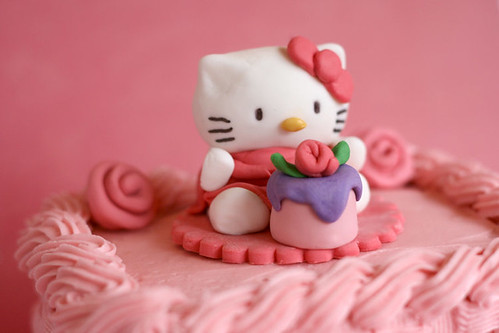
Just too cute!
Now, let’s see what the birthday girl thought about my poor piping skills.
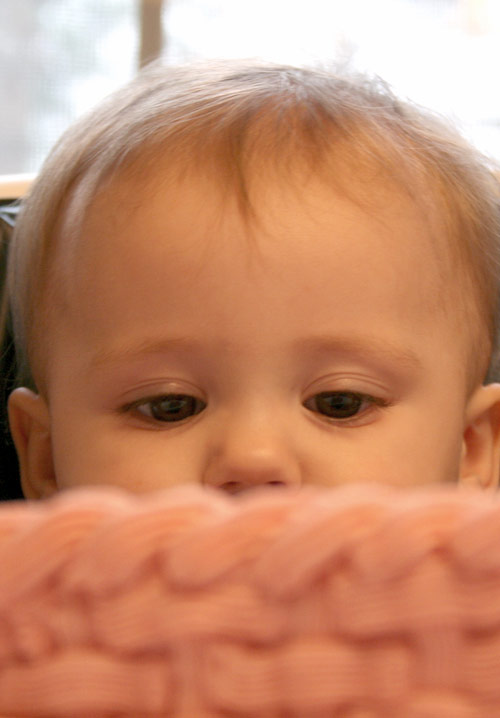
Hmmm… she’s really thinking about it.

Yay! I don’t think she noticed.
Want to try piping a basketweave?
Make some buttercream frosting (recipe here). Tint it with the icing color you want and get the following:
one decorating bag![]()
one coupler![]()
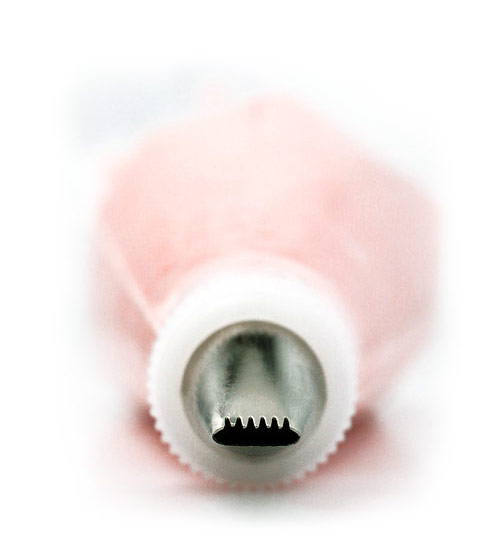
one decorating Tip #47![]()
Here’s what it all looks like…
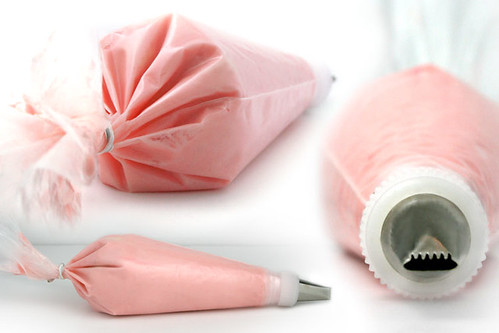
Don’t be scared. It has teeth, but it won’t bite. Promise.
Once your bag is ready, take a look at the diagram below. It’s from Wilton’s Course Book 2: Flowers and Borders![]() .
.
It’s too bad I didn’t look at this first. Oh well… at least you guys can do a better job.
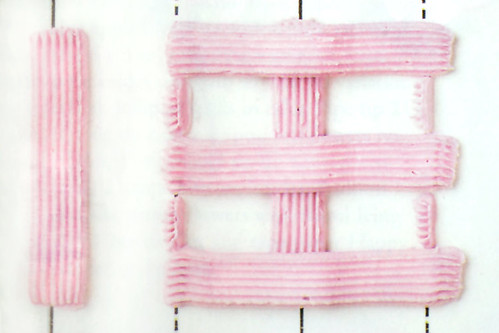
- Basically, you pipe a vertical stripe first.
- Then pipe horizontal stripes with spacers in between to make sure your widths stay consistent.

- Then you draw another vertical stripe covering the ends of the first set of horizontal stripes.
- Then you pipe another set of horizontal stripes. Start by burying your tip under the first vertical stripe to hide the end.
- Then you draw another vertical stripe to cover the ends of the second set of horizontal stripes.
- Take a deep breath. Take your time. Repeat.
That’s the abbreviated version. Hope the pictures help. The The Wilton Course Book![]() gives much better directions.
gives much better directions.
Good luck!
And if your wondering. I used the same cake and frosting recipe from here.
And rope border was made with decorating tip #21![]() .
.
These instructions are for your personal use only. To create Hello Kitty products for commercial sale, you must obtain permission from Sanrio. Visit http://www.sanrio.com/business opportunities/.


that is adorable! i never tried piping a basket weave, and i do
not think i would be good at it. but you sure are! :)
Your hellokitty is ugly haha “bakerella or Angie the perfect baker” haha not try to do me laugh.
you are good
How did you make “Hello Kitty?
whoever made the face of hello kitty it is ugly
HIIIIIIIIIIII
Do you have instructions on how you made the Hello Kitty? I’ve been wanting to learn to make figures with fondant. Great job!
i love the basket but hello kitty is a little fat
Oh your neice is ADORABLE!! :D And your cake is too! ;)
Oooh! I think that as long as it tates good, who cares how it looks? (This could be because im hopless at decorating.Period.)
We wish to thank you once more for the lovely ideas you offered Jesse when preparing her own post-graduate research in addition to, most importantly, for providing all of the ideas within a blog post. Provided that we had been aware of your website a year ago, we would have been kept from the pointless measures we were selecting. Thanks to you.
i have tried basketweave before but my cake was too short but i am going to wilton courses now so i will learn it properly
I LOVE all things hello kitty, and as a hello kitty expert i can tell you that you absolutley nailed it!! Hello kitty is sooo precious!!! GREAT JOB!!!!!!!!
i tried piping a cake on paper,and it was SO HARD!
that cake looks so good …i bet it is good!!!!!! my favorite character is Hello Kitty i love her ever since i was little and i still do!!!!!!!!!!!!!!!!!!!!!!!!!!!!!!!!!!!!!!!!!!!!!!!!!!!!!!!!!!!!!!!!!!!!!!!!!!!!!!!!!!!!!!!!!!!!!!!!!!!!!!!!!!!!!!!!!!!!!!!!!!!!!!!!!!!!!!!!!!!!!!!!!!!!!!!!!!!!!!!!!!!!!!!!!!!!!!!!!!!!!!!!!!!!!!!!!!!!!!!!!!!!!!!!!!!!!!!!!!!!!!!!!!!!!!!!!!!!!!!!!!!!!!!!!!!!!!!!!!!!!!!!!!!!!!!!!!!!!!!!!!!!!!!!!!!!!!!!!!!!!!!!!!!!!!!!!!!!!!!!!!!!!!!!!!!!!!!!!!!!!!!!!!!!!!!!!!!!!!!!!!!!!!!!!!!!!!!!!!!!!!!!!!!!!!!!!!!!!!!!!!!!!!!!!!!!!!!!!!!!!!!!!!!!!!!!!!!!!!!!!!!!!!!!!!!!!!!!!!!!!!!!!!!!!!!!!!!!!!!!!!!!!!!!!!!!!!!!!!!!!!!!!!!!!!!!!!!!!!!!!!!!!!!!!!!!!!!!!!!!!!!!!!!!!!!!!!!!!!!!!!!!!!!!!!!!!!!!!!!!!!!!!!!!!!!!!!!!!!!!!!!!!!!!!!!!!!!!!!!!!!!!!!!!!!!!!!!!!!!!!!!!!!!!!!!!!!!!!!!!!!!!!!!!!!!!!!!!!!!!!!!!!!!!!!!!!!!!!!!!!!!!!!!!!!!!!!!!!!!!!!!!!!!!!!!!!!!!!!!!!!!!!!!!!!!!!!!!!!!!!!!!!!!!!!!!!!!!!!!!!!!!!!!!!!!!!!!!!!!!!!!!!!!!!!!!!!!!!!!!!!!!!!!!!!!!!!!!!!!!!!!!!!!!!!!!!!!!!!!!!!!!!!!
You’re cake came out super cute. Basketweave can be a frustrating piping technique. What works for me is releasing pressure a little before I plan on ending my line. Happy Baking! :)
it is so cute
I don’t think your piping stinks. MY piping stinks. But I will try to practice this one day.
Meeta – thanks
Magpie – I’m still an amateur with it but i like learning.
gopg8r – thanks. her eyes are pretty priceless.
magnet invitation – why thanks a bunch.
I love this blog!Amazing little cakes with instructions. It has become my absolute favorite place to go! So funny and the food recipes and photos are divine! thumbs up!!
Attention All Bakers…You’ll want to know that 100% whole grain sprouted flour can be used one for one in place of all-purpose flour and it tastes amazing as it digests as a vegetable. I couldn’t believe the results…in my baked goods and my reduced waist! Available from Shiloh Farms.
Soooo sweet! Love the cake, your basket weave and your niece!! Her reaction to the cake is precious!
I was going to make this comment up with the Wii giveaway, but a) I have a Wii, and b) there were so many comments…
You are awesome with the fondant. I’ve only done fondant once – when I was figuring out how to make my wedding cake – it’s so much fun – and you do it really really well.
The cake is so pretty. Hello Kitty looks so cute. I like the colors..very sweet and nice.
Hope to try basket weave method soon. Thanx for your tips.
http://mathizworldofcakes.blogspot.com
Hello Bakerella, I love your creativity ! Anyway, looking at all the cupcake faces makes me think you look like a “c” :)
Mary – Thanks!
The Cake Lady – I think you’ll have a lot of fun with them.
What an adorable Hello Kitty!
I just bought the idible pens and am excited to use them!
You have a great blog!
Shelley
The Cake Lady
http://www.mynewcakehobby.blogspot.com
Hello!
I really like what u do, it’s amazing ! This Hello Kitty cake is absolutely beautiful.
I’m a poor to do cake but you, you’re such a lovely and talented baker :).
Good luck !
Kind regards,
Mary.
Thanks for saying so Sandee!
I love this cake! Hello Kitty is so adorable! You did an awesome job with her. And for your first time, I think your basketweave was excellent! I took the Wilton Course 2 class last November and most of the cakes leaving the class didn’t look that good, and we had a live person showing it too us! So kudos, all around! Oh and your neice is a sweety!
Sandee – Cake Thoughts
Jennywenny – Well, I hope you do
Jeff and Judy – thanks!
I Love It! Looks Great!!
Bless, that is adorable, I was just thinking how it was about time I had a go at a hello kitty design! Glad the niece liked it, I’ve got another 7 1/2 months to practice for mine, thats if I get to see her, she’s so far away.
Emily – what if you bought these boxes and made two cupcakes for each guest. You could decorate the tops to go with the shower theme or baby names or colors if they know what they are having. The double box would be a cute gift to the attendees, too.
http://usbox.com/creative-food/takeout/double_cupcake_box___insert.html
Michelle Aguilar – thanks!
Catalina – I stopped by.
Carrie Leber – I need to practice more.
Aurélie – thanks!
Girl Who Can’t Cook – And it will be fun tasting the test subjects, too.
My sister is SUCH a big Hello Kitty fan! I would love to be able to make that gorgeous cake for her birthday…good thing I’ll have 9 months to practise! *LOL
What hello kitty cake beautiful, amazing… What talent !!
that is really adorable and great ideas for piping – it takes such patience, I don’t do it well.
You´ve been such an inspiration to prepare nice looking things!!!I`ve been doing a couple of the ones you`ve done but they hardly look that good´, take a look these next days at gastrobaskandco.blogspot.com
Have a great 2009, and post more lovely things, please!!!!!!!
oh wow, love the cake and everything in this blog.
Wow, you are superior with your decorating and all.
I completed coarse #1 at Michaels for cake decorating but, need to continue. I love to bake.
I even got the big Mama. LOL
Love the coke cupcakes, brillant idea. Yippee!!!!
I love this site, another wonderful creation! Bakerella, I have a quick question….I am helping throw a baby shower next month (Feb) for TWINS! I am in charge of the cupcakes, and was wondering if you might have any creative twin ideas? Thanks! :)
Nancy W – that's great.
Bryna – I'm starting to see the light.
Maggie – I think it's called a rope border.
peewee – bake it for yourself.
Lilla huset på prärien – why thanks
HethRandSeth – thank you
Priscilla – I do a screen capture of each image and then combine them in photoshop to make a graphic.
Heather – it's hard not to
Gretchen Noelle – I know, can you believe it.
Chere – thanks
J Sandifer – thanks for the tip
shirley elizabeth – I haven't made one yet, just google it. You'll get a lot of ideas.
Chinouk – thanks
Jaina – thank you
Aimée – I'm glad you can admit it. We should start a club.
Anonymous -I've just seen so many pics of how it's supposed to be done and I can't get it. Ugh!
pearlsandchocolate.com – thank you
TeaLady -you said it.
Brittany & Barry – thank you
Anonymous – Thanks!!!!
Helana – thanks
Your Frugal Friend, Niki s- thanks
Ileena – thank you
Crys :D – funny. and you're welcome.
suzette – Thanks Suzette
Wendy aka CalvaryGirl – you should jump back in.
Teresa Cordero Cordell – thanks. that's good to hear.
Kelly – Why don't you try some heart shapes. That should be pretty easy. Take a look at the oreo balls I did, in Jan 07 I think.
TranquilityKnots – thanks for the tag.
Eveline – she's a cutie
Aggie – thanks!
Michelle – I'm loosening up.
Bethany – I just bake for friends and family right now.
Anonymous – Glad you received it. they're great aren't they! You can get more on amazon.com. There's a link in the original giveaway post.
Kitty – I'll check them out. But I'm sure they are great.
Marie (from France) – merci
It’s really beautiful!!
Thank you for the tips you make it so much easier to learn!
I LOVE your site and wanted to show you my very first cake pops!! Please let me know what you think!! http://norwegianrefugee.blogspot.com/2009/01/baking-rewind.html
I can’t wait to make more!
I love Hello Kitty and that cake was adorable! I just received the cupcake holder that I won from your last contest…Love it! Where can I get 4 more? *l* Love your website…made the cake pops w/the kids over the holidays and they just LOVED IT!
I think it’s a great cake! I have been following your blog for quite some time but just realized that you were in Georgia. I am in the metro Atlanta. Do you sell any of your masterpieces? If so, tell me where to go!!!! :)
I think your cake came out wonderful! You did an amazing job on Hello Kitty and I think your piping looks really nice too. you’re too hard on yourself. Your niece is adorable
I am in love with Hello Kitty and am VERY excited about your beautiful cake!! Its adorable!!
What a adorable pictures of your niece. She sure looks like she loved your cake. Your Hello Kitty is so cute.
Eveline.
You are one seriously talented lady! Your cakes and cupcakes always make me hungry! Hope you have time to play this game. Yeah! You’ve been tagged =)
http://sallyzblog.blogspot.com/2009/01/i-got-tagged.html
I just love your site. Thanks again! Any plans for Valentine cake pops?? We are having about 10 Six year olds over for a cupcake day in a few weekends to get ready for Valentines Day, I would love to bring a cake pop idea to the table!
Bakerella, I’ve been viewing your blog for some time now and I must say I’m absolutely astounded by you creative work. Kudos to you my friend. Keep up the inspiration to the rest of us. We all really appreciate it.
I loved the cake! I’m amazed that you done that figurine. If it were me it would have been store bought ;) You are such an inspiration. I used to play and bake and decorate years ago, but got away from it. Watching you makes me want to do it again!
Wendy
My Blog: CalvaryGirl
You do NOT stink at piping. Your borders are gorgeous! You totally understand that doing all the verticals at once is the ONE thing that needs to be done differently. Love the topper! And the little girl. She’s adorable. Basketweave is a nice effect – but very time-consuming. And it kills my hands. I did my daughter’s 3-tier wedding cake in basketweave. It was lovely, but…never again! :)
i squealed when i saw this. out loud. in my office. and coworkers heard me.
but i’m not ashamed! sure, this cake isn’t as elaborate as some of the cakes you’ll find on geekologie, but it’s understated, classy, and ridiculously cute.
finally, THANK YOU THANK YOU THANK YOU THANK YOU for spelling out how to do basketweave. I am so inspired!!! :)
I think it looks great!
I think you did a great job!
:)
Don’t be so hard on yourself! YOu did a good job trying even if you were not so happy with the end reesult!
Brilliant!!!!!!!!!!
Your cake looked totally great! I love Hello Kitty too!!
Great cake. I love basket weave, but it isn’t easy.
You are amazingly creative! Love you site!
I am just so in awe of your creations! I would never have noticed any flaws in that cake if you wouldn’t have pointed them out. Guess that’s what separates the experts from the wannabes…
You niece is adorable and the cake is the sweetest!
My name is Aimee and I am basket weave challenged.
I still think it looks delicious.
It looks beautiful and yummie to me!!
Okay I have a big question for you. On Sunday my new husband and I were invited to dinner with a friend couple. I was asked to do dessert. I had one egg. I pulled a family recipe for the simple white scratch cake and halfed it. Perfect. But next to that recipe I found an oh so tempting caramel frosting. Of course I did it, and my first attempt was a disaster and I ruined the top of the cake. I persevered and on my second try got something edible, though it didn’t look so and we ended up calling it “crater cake.” THe thing is, everyone loved it and I surprisingly had an empty dish to take home.
So, I guess the point to this story is that I am now on a mission to perfect a caramel frosting. Do you have any tips? Any recipes for a creamy or fluffy caramel frosting? anything would be helpful.
-shirley elizabeth
Cool tutorial! She was very happy :)
$50 Wedding photography Raffle to support Pink Initiative. Join the cause…
Hi Bakerella, you are bing to hard on yourself. It is pink, girlie and beautiful. I would love it at 51. Keep up the great work.
That topper tops it all! You made that???? Wow!
Great Cake! I love the Hello Kitty.
Hi Bakerella, could you tell me how when you post winners from your contest…you are able to get their picture on the blog and the random integer page too? I would really appreicate this!
Once again, you are so talented!!! Super cute cake!!
Actually Bakerella – I think your cake looks absolutely fabulous!
I just found your blog and am officially obsessed! i am ready to bake a cake tomorrow! i don’t know who for, but who cares! GREAT blog!
I really love the piping at the top. They look like their intertwined. Beautiful!
You are so funny! I think you did a GREAT job silly!
I think the cake is perfect! I guess we are always our worst critic. I’m so glad to have found your blog and will be a follower without fail! Happy New Year!
Anonymous – I hope she does.
My Sweet & Saucy – Isn't it fun.
Chinouk – thanks!
reilly – If you don't mind a mess, let them start early. She can help you hold dump sugar or flour.
Female Farmer – Yes, and bright.
Red Geranium Cottage – I think so, too.
Callie Grayson – that was her idea.
Teresa R – Def get the book.
Lauryn – Sounds fun, but I'm no expert.
Bridget – thank you
khala – merci
Crissy – Thanks
Seanna Lea – $10 … that's crazy. They must be elaborate.
Paula – Have a great 09 right back at you!
Meegan – yes. And a perfectionist.
MC – She picked it right up. I was surprised.
cottage farm villa (aka cottagecharm) – go right ahead Cheryl
Reese – Organizing or eating sprinkles?
Cindy – Thanks for the kudos.
Tabitha (From Single to Married) – she loves taste-testing more.
Anonymous – thank you
Wanda – what a wonderful compliment. Thank you. I'm glad you are doing well and wish you many sweet moments in the kitchen.
Anonymous – Thanks. I must rush to Kroger.
Shawnee – Major thanks!
Y – Happy New Year.
Susan – You would have fun!
hollyc – thanks
My First Kitchen – I like the one where she's starting to get bored, too.
Joy the Baker – I'll have to watch my back don't ya think.
Ann (Miss Sweetstory) – I'm sure you will.
Katie – I'll have her give you some tips.
Kelli – thank you.
LaDue & Crew – I did take some time, but, I'm back now.
Helana – thanks
Kelsie – they were yummy. Especially the ones with snowflake sprinkles.
* TONYA * – thanks!
Spectacular Splatter – Congrats on the blog.
The Ibrahims – thank you!
jacquisbakingsomething – Happy New Year to you, too!
You do NOT suck at the basketweave—and who would know exactly what a “perfect” weave would look like if you hadn’t shown us.
I, too, took all the Wilton courses, and basket weave is left to the interpretation of the “weaver”.
You rock with that cake gal!!
such a pretty cake!
I think the cake looks fantastic and as for the wonky basket weave…a blind man would be happy to see it!
Your photos are so amazing. You’ve inspired me to try my hand at food photography on my own blog –
http://oneordinaryday.wordpress.com/
I’m still working at it though, but having fun!
That actually looks pretty good for a first attempt =] I’ve taken all the Cake Decorating Courses offered by Wilton, my basket weave looked hideous =[
I love the colour combo. And the Hello Kitty figurine is fab! Whenever I try to make figurines, the face turns out fine but not the body.
Great tutorial, and the cake looks amazing!!!
Seriously? That cake is lovely! And your niece’s reaction – priceless. Thanks for sharing, and for the basketweave tutorial.
i love it!! such a beautiful cake :)
if I have enough time, I might consider attempting this for my roommate’s 21st birthday cake!
Just wondering how you set up your always perfect backdrops?
That cake is absolutely precious! I LOVE Hello Kitty & I'm 40! My daughter even got me a Hello Kitty cake for my 40th birthday. Wasn't nearly as adorable as your cake. I've never attempted basketweave, but I can assure you your first attempt would be considered perfect compared to what I could do.
I think it looks FABULOUS!!
I tried your buttercream frosting recipe for cupcakes I made for New Year’s Eve and it was DELICIOUS!!! So delicious that I ate all the leftover straight from the bowl. Thanks!!!
I, too, hate the basket weave! I think yours looks fine. The Hello Kitty is absolutely adorable! Super cute as always. :)
Thanks for posting the cake! First, it looked really good; I didn’t even notice the basketweave until you pointed it out. Secondly, that photo of your niece clapping with delight is amazing! I appreciate you posting this tutorial. I think I might have to try it sometime.
I think your cake looks beautiful and I love the hello kitty on top! I especially love the birthday girl’s reaction. That is priceless. Once again you rock my world!
Thank you for going a step further and showing how to do the basketweave. Definitely inspiring!
OMG, the cake is so freaking adorable! And don’t be so hard with yourself. The basketweave looks pretty good to me… and hey, your nice – soo cute btw – seems to like it too!
We all have different talents. My basketweave is fine but the hand modeling of the adorable kitty is beyond me. I really appreciate you explaining what you were trying and why you are happy/not happy with the results. We can all learn something. I often try ambitious things or last minute jobs for family/friends & get shy about posting them when they don't turn out perfect. (El Cad)
OMG! I love it! I think you did a GREAT job! I didn’t even notice the stuff you think you did wrong!
It’s amazing — Seriously!
Smiles,
Jen
I wish I had the patience and dexterity to do that. I love to back and I love to ice, but after a while of icing, I just want to collapse!
I would have never even noticed – your cake is beautiful!! As is your photography – very nicely done!
The cake is fabulous, and the colors are so girly and sweet! If you’d taken my picture upon seeing the cake, I’d have a toothy grin, too… complete with lots of clapping.
great tutorial! and I am pretty sure the birthday girl didn’t notice at all – she looked thrilled beyond belief!!! Happy 2009!
Totally didn’t notice!
it didnt look bad at all! and your niece is sooooooo adorable i wanna bite her cheeks! hehee
Never really thought that I could accomplish something like that. You’ve now shown me I can! Thanks!
You should be Very Proud of your cake. It is beautiful!!! You did a great job!! Your work is outstanding!!!
Michele S
The cake is very pretty. I learn with each new cake, each new birthday and look forward to trying the basket weave. I love the Hello Kitty – nice work. ~Kelly
unDeniably Domestic
Wow–if that’s what it looks like when you say you can’t do it–I am amazed :-)!!! You are awesome! Thanks for the tutorial!
The cake turned out great! I love the color of pink you used. Your tutorial is great and the pictures are wonderful (as usual). TFS!
what a perfect picture of joy!
I love her clapping…thanks for sharing…
eBeth
Your cake impressed me. I wouldn’t have even noticed whatever it was that was wrong…
You have an amazing talent!
Beautiful! That topper is just the cutest thing!
I’ve never tried the basketweave. So, thanks alot for the tips! :)
Thanks for the tutorial. I’ve always wondered how to do that. It turned out adorable. Of course, all of your stuff is adorable!!
I LOVE the cake! Gorgeous. I think the basket weaving looks fine.
You are way too hard on yourself (I always do that too though) The cake turned out adorable though…I love the colors and the topper!
That cake is adorable and almost as cute as that precious baby!
Are you kidding me…this is adorable! Your photographs are amazing too!!
I loved it!!!!!! Super sweet!!!! What a blessed baby!!!! Cute, cute, cute!!!!
the cake is adorable!!!! Piping is hard stuff and I think you didn’t a better job than I have ever done! I cheat and decorate with stars!
I think hello kitty is so cute. This is an awesome cake. I would have never known you stink until you admitted your shortfall. Icing is one of those things for me I do not care about design I still love the taste every time.
looks way better than my Basketweave ever has! That picture is so adorable! Get outta town- she is adorable!
Your cake looks great too!
Alright, even Wonder Daddy is laughing at how ADORABLE that little girl is! Great photos :)
Ok me thinks you are being just a little to critical of your basket weave. I mean for your first time come on…lol. And your Hello Kitty figure ROCKED!!!! Thank you so much for sharing pictures of the birthday girl what a cutie pie.
Hope you have all the best in 2009 and thanks for bringing us such a great blog.
The cake looks beautiful – Hello Kitty is perfect and your niece is adorable. Looks like she approved from the pic of her clapping :)
Dear Bakerella-
When I grow up I want to be you. I think the cake looks great regardless of straight lines.
Oh, my… that was a beautiful cake (and what a sweet reaction from your niece!). You are great at piping – just think how good you would be with a little practice! Much… much better than me! I am thinking that the consistency of that frosting has something to do with how good the cake looked! I am defiantly trying that!
Btw, have you tried marshmallow fondant? My kids don’t like the taste of the regular stuff, so I just do marshmallow…. the consistency is the same to work with and it turns out great!
Let me know if you would like the recipe.
Hope your Holiday was lovely!
Angela
I would not have noticed it had you not pointed it out. I love it!
The cake is beautiful…and I think your piping is great!
I have seen much worse come out of bakery!
Hey I think your cake looks amazing. For not doing the basket weave right, it sure looks pretty good. To an un-educated person it would look normal. Good job and super cute!
The Hello Kitty is priceless. The basket weave looks complicated. Your cake still looks awesome!
Thanks for all the great photos and the explanation of how to create a basket weave.
Hello Bakerella, Please forgive my boldness, but I am doing a bit of blog surfing to tell people about my giveaway. There are no gimmicks. This is just my way of celebrating two years of blogging. I hope that you will do me the honor of coming over and taking a look.
I stink at basketweave but after seeing your instructions I think I’ll give it another go. The hello kitty is too cute!!! Thanks Bakerella!!
I know everyone is critical of their own work but that really is the cutest cake I’ve seen in a long time. I showed my 7 year old daughter and all she could say was “Awwwh! I wish you could make cakes that good!” LOL
Your cake turned out awesome and that niece of yours is a cutie pie! The basket weaving lesson makes my brain hurt a little……
What a beautiful cake! You really are so talented! I’m hoping to take a cake decorating class someday when my daughter is in school full time and I can practice and bake! You inspire me!
It’s beautiful, and I love her reaction! :) I dunno, maybe I’m just weird, but I think “imperfections” really give character and heart to a creation. Perfect schmerfect… ;)
I wouldn’t have noticed! It looks adorable and I love the picture of your niece clapping! I think I one year old is a great judge of what looks good…they are honest! LOL! Wonderful cake!
I think it still looks sweet. Also, I’m sure it tasted wonderful.
Nancy
http://www.basketmasterweavings.blogspot.com
As a Wilton instructor I have to say GREAT JOB! Not every cake will be perfect but you know how you can tell it is a great cake? Look at the smiling face of the person you gave it to! That makes it PRICEless!
Looks beautiful to me, Bakerella. :)
Just the fact that you’re willing to post your less-than-perfect creations, learn from them and teach us says a lot about you, Bakerella! I think that’s why we all love reading your blog. :) I completely agree that only the pros would know it wasn’t exactly how it was *supposed* to be, that Hello Kitty is so darn cute and your niece is absolutely adorable. Well done!
that came out SO pretty!!
I love your fondant figurines, I do not make mine nearly as beautiful as yours are…and that cake recipe rocks!!
~Tiffaney~
Thanks for the tutorial, but your cake looks great too!
I think the cake is beautiful! Fantastic basketweave, especially considering it was your first time. Thanks for posting the tutorial — I have never seen one that spells it out so well. I have done basketweave many times, but have never felt that I was very good at it. I think the tutorial will be very helpful the next time I do it. The Hello Kitty figure is adorable. It’s no wonder that the birthday girl loved her cake! :)
Hello kitty must be popular, I’m making one this week too! Your kitty is adorable, great job! danielle
Our wedding cake was basket weave, but seriously, I would not know you “did it wrong”! It’s too cute and Hello Kitty takes all the credit, that’s where the eyes look.
Great job!
I think you did a great job, for your first time! The instructions sound hard… but I do better, hands on. Might give it a try some time.
wow! I don’t think I’ll ever venture that far, but this is a GREAT tutorial!
The cake looks beautiful – the birthday girl seems to agree :-)
That cake is gorgeous!!! I love the tips on how to do the basket weave. I’ll probably mess it up and I’m not as skilled in that department but practice makes perfect.
The Hello Kitty on top is so cute! I love it, and looks like the Birthday girl did too =)
I think it’s adorable! I haven’t tried this basketweave yet but I do plan on it. Thanks for all the tips and I do love that little Hello Kitty on the top!
it doesn’t need to be perfect in my mind to be beautiful. it’s all that time and love that went into making that cake for that gorgeous little girl.
And I can’t believe that Hello Kitty – you made that? Amazing! I think you did a GREAT job.
the basket weave is way above my skills, I am lucky to get any icing on looking halfway decent, heehee…
I just recently took the Wilton 1 cake decorating class. Whew…Couldn’t make a rose because my buttercream was never the right consistantcy! How frustrating! I think basketweave is in the next class–No thanks! Too much pressure!!(Tee Hee) Your niece is adorable!!
Well I think it’s ‘stinkin’ cute! Who would’ve noticed had you not pointed it out? The birthday girl obviously thinks it’s perfect.
I love the pink & I love the basket weave. Your neice is gorgeous of course, I wonder how long before she becomes Bakerella #3!
So freaking adorable!!!
I took the first Wilton course, which didn’t cover the basketweave. It’s good to know that with care it is something I could do (and the correct tip).
You make wonderful fondant items. The Hello Kitty is perfect!
I think you did a nice job anyways, if you dont point it out I would have not notice at all!!
Love that Hello Kitty has her own cake ;)
I think your cake looks perfect – and your niece is too!
Your Hello Kitty looks so cute. I’ve made a Hello Kitty before and I can say that I stink at that!
Nonsense..it looks so pretty and to most “untrained” eyes, it looks perfect. Your niece is a doll!
The cake is beautiful! Your tutorial was awesome, but thinking about actually trying it made my brain hurt!
Beautiful cake but I must say that this little girl is even prettier. I do love your pictures of this little princess.
Happy birthday for the baby and Happy New Year for your.
What a priceless photo of the birthday girl! Love your cake, and thanks for the instructions!
I love doing a basket weave.
Why?
Because when you mess it up, like you did, you really can’t tell.
Well, I could tell, but it didn’t look bad. Superman works for The Longaberger Co., and they make baskets.
Hand woven baskets always have slight imperfections.
Your cake looks fabulous. I heart pink.
Il est trop mignon ce petit garçon !!
Il faut dire qu’il est gâté avec ce superbe gâteau !!!
Bizzzzzzzzz
Barbichounette
Never done basketweave. The fact that you did it yourself is special enough. Glad the recipient enjoyed it and the photo certainly says it all.
I love all your creations – you are very talented!!
Still looks better than anything I would have done!
Sommer
How cute ! i love Hello Kitty ! you re great:) Don’T worry the basketweave is not that bad. and the cake looks adorable. No wonder the little girl was clapping with joy :)
I love it- so cute! I love doing basket weave! It took me a few tries, but I have it down, and it is my favorite ‘go to’ for an elegant look. So glad to see this post- it means you are back! Missed ya Bakerella- Happy 2009!
That is darling, and her reaction is priceless!!
I would be so lost on basketweave, heck I’ve never attempted a lattice pie crust either, lol.
-oooh, I forget, have you let us see your photo set up before? I’m curious about your lighting and how you set up, I need something for night time, since my sunlight goes away fast. ;)
It’s still a pretty cake. I stink at basketweave. I hate it. My Wilton instructor from a few years still laughs about the fact that I cant do it.
I still think the cake looks beautiful, if you hadn’t pointed it out, no one would’ve noticed!!
I loved the tutorial on how to do basket weave though, I will have to try it out sometime when I am feeling brave!
The hello kitty is adorable…and so is the Birthday girl!