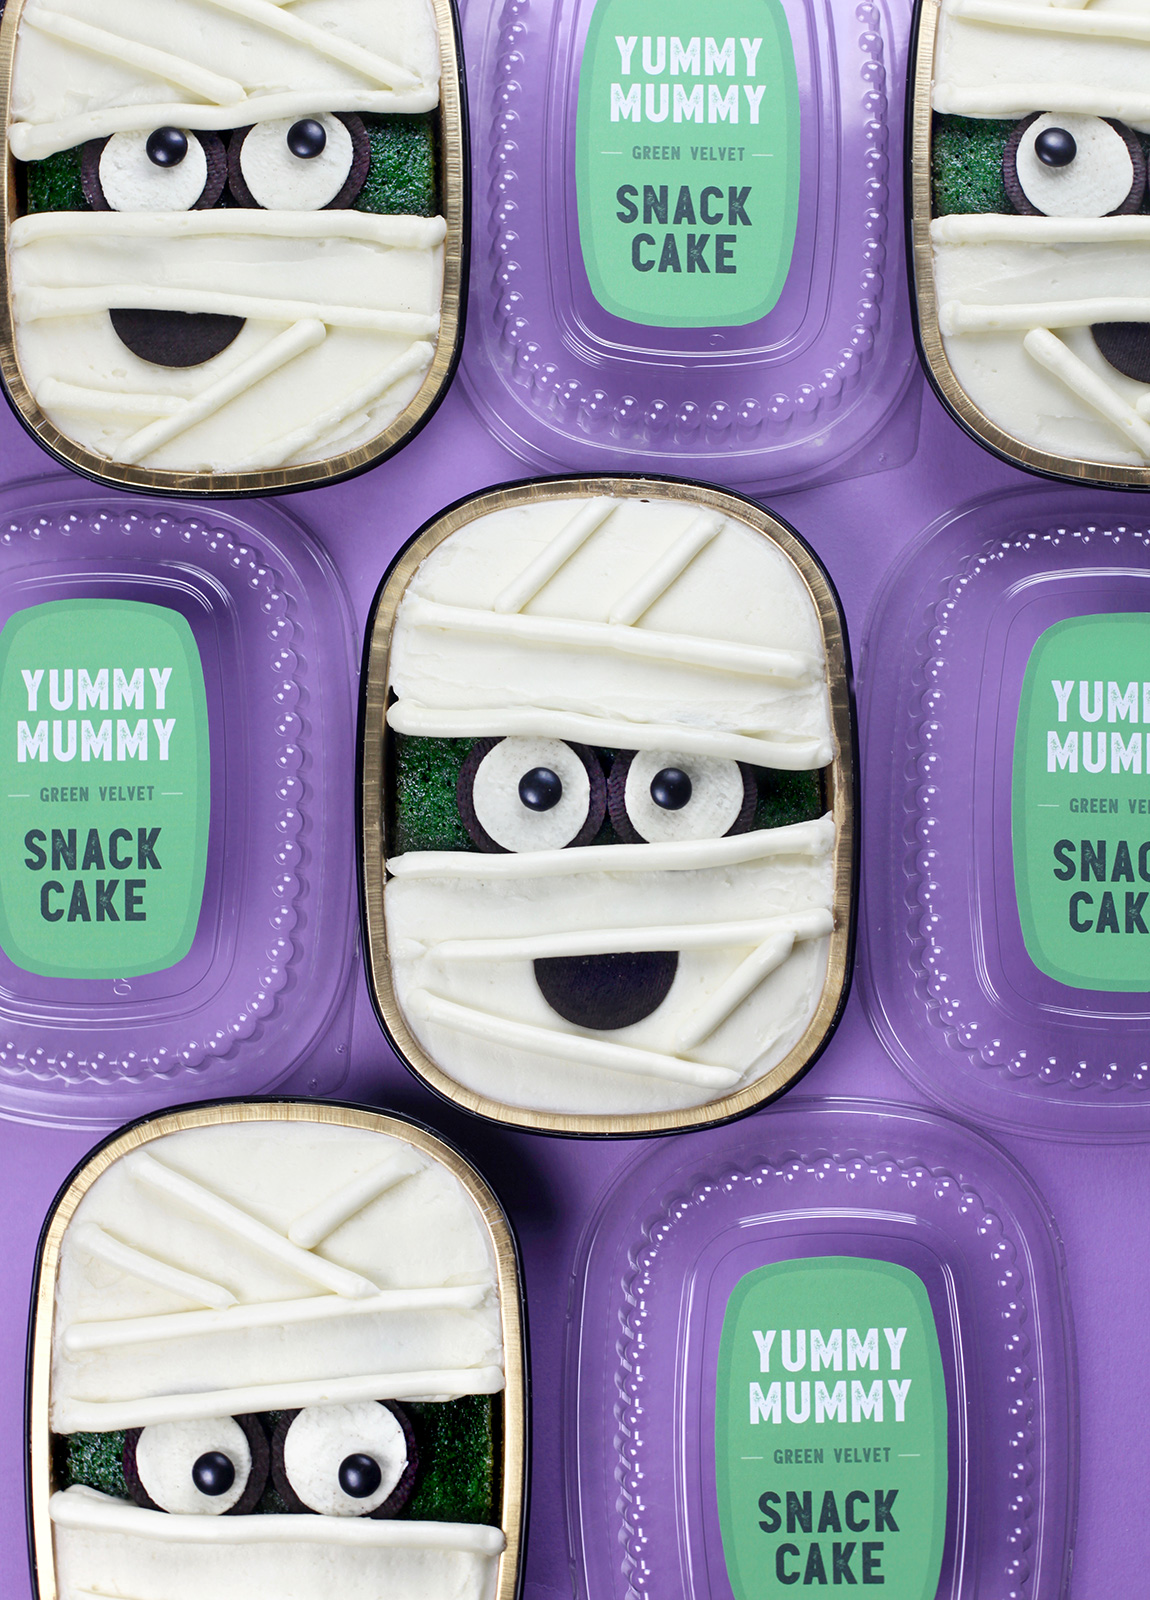
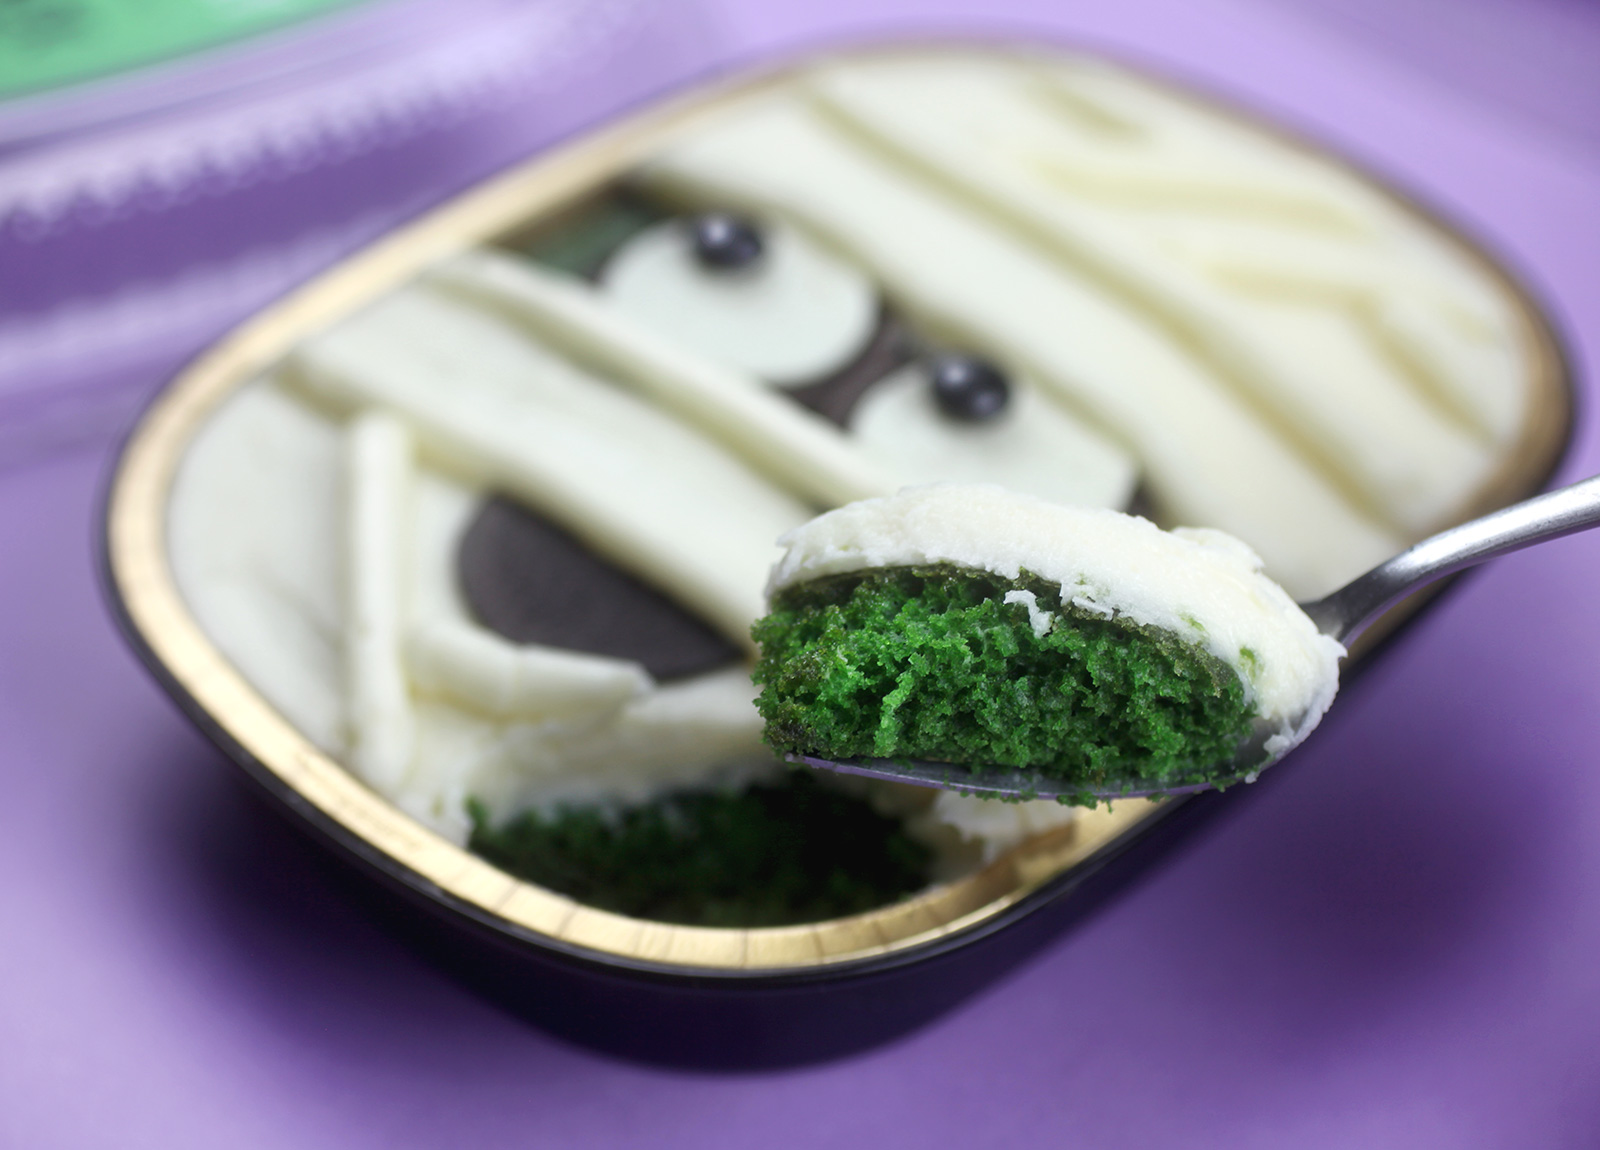
Halloween is almost here and I couldn’t resist making and decorating spooky cute snack cakes to get in the mood. I’ve been wanting to try one of my cake recipes to bake in these individual foil baking containers to see how many cakes it would yield. So I used my red velvet cake recipe (turned green, of course) for the mummy faces and then decorated them as simply as I could for a pretty fun and easy individual treat.
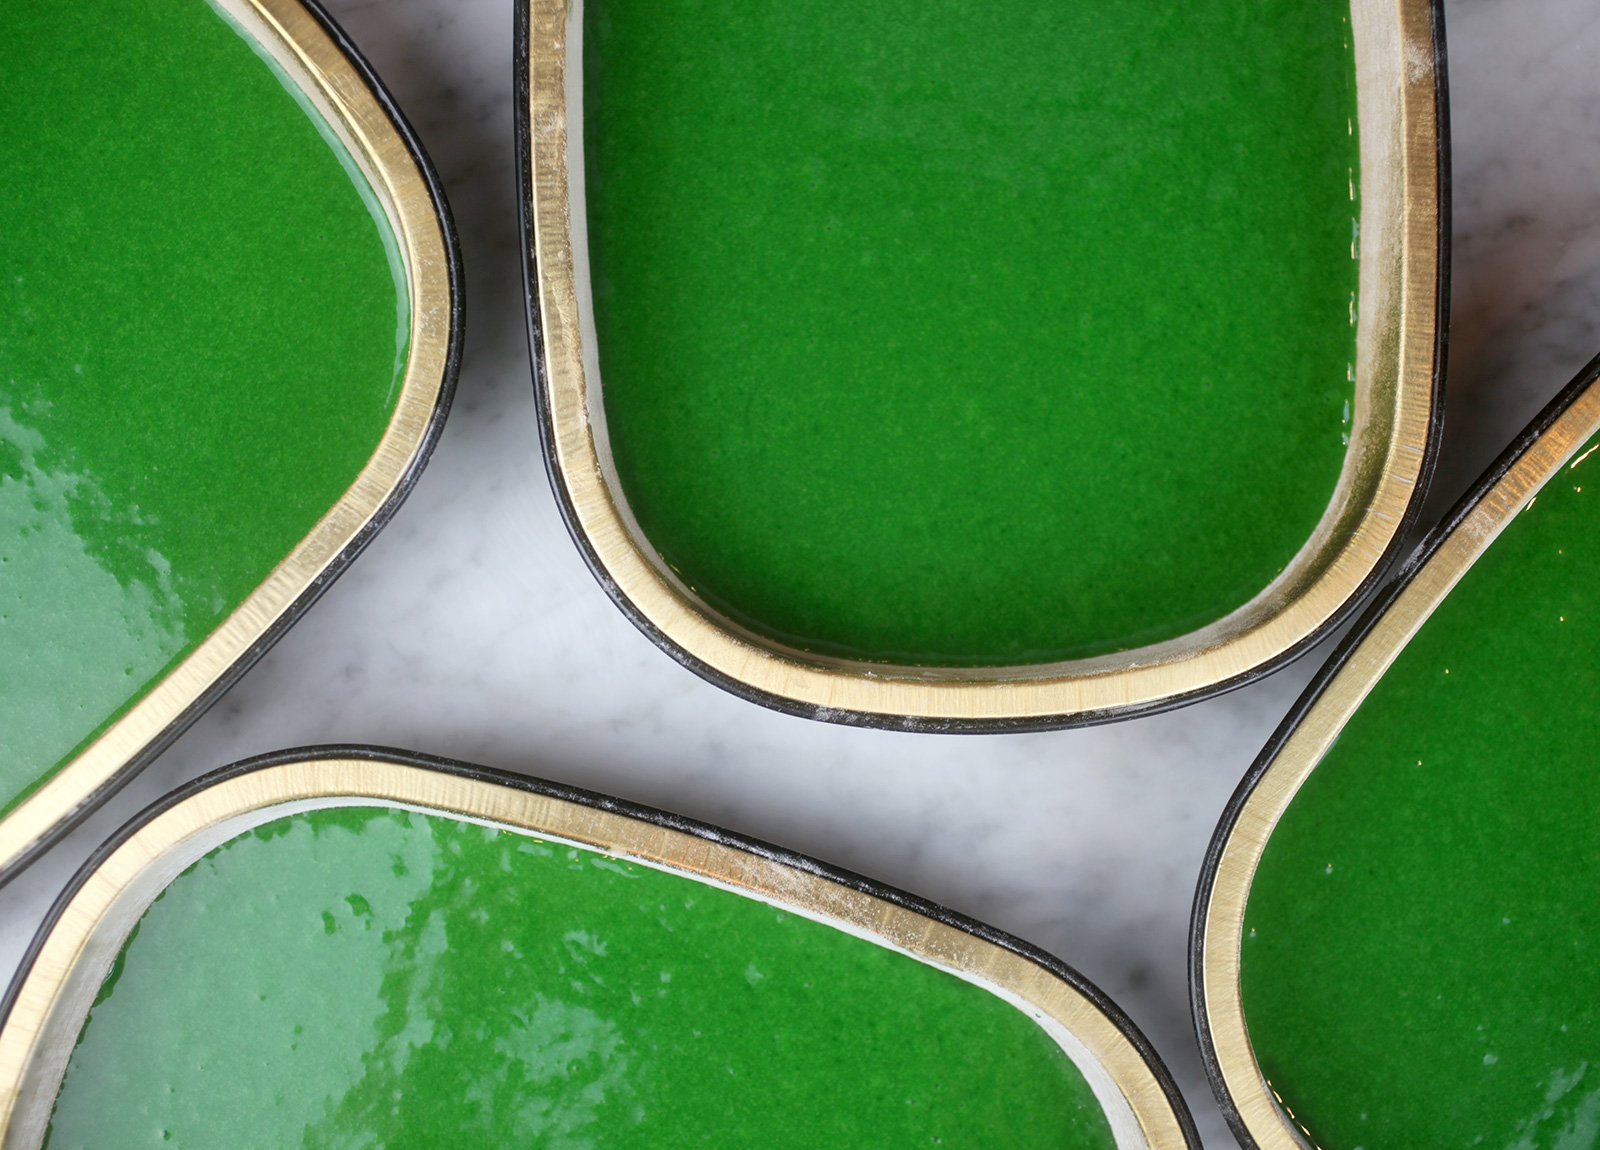
Green velvet cake batter. Not the most appealing in general, but it definitely works for this project. I like the green for these because it allows a hint of the color to show for the mummy faces. Now, if I were decorating these and covering the cake completely with frosting, I’d just stick with regular red velvet, you know.
The recipe yields four snack cakes using these cute containers. So… pretty good for gifting.
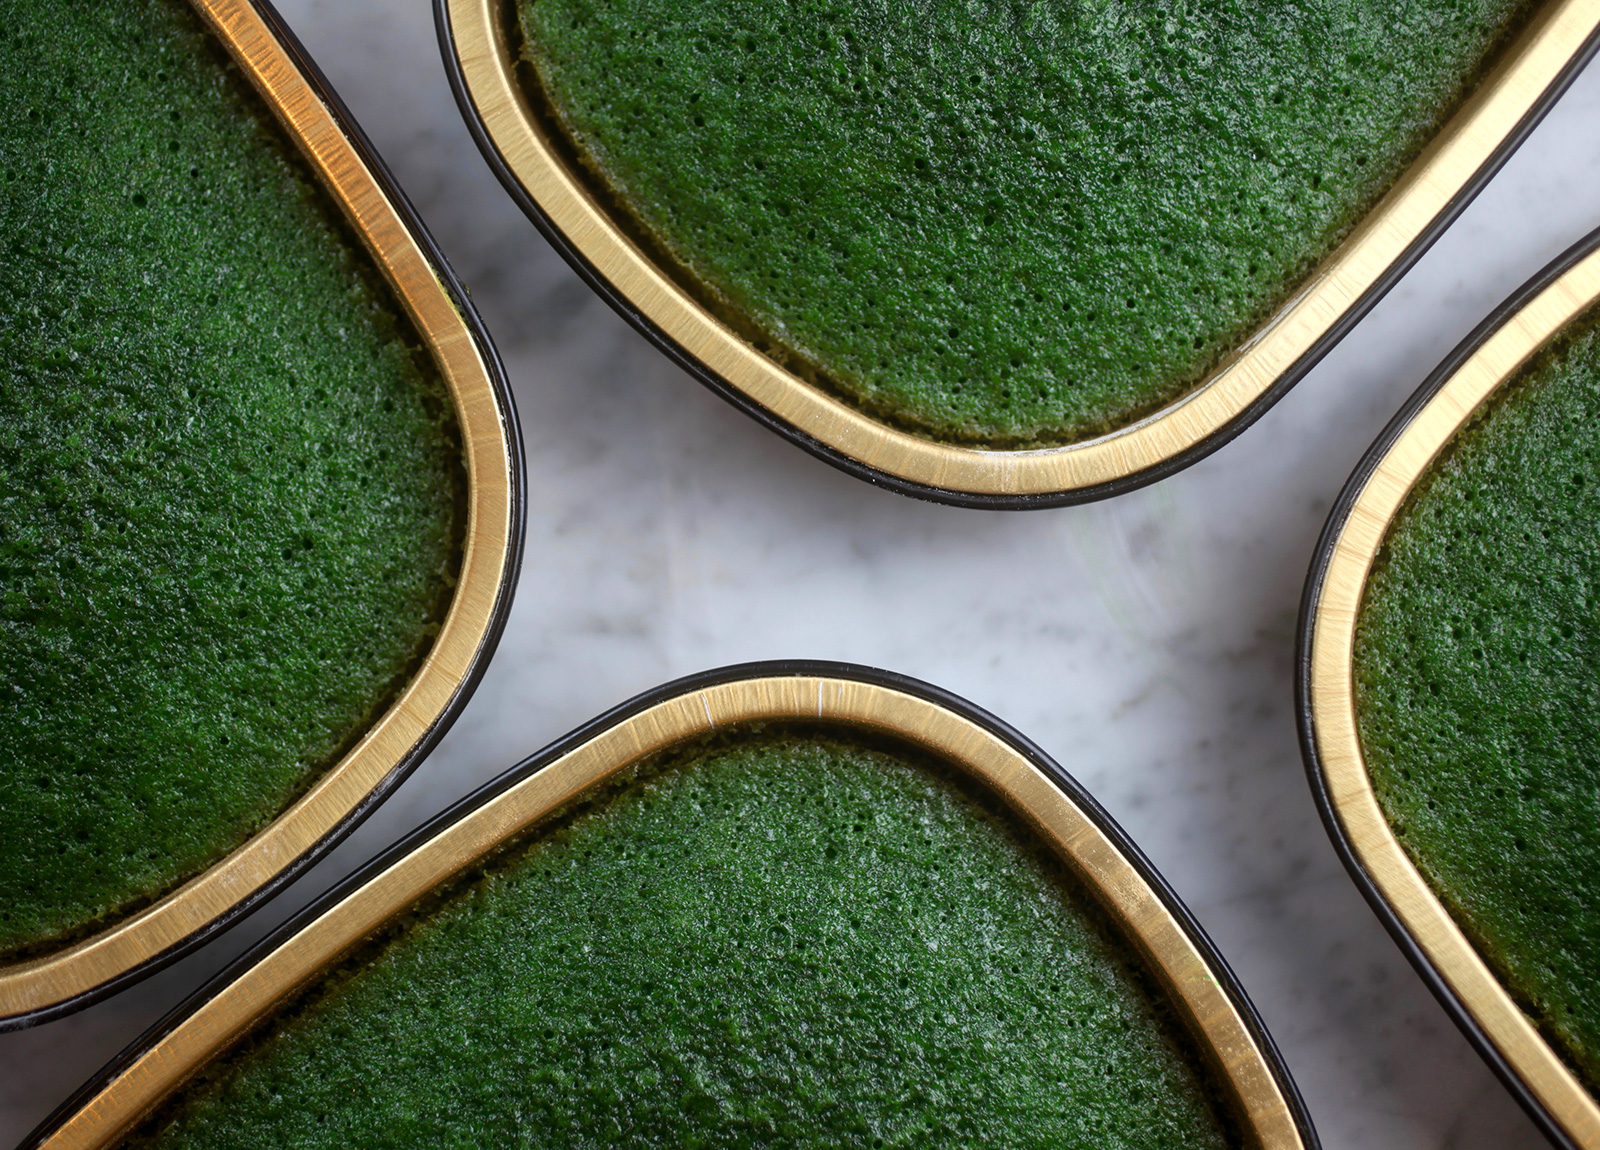
All baked and ready for their close up.
Sidenote: I’m happy to know my red velvet cake recipe will also make four little snack cakes. Happy to start planning for the holidays.
Now let’s decorate.
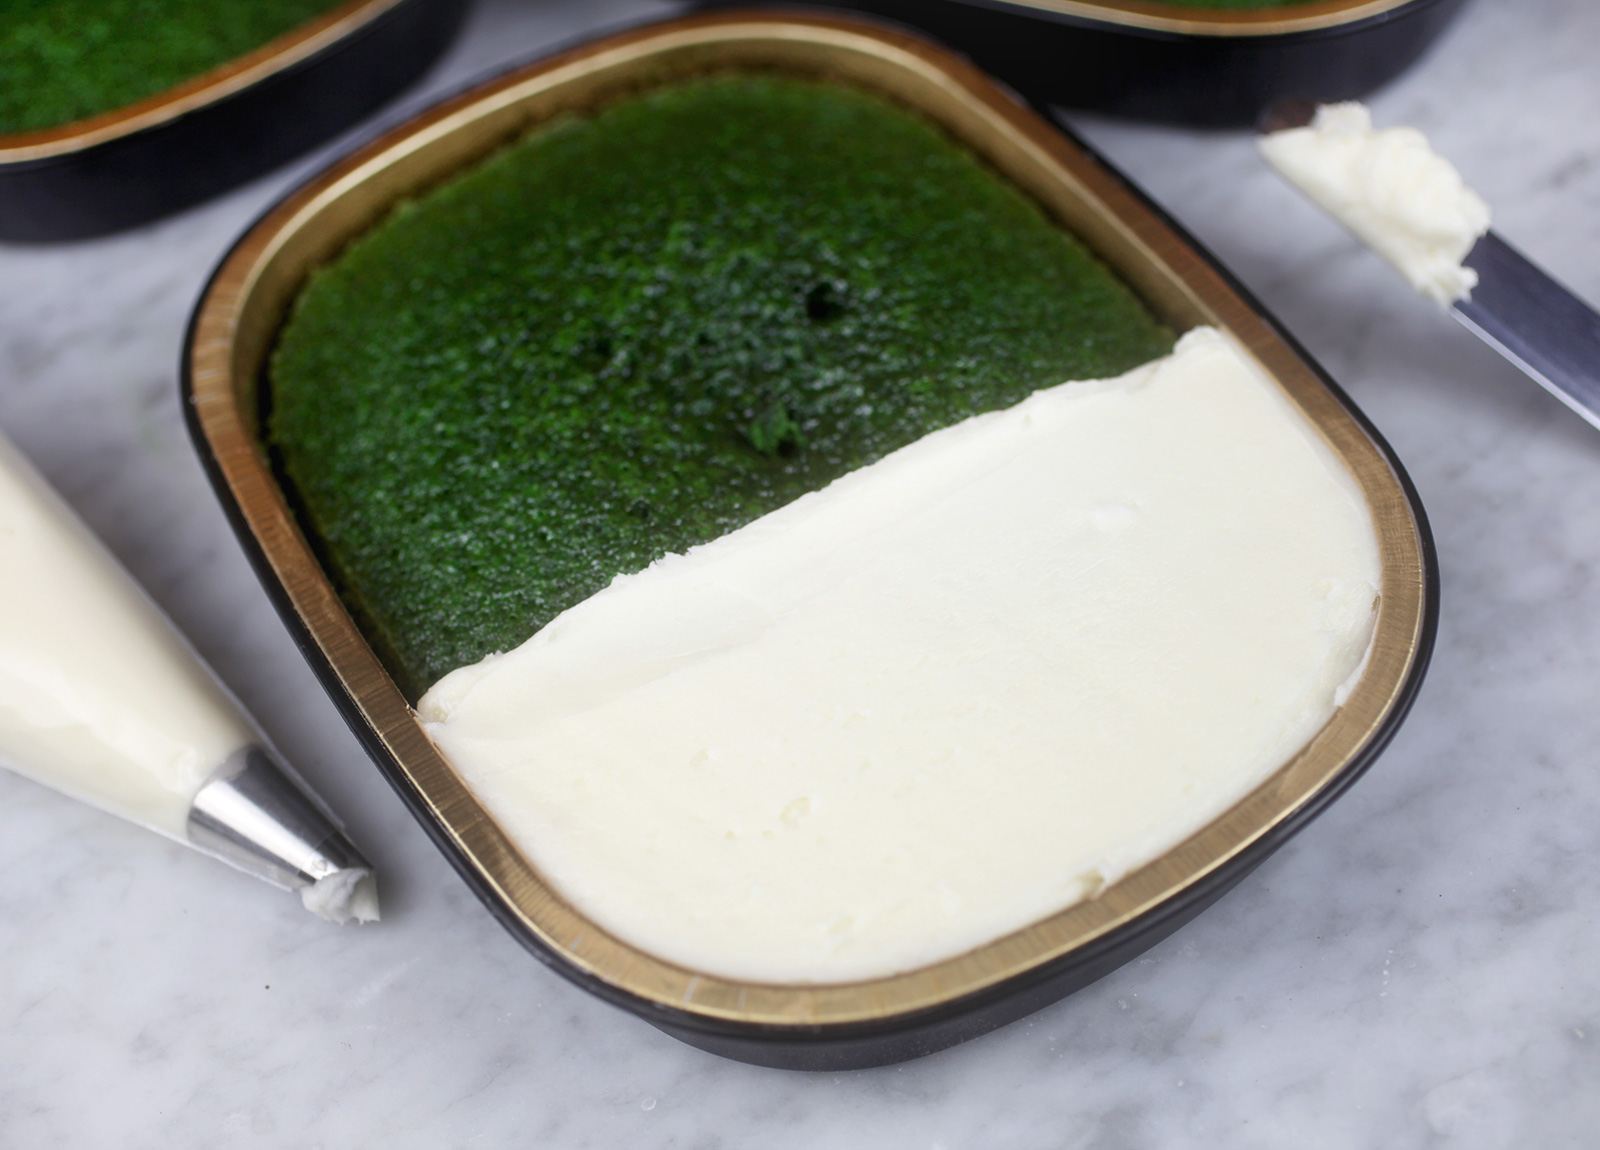
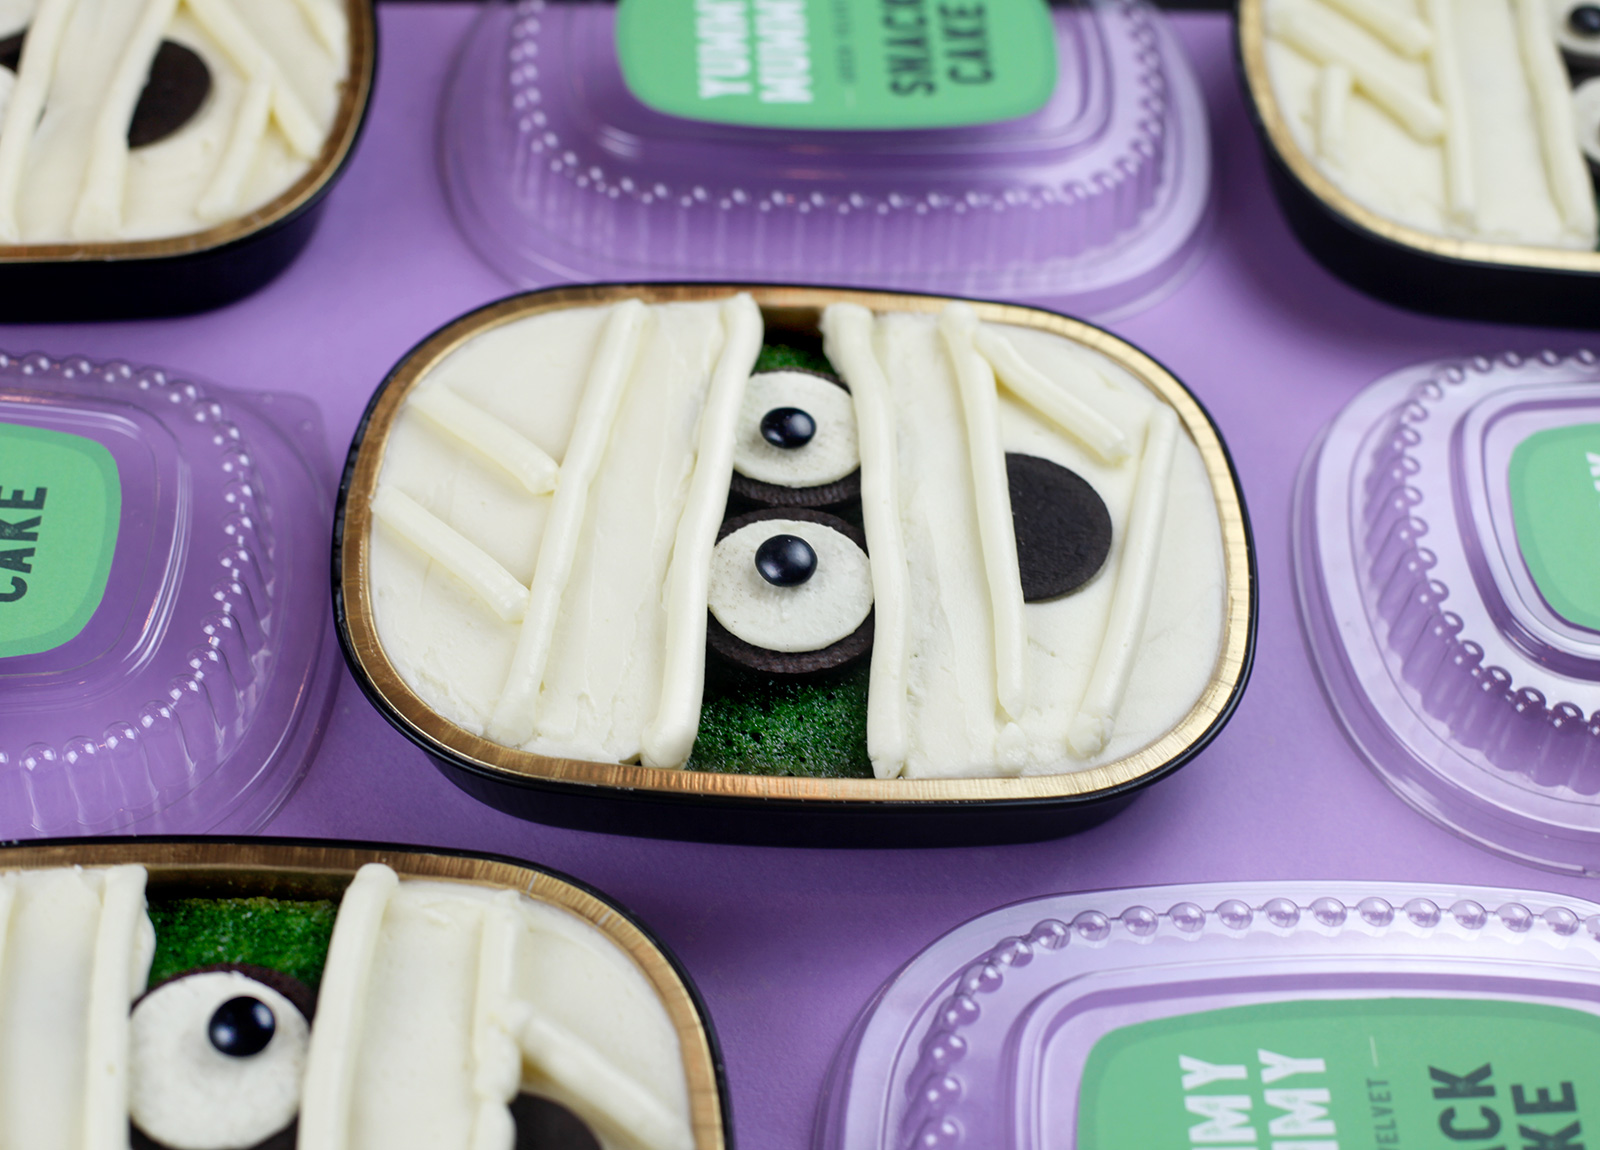
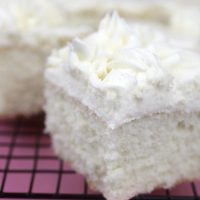
First up, frost a large portion of the bottom and top of the cake leaving the green cake exposed in the middle for the mummy’s face.

You can pipe a line of frosting to use as a border and then fill in the shape using an offset spatula for a smooth surface. You’ll get frosting on the edge of the container, but no worries – it will wipe off easily.
Once you have the top and bottom areas frosted, you’ll need some big eyes.
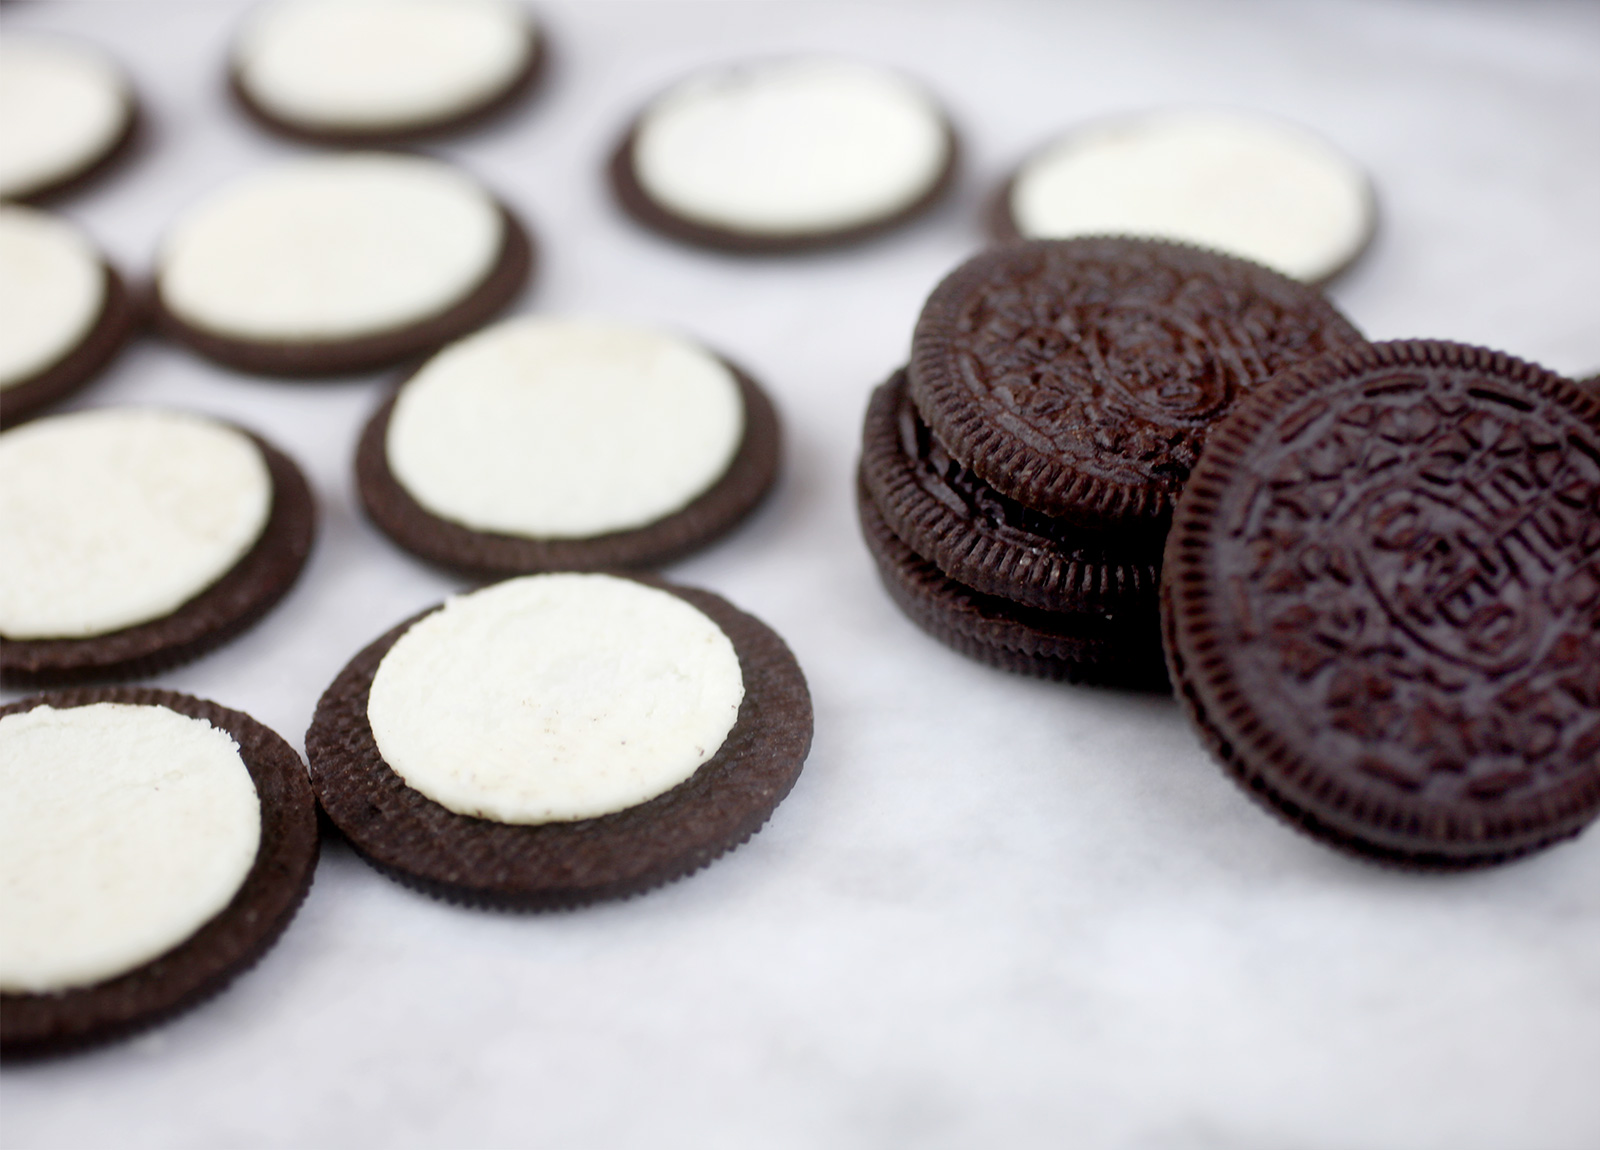
Oreos were the obvious choice. Carefully separate them and cross your fingers that they end up with all the creme center on one side of the cookie. If not, you may have to eat your way through enough until you get eight clean cookies and creme halves for the eyes. If there are a few small crumbs on them, just place the cookies in the fridge or freezer for a few minutes to chill and then gently scrape any crumbs off.
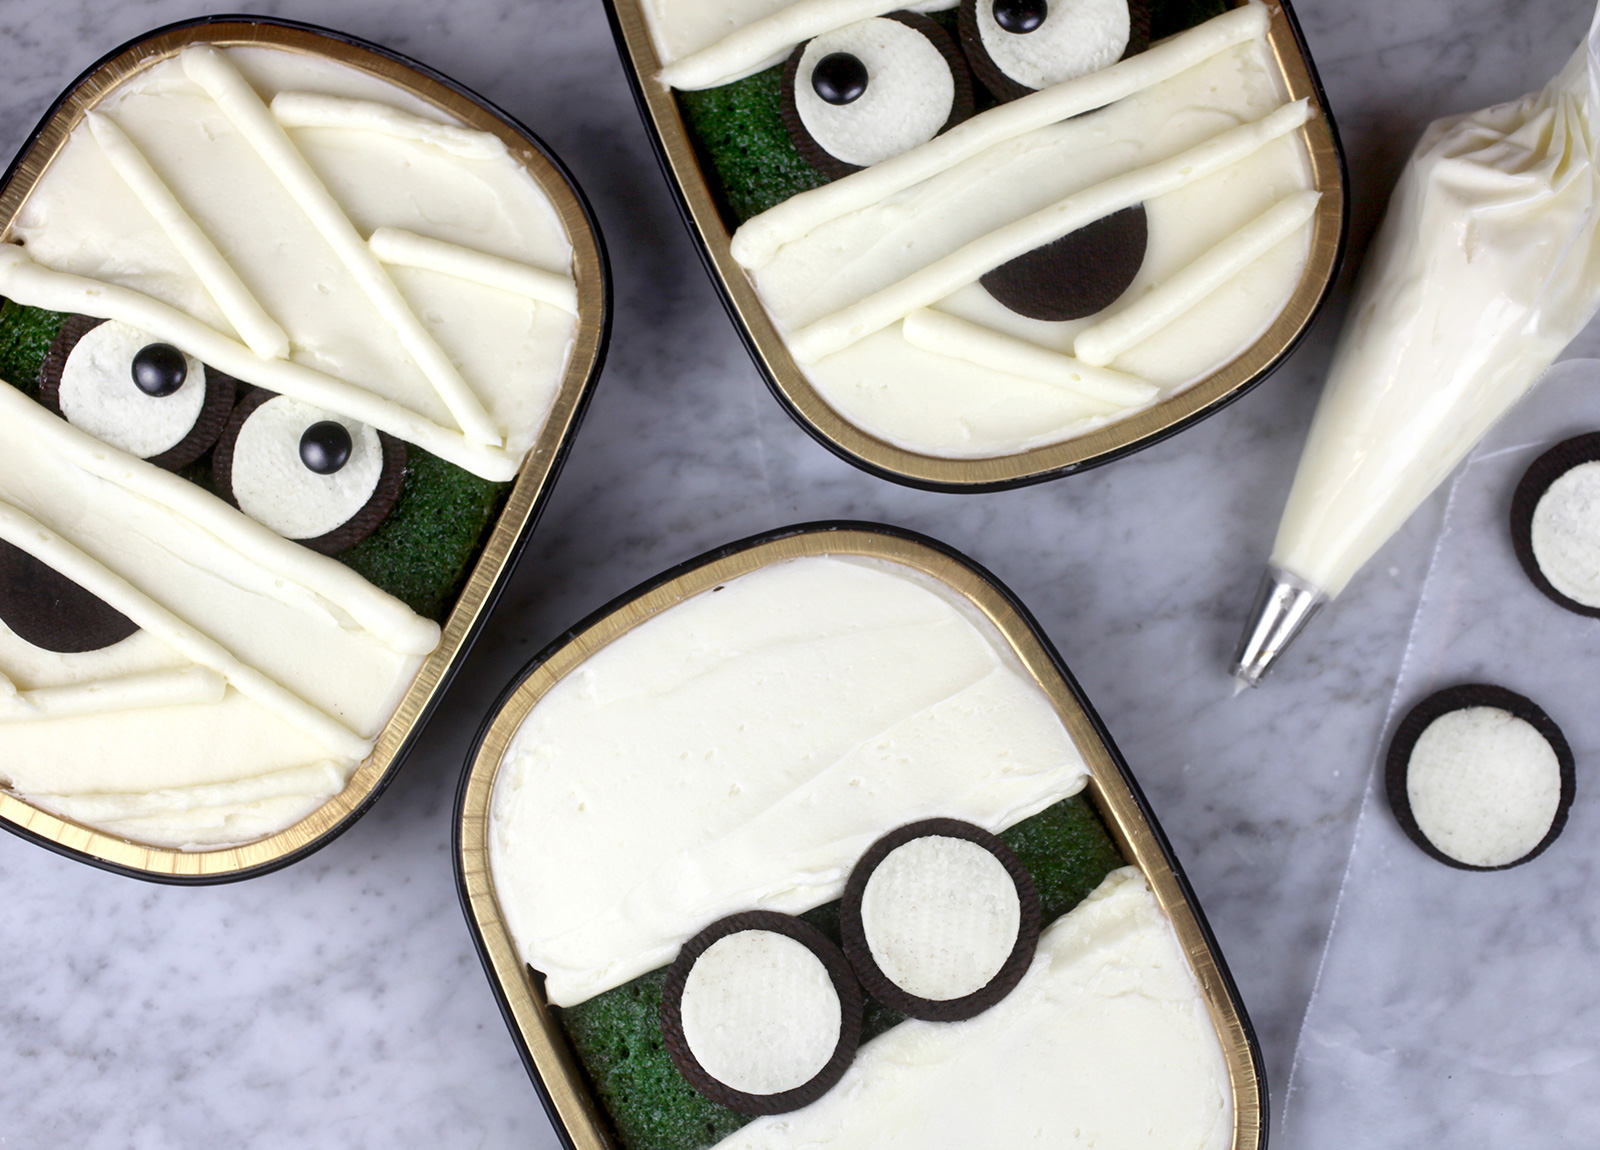
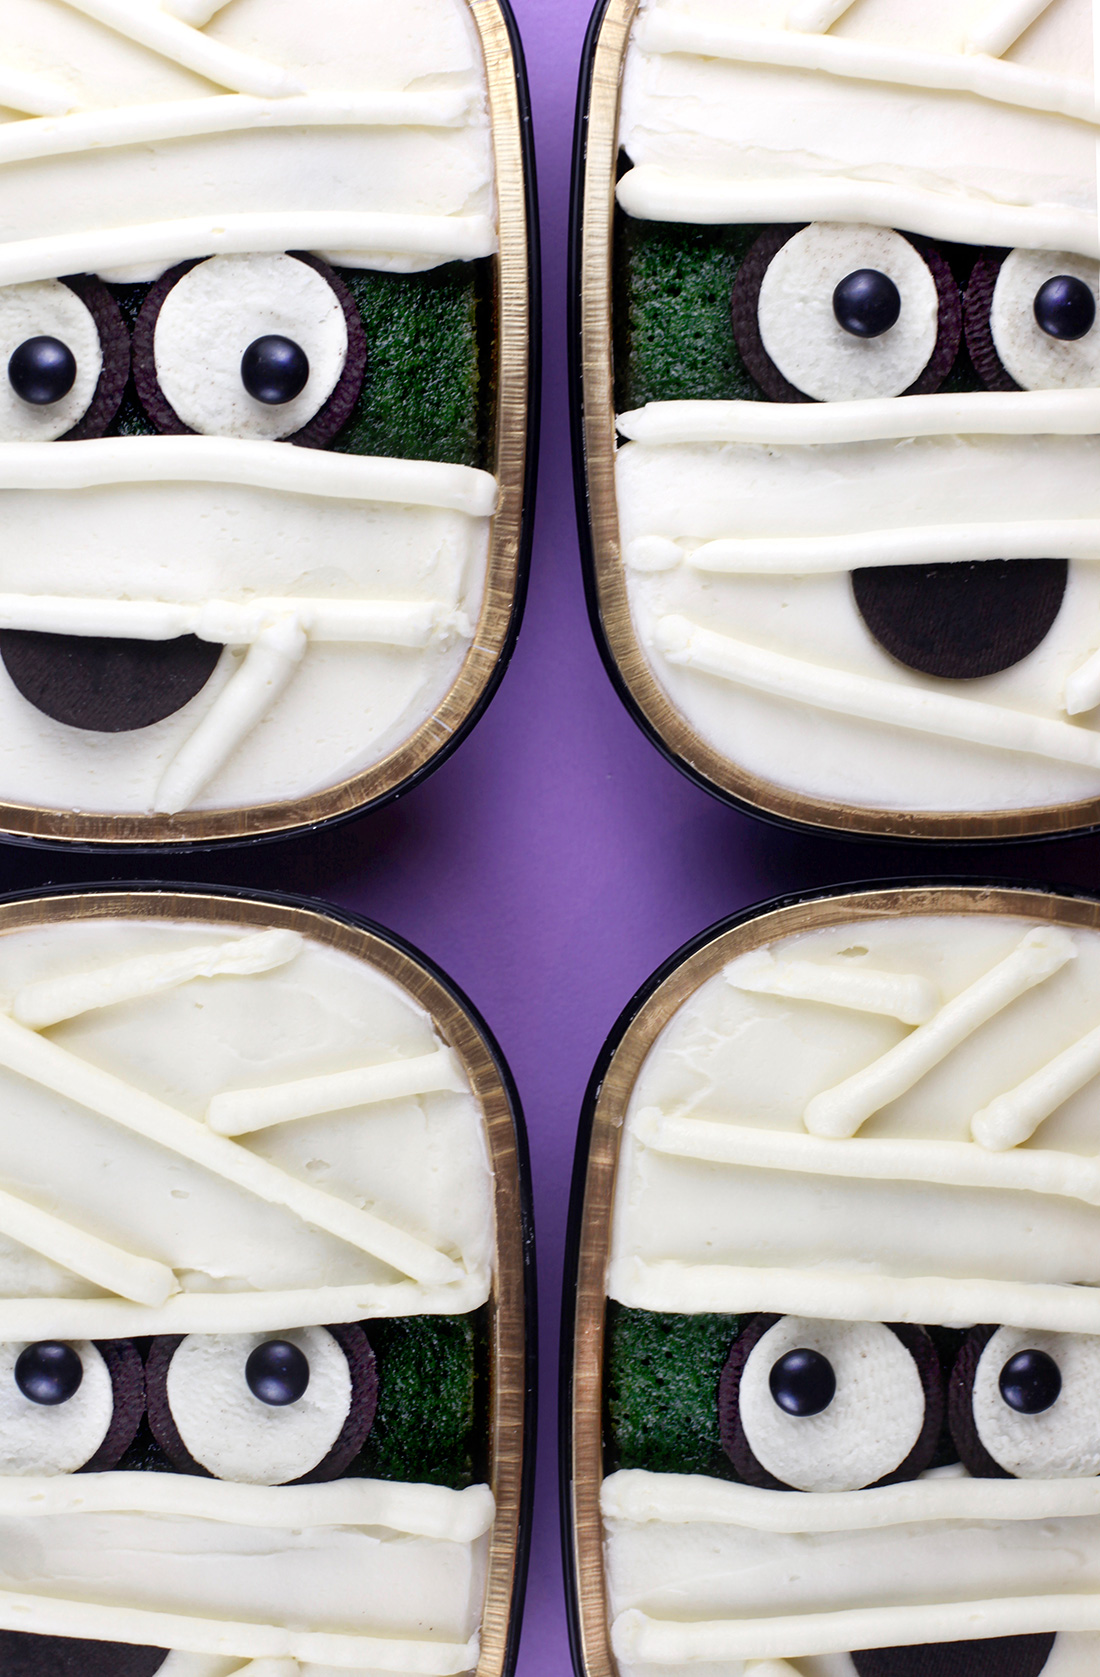
Tada. Cookie eyes. And for the pupils, use some black M&M’s candies in place in different positions to finish off the look.
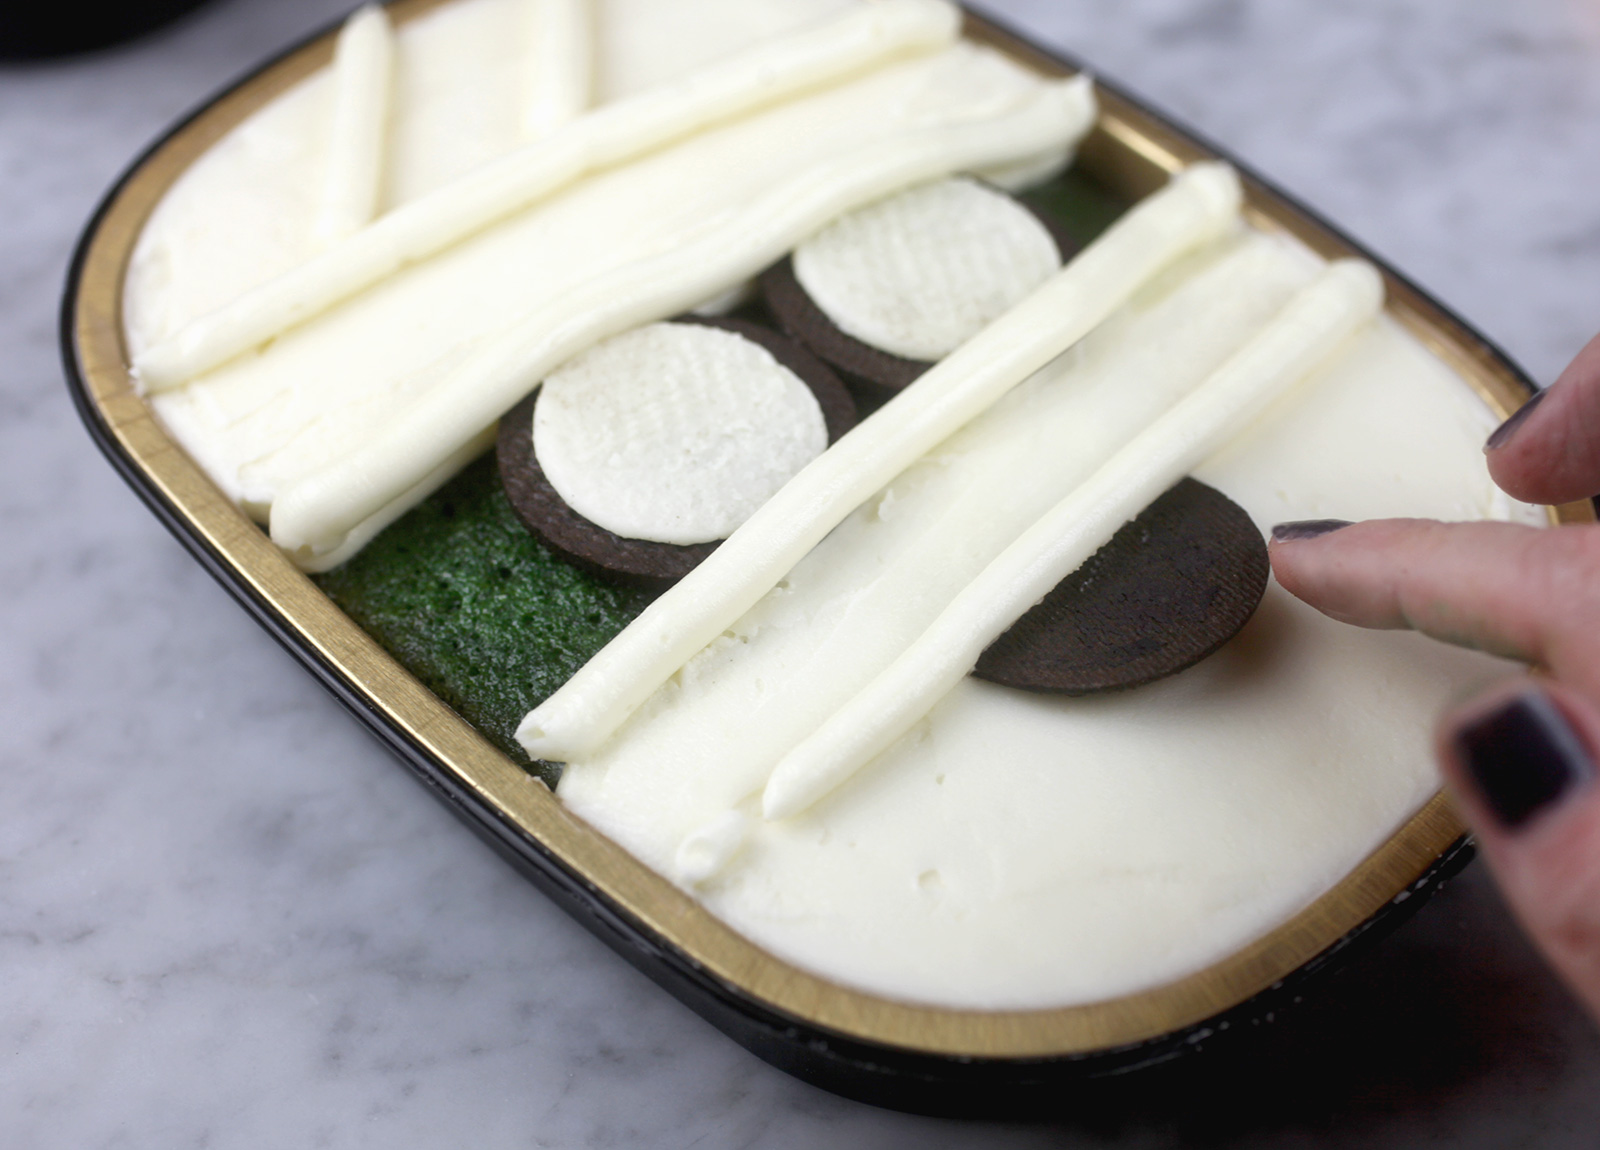
To give the vibe that the mummy is wrapped up, pipe frosting in parallel lines, going in different directions. Then use a separated cookie, cut in half for the mouth. Gently place in position while trying to tuck it underneath a piped buttercream line.
Tip: For the mouths, I used Oreo Dark Chocolate Thins, separated. These worked out really nicely, without adding extra thickness. And they separated much easier than regular Oreos. Next time I will have to try Original Flavor Oreo Thins to see if those also separate as nicely and if they do I would use those for the eyes.
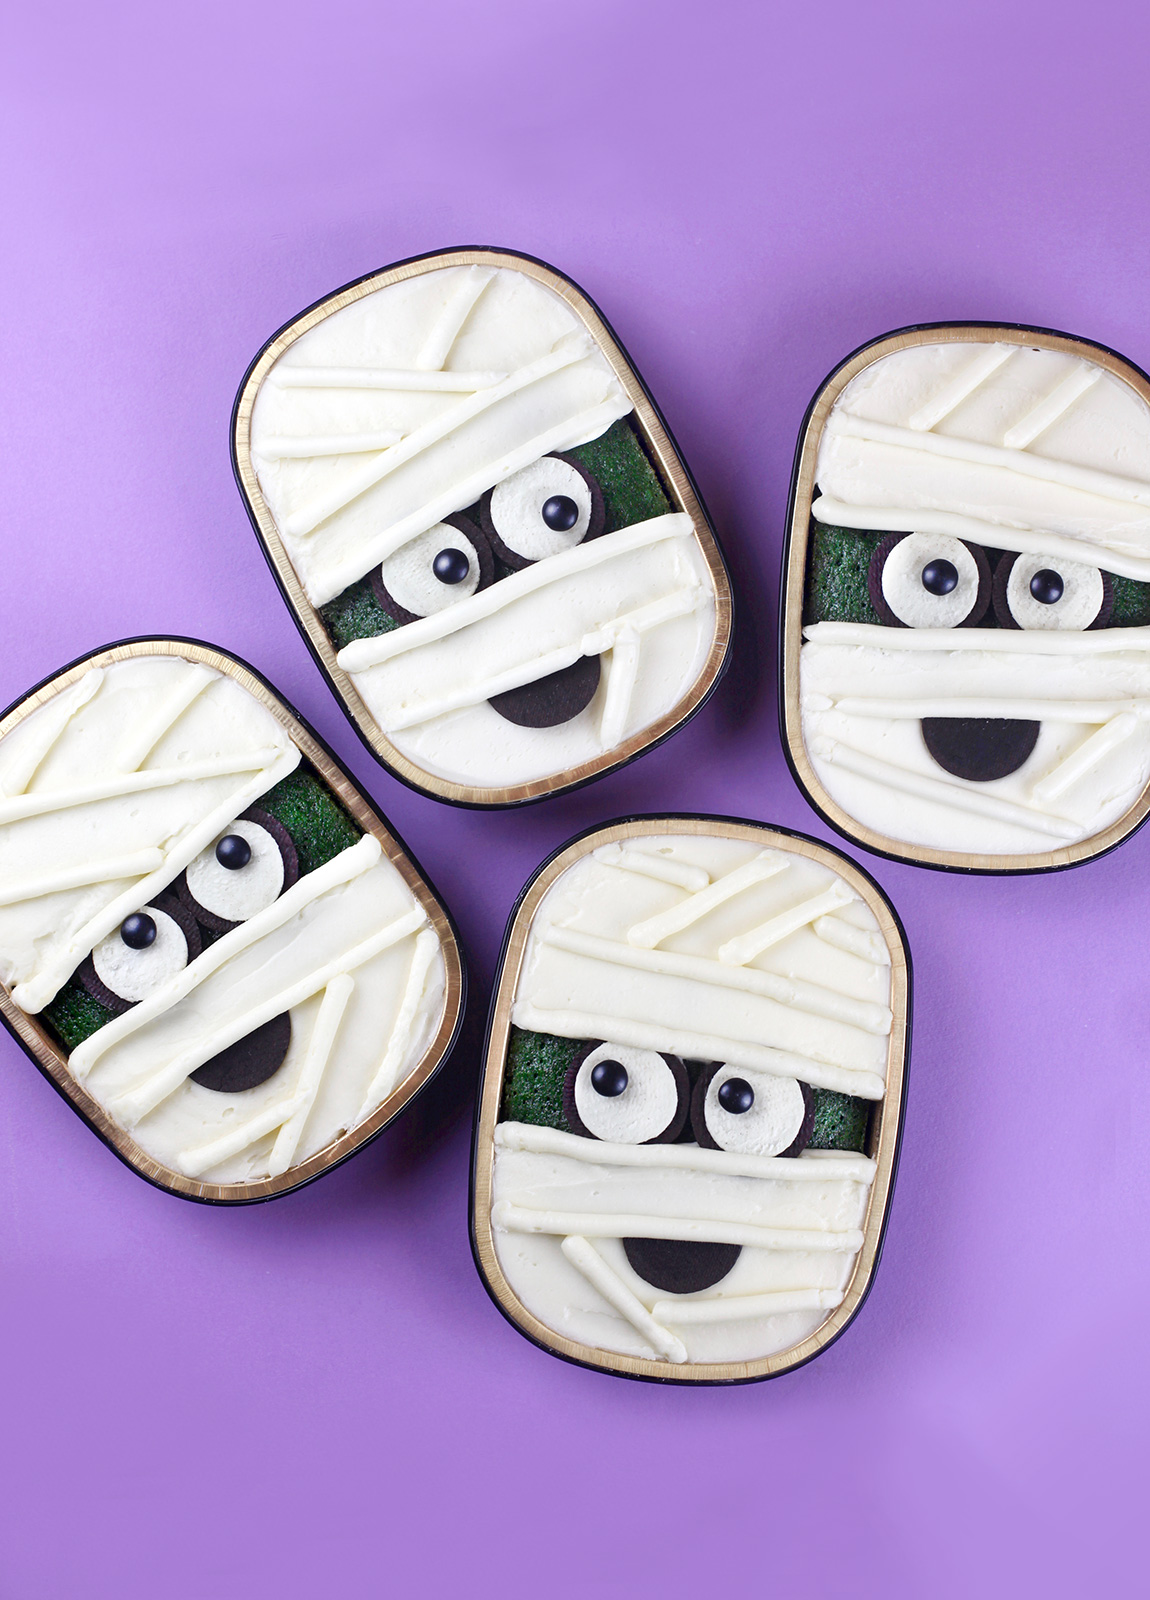
Wrapped and ready to go.
Use these individual foil containers to bake the cake in. Download and print this label to attach to the cake's lid for gifting.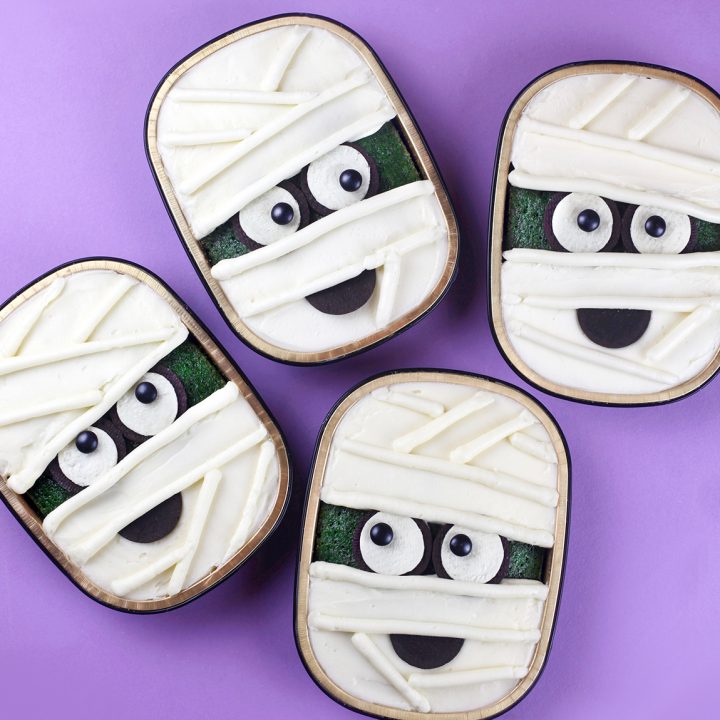
Yummy Mummy Snack Cakes
Ingredients
GREEN VELVET CAKE
CREAM CHEESE FROSTING
DECORATIONS
Instructions
Notes
If you end up getting some of these 23 oz foil containers and want to make your own individual snack cakes, then download the snack cake label I designed for you to use, too! They’ll be super cute as a gift.
Download the pdf: Yummy Mummy Snack Cake Labels
Enjoy and have a Happy Halloween!


What a fantastic idea for Halloween! These mummy snack cakes look incredibly fun, especially the way you used the Oreos for eyes. It’s always inspiring to see such creative decorating. Sometimes when I’m looking for i…
These mummy snack cakes are a perfect spooky treat for Halloween, and the green velvet cake twist is brilliant!
I like the mummy wrap idea using marshmallows, but I’m curious—do they stay soft and flexible after a day, or do they turn into a sticky mess? Has anyone tried chilling them to keep the shape longer?
These mummy snack cakes are absolutely adorable and perfect for Halloween! I love how creative the decorating is with the chocolate drizzle and candy eyes. My kids are going to go crazy for these. Definitely bookmarking this for our Halloween party this year — thanks for such a fun and festive recipe!
These mummy snack cakes are adorable! Perfect for Halloween parties. I love that the recipe uses individual foil pans — makes them so easy to gift. I’ve been saving Halloween recipes like this one as PDFs for my holiday baking collection, such a great idea for themed treats!
I’ve always struggled to get the marshmallow eyes to stay put without melting into the frosting—do you chill the cakes first before adding the candy eyes, or is there another trick to keep them from sliding?
Great post! Thanks for sharing these insights. I really enjoyed reading your perspective on this topic.
I love the idea of turning red velvet cake green for a Halloween twist! The green cake peeking through the frosting really adds to the mummy effect. I’ve never tried baking in those individual foil containers, but now I’m curious about the yield. Also, your tip about separating Oreos carefully for the eyes is genius—I usually end up with crumbs everywhere. Thanks for sharing such a fun and easy treat idea!
These mummy snack cakes are such a clever Halloween treat—the green velvet showing through for the face is a perfect touch. When I make similar projects, I introduce blogs to share travel things about southeast asia.
Lapak Asik menyediakan top up game, voucher, dan pulsa secara cepat serta aman dengan harga kompetitif dan layanan praktis.
The green velvet batter is such a clever way to show the mummy’s face without extra coloring—definitely bookmarking this for Halloween baking. When I’m grading my students’ holiday cooking projects, I often pull up easygrader.online to keep the scoring quick and consistent.
These mummy snack cakes are such a clever Halloween treat—the green velvet showing through for the face is a perfect touch. When I make similar projects, I often use circle-crop-image.com to quickly square up my finished photos before sharing them online, just to keep the focus on the details.
Solid post about Yummy Mummy Snack Cakes. It was easy to read and had a practical angle.
These Yummy Mummy Snack Cakes are such a fun and creative idea for Halloween! I can’t wait to try making them and sharing them with my friends at the Freak Circus. Perfect for a spooky, yet sweet, treat!
These mummy snack cakes are absolutely adorable and such a fun idea for Halloween! I love how you turned red velvet green for that subtle “mummy face” peek. Using Oreos for eyes is pure genius too – so simple yet effective. And knowing your red velvet recipe scales perfectly for individual treats opens up so many possibilities. I’m definitely inspired to try this!
I’ve been looking for a recipe exactly like this! Your clear step-by-step approach makes cooking feel so much easier. The flavor combination is creative yet simple. This is going straight into my recipe collection!
These Yummy Mummy Snack Cakes are such a fun and creative idea for Halloween! I can’t wait to try making them and maybe even come up with a freak circus-themed twist for my little ones.
These mummy snack cakes look absolutely adorable and delicious! The green velvet idea is so clever for Halloween treats. I love how you decorated them simply but effectively.
Looks delicious! I love how you broke the steps down so clearly — this is definitely going on my weekend cooking list. Thanks for sharing the recipe!
These green velvet mummy cakes are so clever and festive! I love how you used the red velvet recipe and just changed the color for Halloween. The hint of green peeking through the frosting is a great touch. And using Oreos for the eyes is genius! Such a fun and easy way to make individual spooky treats. I might try this with my kids – they’d love decorating them. Thanks for the inspiration!
These mummy snack cakes are absolutely adorable! I love the idea of using green velvet cake for the mummy faces – it’s such a creative touch. And using Oreos for the eyes is genius! They look so fun and easy to make, perfect for a Halloween party or just a spooky treat. I’m definitely going to try this recipe, especially since it yields four small cakes that can be gifted. Thanks for sharing this creative and festive idea!
These are absolutely adorable! What a clever idea to bake the red velvet (or should I say green velvet!) cake in individual foil containers. They came out perfectly for gifting! The mummy faces are so cute and simple, and I love the Oreo eyes. Thanks for sharing this fun and festive recipe/decoration idea – I might just have to try this for Halloween this year!
These Yummy Mummy Snack Cakes
are such a fun Halloween idea. I
love the green velvet cake with
the Oreo eyes and black M&M
pupils. The individual foil
containers make them feel extra
cute and giftable.
These mummy snack cakes are so creative! I love the Oreo cookie eyes and the green velvet cake. I use ShotEdit to create fun Halloween decorations and social media posts for my crafting projects. The device frames and background remover make everything look so professional! Speaking of fun games, have you tried a logo color quiz to test your brand color knowledge?
These Yummy Mummy snack cakes are so cute! I love creative holiday treats like this that are fun to make and share. The tutorial is easy to follow and the results look amazing. I’ve also been exploring creative online tools lately, including for profile photos. Thanks for the inspiration!
These mummy snack cakes are absolutely adorable! I love how the green velvet shows through between the frosting strips — such a clever way to do the mummy wrapping effect. The Oreo eyes with M&M pupils are genius. I made these for a Halloween party and they were a huge hit. Thanks for sharing such a fun and creative recipe!
Great post! Thanks for sharing these insights. I really enjoyed reading your perspective on this topic. It gave me a few new ideas to think about.
These mummy snack cakes are adorable! The green velvet is such a fun touch for Halloween. I recently discovered logocolorquiz.com — a brand color guessing game — and it has been my go-to activity while waiting for baked goods to cool. Great way to pass the time and test your brand knowledge!
These look adorable! I love how you turned the red velvet into green for that extra spooky effect. The individual foil containers are such a clever idea too—did you find they baked more evenly than a regular cake pan? I’m definitely trying this for my Halloween party this year!
These Yummy Mummy Snack Cakes look absolutely adorable andable! The photo alone makes me want to try making them for a Halloween treat. What a creative and fun idea – perfect for getting into the spooky season spirit!
These are such a fun and creative treat idea. I love how playful the mummy design is, and it looks like something both kids and adults would enjoy making for a party or holiday dessert table. The decorations make them feel special without being too complicated.
These are such fun and creative snack cakes. I love how playful the mummy design is, and they would be perfect for a Halloween party or a themed dessert table.
Thanks for sharing such a cute and easy-to-follow idea!
These Yummy Mummy snack cakes are absolutely adorable! Such a fun and creative Halloween treat that kids will love.
These Yummy Mummy snack cakes are absolutely adorable! Perfect for Halloween treats and so fun to make with kids.
These mummy snack cakes are absolutely adorable! I love how simple yet effective the piping technique is to create that iconic wrapped look. They would be the perfect addition to any Halloween party spread or a fun festive treat for the kids. Bakerella always has the most creative ideas that look professional but are actually doable at home. I am definitely planning to make a batch of these for our upcoming spooky celebration this weekend. Thanks for sharing such a cute and easy-to-follow recipe!
good
These adorable Yummy Mummy Snack Cakes are the perfect Halloween dessert idea, especially if you love fun baking projects and creative treats for parties or family gatherings. The individual green velvet cakes with mummy-style frosting make them great for gifting and seasonal celebrations.
And if you’re looking for entertainment after dessert, many players enjoy trying out live casino games login options online, where live dealers and real-time gameplay create a more interactive casino experience from home.
Interesting read: “Yummy Mummy Snack Cakes – Bakerella”. Thanks for sharing this!
These look adorable! I love how you transformed the red velvet cake into green for that extra spooky effect. The mummy decorations are so creative with the frosting details. Did you find that baking in the foil containers affected the bake time at all compared to your regular pan? Thinking about trying this for a Halloween party!
Practical and to the point. Thanks!
This was a helpful read on Yummy Mummy Snack Cakes. I especially appreciated how clearly you connected the examples to the bigger picture.
This red velvet recipe, now green for the mummy faces, really caught my eye while I was on my lunch break! Using Oreo cookies for eyes and black M&M’s for pupils is such a clever touch. would certainly be easier to digest than these snack cakes, right?
The green velvet cupcakes are a fun idea, especially with the clever color choice for matching the character design and making the treats feel more creative.
These mummy snack cakes are absolutely adorable and look so delicious! I love how creative you are with your recipes and decorations. It makes me think about how technology is also advancing to create more natural experiences, like how an **ai vocal generator** can produce realistic voices for storytelling or presentations. Thanks for sharing such a fun Halloween treat idea!
These Yummy Mummy Snack Cakes are such a fun Halloween idea! I love that you turned the red velvet green for a spooky effect, and baking them in individual foil containers is brilliant for easy treats. The simple decorating sounds perfect for a quick and fun project.
These mummy snack cakes are ADORABLE! Perfect for Halloween parties. I run ShotEdit, a free online image editor for quick screenshot beautification – works in browser with no install needed. Great for bloggers and content creators!
These mummy snack cakes are absolutely adorable! I love the idea of using green velvet cake for the mummy faces – the hint of color showing through the frosting is such a clever touch. And baking them in individual foil containers makes them perfect for gifting. Thanks for sharing this spooky cute and easy treat idea! I’m definitely going to try this out for Halloween.
These mummy snack cakes are absolutely adorable! What a fun and creative idea for Halloween. I especially love the touch of green velvet cake showing through for the mummy’s face – it really makes them stand out! And using Oreos for the eyes is genius. I’m definitely going to try this recipe, especially since it yields a perfect amount for gifting. Thanks for sharing this spooky and cute treat idea!
that frosting looks perfect
These Yummy Mummy Snack Cakes sound perfect for Halloween!
These Yummy Mummy Snack Cakes sound perfect for Halloween! I love the clever idea of using green red velvet so a hint of color shows for the mummy faces. Baking them in individual foil containers for easy, single-serving treats is brilliant. Such a fun and simple way to celebrate!
Great guide! I also rely on the Subnautica 2 Guide for tips on route planning and survival strategy.
Love these Yummy Mummy Snack Cakes for Halloween! Turning red velvet green is such a clever idea for a spooky touch, and the individual foil containers make them perfect for easy treats. It’s great to know one recipe yields four cakes. So fun and simple!
These Yummy Mummy Snack Cakes are absolutely adorable! What a creative and fun idea for Halloween treats – they look perfect with their little candy eyes peeking out. I can imagine how much fun it would be to make these with kids, and they’d definitely be a hit at any spooky gathering. Thanks for sharing such a delightful and easy-looking recipe!
The way the green cakepeeks through the frosting to form the mummy’s face is such a fun detail, and I really appreciated the tip about using Oreo Dark Chocolate Thins for the mouth—they separate so easily.
This is a clever and practical tip for working with Oreos in a recipe. I like how the instructions make the process feel simple, even for small details like keeping the cookie halves clean.
Hello, thanks for sharing this. I have been exploring AI video generation tools and wanted to mention Gemini Omni, which helps generate videos and quickly find useful AI video prompts
These mummy snack cakes are absolutely adorable! I love the idea of using green velvet cake for the faces – it’s such a clever touch. Four cakes from your red velvet recipe is perfect for gifting, and the decorating instructions are so clear and easy to follow. The Oreos for eyes are genius! Can’t wait to try making these for Halloween! Thank you for sharing such a fun and creative recipe!
I love howyou left the green cake exposed for the mummy face and used Oreo halves as eyes—so clever and easy to assemble.
These mummy snack cakes are really fun, especially because the little faces are so easy to recognize right away. I like treats with simple visual details like this, and that same quick recognition makes small food-themed games enjoyable too.
great for gifting too
These mummy snack cakes are such a fun idea—perfect for a Halloween party! I love how simple they are to decorate, yet they still look so cute and festive. I might try making them with my kids this weekend; they’d get a kick out of piping the “bandages” themselves.
These mummy snack cakes are adorable! I love how the white chocolate drizzle creates a perfect bandage effect. It’s a fun and easy way to prep for Halloween treats.
These Yummy Mummy Snack Cakes are fantastic Halloween idea! I love the clever tip to use green red velvet so a hint of color shows for the mummy faces. Knowing one recipe yields four individual cakes in those cute foil containers is super helpful. Perfect for a fun, easy treat!
Professional, creative, and informative content all in one post. The quality of the work speaks for itself and reflects a high level of dedication and passion.
Such an amazing and informative post. The dedication and passion behind this work are clearly reflected in the quality of the final result. Great job.
Impressive effort and excellent attention to detail. This kind of high-quality content deserves appreciation and support. Keep moving forward with confidence and creativity.
This green velvet mummy cake idea is brilliant! I love how the exposed green batter creates the face effect. The tip about using Oreo Thins for easier separation is a game-changer. Definitely trying these for Halloween treats.
Appreciate your sincere sharing! imgful.io with Nana Banana AI makes one-click photo editing super simple for everyone.
Love the green velvet choice for these mummy cakes! The way you left the green showing through for the faces is such a clever design choice — it really makes the Oreo eyes pop against the white frosting bandages. Color choices like this always remind me how much character design depends on getting the palette just right. I actually came across a fun daily browser game called Toon Tone that challenges you to guess iconic colors from cartoon and anime characters by memory. It’s surprisingly tricky but addictive — definitely worth a try if you’re into creative color work like this!
Those are ridiculously cute! I never would have thought to turn red velvet cake green for a mummy, but it looks so fun, and those foil baking containers are perfect for portion control (which I definitely need!). I’ll have to try this out for our Halloween party.
These Yummy Mummy Snack Cakes are fantastic Halloween idea! I love the clever tip to use green red velvet so a hint of color shows for the mummy faces. Knowing one recipe yields four individual cakes in those cute foil containers is super helpful. Perfect for a fun, easy treat!
These Yummy Mummy Snack Cakes are fantastic Halloween idea! I love the clever tip to use green red velvet so a hint of color shows for the mummy faces. Knowing one recipe yields four individual cakes in those cute foil containers is super helpful. Perfect for a fun, easy treat!
These are adorable! I never thought of using individual foil containers like that – so much easier for portion control. I might try this with a chocolate cake recipe and use white chocolate for the mummy wrappings. Do you think melting wafers would work well for that?
I made these Mummy Snack Cakes for my daughter’s Halloween party last year and they were a hit! The white icing drips made the perfect “bandages.” I took so many photos that I ended up using analbum collage maker to compile all my Halloween baking projects. These would be adorable with googly eyes pressed into the chocolate before the icing sets – has anyone tried that?
Oh my gosh, those look adorable! I’ve never thought of baking cakes in those little foil containers, but it’s such a cute idea. I might try it with my kids this weekend using your chocolate cake recipe.
Okay, those are seriously adorable! I’m wondering how well the melted white chocolate actually stays on the snack cakes when you’re wrapping them like mummies? I might give it a shot, though, because they’re just too cute to pass up for my kid’s Halloween party.
These Yummy Mummy Snack Cakes look like the ultimate nostalgia trip! There’s something so comforting about a classic snack cake that just hits the spot. It’s the perfect vibrant treat to brighten up a busy week. Whenever I’m taking a break from the ‘daily grind’ to enjoy a snack, I love to pair it with a quick session of Arrow Puzzle.
Made these for my son’s Halloween class party and the kids went
absolutely nuts over the mummy faces! Your decorating instructions made it so
easy, even my Oreo-separating disasters turned out cute haha. I’ve been
working on my baking photos lately and discovered image-to-psd.app — it turns
my flat cake shots into layered PSD files so I can clean up crumbs, adjust
colors, and make fun little recipe cards for sharing. Perfect for spooky bakes
like these!
Those mummy wrappings look so fun! I’m wondering if I could maybe use a slightly different kind of candy melt, like maybe a darker chocolate, just for a bit more flavor. I think my kids would really get a kick out of these.
These mummy snack cakes are absolutely adorable for Halloween! I love the idea of using green velvet cake – it’s such a fun and unexpected twist that totally works for the mummy theme. It makes me think about how creative you can get with ingredients and presentation, much like how we’re exploring innovative ways to streamline workflows with tools like the Paperclip AI guide.
These Yummy Mummy Snack Cakes look absolutely adorable, especially with those little candy eyes! I’m always trying new recipes and often take photos of my finished creations to share with family or to keep a digital
Appreciate the breakdown.
green velvet is so unique
love the mummy idea
Thanks for sharing this. I have been collecting good resources around Yummy Mummy Snack Cakes, and this one is worth saving.
These green mummy cakes are so creative and fun for Halloween! I love that you used red velvet cake batter dyed green for the mummy look. The idea of baking in individual foil containers is clever too. Thanks for sharing this spooky cute treat idea!
The little aside that you decorated them “as simply as I could” really makes these charming instead of fussy. It keeps the Halloween mood playful and makes the cakes feel genuinely doable.
What a soulful and decadent way to celebrate the festive season! In our role as Cultural Ambassadors in Yunnan and Tibet, we are always seeking the ‘authentic soul’ of a tradition, and these ‘spooky cute’ individual treats capture that spirit of ritual perfectly [73, Conversation History]. Seeing the green cake peek through the piped buttercream bandages feels like uncovering the hidden heritage of a destination—it’s about finding the ‘original source’ of the character [73, 78, Conversation History]. At kiki holidays, we believe the best experiences—whether a cultural journey or a handmade gift—are those tailored with heart and insider expertise. These are truly ‘wrapped and ready to go’ for a memorable Halloween [77, Conversation History]!
Flipbook is an infinite visual browser where every page you see is a generated image, not HTML. There are no text overlays, no predefined links, no buttons — just pixels rendered on demand. You click anywhere on the image to dive deeper into that topic, and Flipbook generates a brand new visual page in real time.
Oh wow, these mummy snack cakes are so fun! Love how creative they look with those little candy eyes peeking through. Perfect for Halloween parties!
By the way, speaking of staying on top of things – I recently discovered Cat Gatekeeper, this adorable app that literally forces you to take breaks. You set a timer for scrolling your favorite sites, and when it runs out, a cute cat takes over your screen until you actually rest. Such a clever concept for anyone who loses track of time while browsing recipes online! Definitely worth checking out if you struggle with screen time too.
Have you ever tried making these snack cakes with different fillings?
Great post—really enjoyed reading this. You’ve explained the topic in a clear and practical way, especially the part about how it applies in real-world scenarios. It gave me a new perspective and a few ideas to try out myself. Looking forward to seeing more content like this—thanks for sharing!
Super cute Halloween treat—simple decorating tricks turn these mini cakes into fun, giftable mummy faces.
Thanks for sharing this insightful post. I learned a lot from reading it.
These playful treats bring such a sense of festive ritual, reminding me of the many fascinating traditional foods found in Eastern celebrations.
The idea of baking and decorating right in the foil containers is so practical, and turning the red velvet green is such a clever twist.
I made these mummy cakes for my daughter’s Halloween party last year and they were a huge hit! The little candy eyes are what really make them come alive. One tip – I found that cooling the cakes completely before wrapping them with the fondant strips helps everything stick better.
Making these for Halloween this year — the green velvet twist is too clever not to try!
Solid post about Yummy Mummy Snack Cakes. It was easy to read and had a practical angle.
These mummy cakes are kinda cute but let’s be real, green velvet sounds more like a Halloween prank than a treat. Hope they taste better than they look!
These mummy snack cakes are adorable! I love the idea of using Oreos for the eyes, so clever. I might try this for a Halloween party.
Practical and to the point. Appreciate the detailed breakdown here.
These mummy snack cakes are absolutely adorable! I love how the white candy coating creates the perfect bandage look, and the candy eyes add such a fun personality. The green velvet base is such a clever touch too. I’ve been experimenting with GPT Image 2 to create custom food art concepts for my own baking projects, and it’s amazing how AI can help visualize creative dessert ideas before you even start decorating. These little mummies would make such a hit at any Halloween party!
I tried making the Yummy Mummy Snack Cakes from this recipe and they came out adorable and tasty. Using the red velvet cake recipe turned green for the mummy faces worked perfectly, and baking them in individual foil containers made portioning simple — the recipe yielding four cakes was spot on. The straightforward mummy decoration is great for a quick Halloween treat, and the photos really help with the piping and eye details. I’ll definitely make these again for a small spooky get-together.
I tried making the Yummy Mummy Snack Cakes from this recipe and they came out adorable and tasty. Using the red velvet cake recipe turned green for the mummy faces worked perfectly, and baking them in individual foil containers made portioning simple — the recipe yielding four cakes was spot on. The straightforward mummy decoration is great for a quick Halloween treat, and the photos really help with the piping and eye details. I’ll definitely make these again for a small spooky get-together.TreesHateYou
These mummy snack cakes are so creative and festive! I love the idea of using Oreos for the eyes. It reminds me of some of the fun, quick games you can find online to pass the time.
These mummy snack cakes are so adorable and creative! Perfect for a Halloween party or a fun treat for the kids.
This answered a question I’ve had for a while. Thanks!
These mummy snack cakes are adorable! I can see these being a huge hit at any Halloween party. I love how simple they are to make but they look so impressive. Baking has always been my go-to creative activity, but recently I’ve discovered another creative outlet – designing Mii characters for Tomodachi Life: Living the Dream. I’ve been sharing my creations on Tomomii and it’s been such a fun way to express creativity. Between baking cute treats and designing quirky Miis, I feel like I’m exercising both sides of my creative brain!
These mummy cakes sound like such a fun and easy Halloween project! I’d probably use chocolate sandwich cookies too for the eyes, since the contrast against the green cake looks so spooky. Can’t wait to try this with my own red velvet base next season!
These mummy snack cakes are such a fun Halloween idea! I love how you turned the red velvet green for a spooky touch. Using individual foil containers makes them perfect for parties. Great job on keeping the decoration simple and cute.
These mummy snack cakes are such a fun Halloween idea! I love how you turned the red velvet green for a spooky touch. Using individual foil containers makes them perfect for parties. Great job on keeping the decoration simple and cute.
This is exactly what I was looking for, thanks!
Appreciate the detailed breakdown here.
These mummy snack cakes are so adorable and creative! Perfect for a Halloween party or a fun treat for the kids. The presentation is just too cute. Love how you always come up with the most fun dessert ideas!
Practical and to the point. Thanks!
Helpful resource. Added to my reading list.
Really enjoyed reading this. Keep it up!
Really enjoyed reading this. Keep it up!
These mummy snack cakes are so creative and festive! I love the idea of using Oreos for the eyes. I’m thinking of using a scrolling text effect for my Halloween party invites this year.
Transchar is a completely browser-based, free online symbol translator that converts plain text into Wingdings, Braille, Morse code, and various fancy special characters with a single click.
These are so creative and fun! Love the Oreo eyes – such a clever and easy way to make them spooky. I might have to try these for our Halloween party!
These Yummy Mummy Snack Cakes look so fun! I love the idea of using individual foil baking containers. Turning the red velvet cake green for the mummy faces is a clever touch, and I appreciate that you kept the decoration simple and easy. Perfect for a quick Halloween treat!
These mummy snack cakes are adorable! I love how you used green velvet batter to give them that spooky yet playful vibe—perfect for Halloween. The idea of baking them in individual containers for gifting is genius. Now I’m tempted to try this with my own twist!
These mummy cakes got me thinking—if only removing those pesky watermarks was as easy as eating cake! Luckily, the Gemini watermark remover removes watermarks so you can focus on baking (and not editing).
Say goodbye to blurry photos! With picupscaler.com, transform low-res images into stunning 4K clarity in one click. Whether it’s restoring old memories, upscaling anime wallpapers, or fixing blurry product shots, our AI brings back every hidden detail.
These mummy snack cakes are so cute and creative. The step-by-step photos make the decorating process feel easy and really fun for Halloween.
These Yummy Mummy Snack Cakes look so fun! I love the idea of using individual foil baking containers. Turning the red velvet cake green for the mummy faces is genius and adds that perfect spooky touch. Definitely going to try these for Halloween!
These mummy snack cakes are so creative! I love the idea of using Oreos for the eyes. It reminds me of the fun I have building houses and roleplaying in Brookhaven.
This is really helpful content about snack cakes Halloween baking. nemotron3.online aggregates many useful AI tools in one place – a great bookmark to have if you work with AI regularly!
These snack cakes are a fun idea. The simple decorating approach makes them feel very doable.
Using Oreos for the eyes and M&M’s for the pupils is pretty clever. I also love the idea of using green velvet cake for Halloween – such a fun twist! Imagine seeing these spooky cakes in the breakroom; they can definitely brighten up my day.
Oh, those Oreo eyes are such a clever touch! I love how Bakerella used green velvet cake for the mummy’s faces-what a fun twist for Halloween! Just thinking about the color makes me smile on a morning commute. The little snack cakes are a cute and straightforward festive treat idea.
I couldn’t help but smile at the idea of green velvet cake for mummy faces. Using Oreo cookies for eyes? Ingenious! I might try this myself at home one afternoon.
I was surprised to see green velvet! The use of Oreo for eyes and black M&M’s for pupils gives it a cheerful touch. While scrolling through this page, I thought, should I try to make these for Halloween too? It looks spooky but cute, perfect for gifting.
When Bakerella mentions using green velvet cake-how creative! I love the idea of repurposing a classic recipe like red velvet for Halloween. Mixing Oreo cookies and M&M’s for the eyes, now that sounds both fun and yummy! Reading this on my lunch break gave me the urge to get baking myself.
The green velvet cake is a great touch for the mummy faces, and using individual foil baking containers is a clever idea.
Thanks for sharing this Halloween treat idea. If you ever keep a small list of creative AI tools, Happy Horse Prompt is a practical AI video prompt library
These mummy snack cakes are so creative and perfect for Halloween! I love the idea of using green velvet cake for the spooky mummy look. Definitely going to try this recipe!
These Yummy Mummy Snack Cakes look so fun! I love that you used your red velvet recipe and turned it green for the mummy faces. Such a clever way to add a spooky touch. The foil baking containers are a great idea for individual treats too!
These Yummy Mummy Snack Cakes are so creative! I love the idea of using individual foil baking containers and turning the red velvet cake green for a spooky touch. It’s great that the recipe yields four snack cakes – perfect for a small Halloween gathering!
Those Yummy Mummy Snack Cakes look so fun, Bakerella! Turning the red velvet cake green for the mummy faces is such a clever idea. I love that the recipe yields four snack cakes, perfect for a small gathering. Definitely going to try these for Halloween!
These mummy snack cakes are adorable! I love the idea of using Oreos for the eyes, so clever. I’m always looking for fun and creative ideas like this.
These mummy snack cakes are so creative! I love the idea of using Oreos for the eyes. It’s a fun and spooky treat for Halloween!
This is such a helpful resource on Yummy Mummy Snack Cakes! Bookmarking for future reference.
Excellent breakdown of Yummy Mummy Snack Cakes. Shared this with friends who were curious.
AvenChat is a free AI assistant powered by Google’s Gemma 4, offering instant access to multimodal capabilities without any registration.
These are so adorable! I love that you tinted the red velvet green so a little color peeks through the mummy frosting—it makes them extra spooky cute without overcomplicating the design. Baking them in individual foil containers is such a smart gifting idea, too.
Horse Magnifier is a browser puzzle game where you place and move lenses over an image to line up distorted horse shapes and reveal the hidden target. It looks funny at first, but the puzzle design is surprisingly clever, and even small adjustments can completely change what you see.
????????????????????????????????????????4????????????????????????????????????????????????????????
These mummy snack cakes are so cute and creative for Halloween! I love how you turned the red velvet cake green for a spooky effect. Using individual foil containers is a smart idea for easy treats.
These mummy snack cakes look absolutely adorable and perfect for Halloween! I love the creative use of Oreos for the eyes and the green velvet cake is a fun twist.
Practical and to the point. Thanks!
What a fun Halloween baking project! The mummy design is so clever and looks surprisingly doable. I bet kids would love helping make these too. Great inspiration for spooky season treats!
These mummy snack cakes are adorable! Such a creative Halloween treat idea. I love how detailed the wrapping technique is — they really do look like tiny mummies. Definitely saving this for next Halloween!
Quality content right here. Appreciate it.
Really enjoyed reading this. Keep it up!
These mummy snack cakes look absolutely adorable and perfect for Halloween! I love the creative use of Oreos for the eyes and the green velvet cake is such a fun twist.
These green velvet mummy cakes are such a clever idea! I love that you experimented with the foil containers and got four individual cakes out of the batch – that’s perfect for sharing with neighbors or coworkers. The green color peeking through is honestly such a smart touch for mummy faces, and I appreciate that you kept the decorating simple since the concept is already so cute. Definitely stealing this idea for my Halloween baking this year!
These mummy snack cakes are such a clever idea for Halloween! I love how they used green velvet cake to peek through the frosting for the ‘face.’ Next time I’m thinking about , I’ll remember this creative baking.
Love this post! As someone who creates content, I’ve been using Suno AI for generating music – it’s amazing for creating original tracks without any licensing headaches. Check out AI Musical at sunoaimusical.com for AI-powered music generation. Perfect for creators who need background music!
Love this post! As someone who creates content, I’ve been using AI-generated music for my videos – it’s perfect for background tracks without licensing headaches. Found a great tool called Musikalis (musikalis.com) that turns text prompts into original songs. Thought fellow creators here might find it useful!
JpgToMp4 is a next-generation AI video generation platform designed specifically for modern content creators. Whether you’re crafting eye-catching shorts for TikTok and Instagram or planning high-quality commercial ads for clients, simply upload a basic JPG or PNG image, enter a text prompt, and generate a high-definition, smooth MP4 video in seconds. The platform seamlessly integrates the world’s most advanced visual models, including Veo 3.1, Flux 2 Pro, and Nano Banana Pro, granting users fine-grained control over camera movements and character actions. With commercial licensing included, it completely shatters the steep learning curves and high costs of traditional video editing.
This is super helpful, thanks for the effort!
Came across this while researching — glad I did. Very informative.
The idea of using green velvet cake for mummy faces is such a clever twist—it adds that spooky touch without being too over-the-top. It makes me think about how small details can really elevate a simple treat, and now I’m inspired to try something similar for my own Halloween party!
good job
Turning red velvet cake green for mummy faces is such a clever Halloween twist! It makes me think about how color plays a role in food presentation, much like in Chinese calligraphy where brush strokes create visual art. I’ll definitely try this for my next spooky gathering.
Great Post. Thanks
Thanks for sharing
These mummy snack cakes are super creative! I love how they used green velvet cake for the face and Oreos for the eyes. Definitely trying this for Halloween!
These mummy snack cakes are absolutely adorable, and I love the creative twist of using green velvet cake for a spooky Halloween touch!
hese mummy cakes are adorable! Oreo eyes and M&M pupils are such clever decorating ideas
Genius to use foil pans—This green velvet cake is brilliant! Such a fun Halloween treat for kids and adults alike
This green velvet cake is brilliant! Such a fun Halloween treat for kids and adults alike
Genius to use foil pans—great for gifting, the mummy design is spooky sweet perfection
So cute and festive! Can’t wait to bake these for my Halloween party this year
Love this easy recipe! Oreo eyes and M&M pupils are such clever decorating ideas
These mummy cakes are adorable! The green velvet twist is perfect for Halloween, so fun to make ?
these mummy snack cakes are too cute! i love the idea of using green velvet for halloween – it’s such a fun and spooky twist on red velvet.
The green velvet cake is a great touch for the mummy faces, it adds a fun hint of color.
These mummy snack cakes are such a fun Halloween idea! I love how you turned the red velvet green for a spooky touch and used individual containers for easy treats. Great tip about the frosting affecting the color choice too.
These mummy snack cakes look so fun for Halloween! I love how you turned the red velvet cake green for the spooky faces. Using individual foil containers is a clever idea for easy individual treats.
Solid content. Will definitely come back for more.
This was a valuable and insightful read. I appreciate how you broke down the key points without overcomplicating things, making it easy to follow while still being informative. The examples were especially helpful in reinforcing the main ideas. Definitely bookmarking this and looking forward to your future posts.
These look absolutely delicious! Baking content like this is so inspiring. If you create videos about baking, check out klingo1.site for AI video tools that can help you produce professional-quality baking videos effortlessly.
Helpful resource. Added to my reading list.
Great post—really enjoyed reading this. You’ve explained the topic in a clear and practical way, especially the part about how it applies in real-world scenarios. It gave me a new perspective and a few ideas to try out myself. Looking forward to seeing more content like this—thanks for sharing!
These mummy snack cakes are the cutest Halloween treats! Kids would go crazy for these at a party. The white chocolate wrapping detail is so clever. Love how creative and fun your recipes always are!
Solid content. Will definitely come back for more.
I never would have thought to use Oreo Dark Chocolate Thins for the mummy mouths! That’s a clever way to keep the layers thin and make them easier to separate, which is always a struggle with regular Oreos. I’m definitely giving that a try next time I make a similar treat.
I never would have thought to use Oreo Dark Chocolate Thins for the mummy mouths! That’s a clever way to keep the layers thin and make them easier to separate, which is always a struggle with regular Oreos. I’m definitely giving that a try next time I make a similar treat I found this especially useful.!
I never would have thought to use Oreo Dark Chocolate Thins for the mummy mouths! That’s a clever way to keep the layers thin and make them easier to separate, which is always a struggle with regular Oreos. I’m definitely giving that a try next time I make a similar treat.
These green velvet mummy cakes are such a clever idea! I love that you adapted your red velvet recipe to green for the spooky effect – the subtle color peeking through the frosting is perfect for the mummy theme without being overdone. The fact that your recipe yields four individual cakes in those foil containers makes them ideal for Halloween gifting, and honestly, the simplicity of the decoration is what makes them so charming. I’m definitely going to try this with my own cake recipe before Halloween!
These look absolutely adorable! I love that you experimented with the green velvet cake for the mummy faces—it’s such a clever way to add that spooky color without having to completely cover them in frosting. The fact that your recipe yields four individual cakes in those foil containers is perfect for gifting too, which makes them way more practical than one big cake. I’m definitely going to try this with my own cake recipe this year!
These look so adorable! I love how you adapted your red velvet recipe by turning it green—that’s such a clever way to add visual interest while still letting the mummy theme shine through. The fact that you got four individual cakes from one batch is perfect for gifting, and the simplicity of the decoration actually makes them feel more charming. I’m definitely going to try this with my favorite cake recipe in those foil containers!
These green velvet mummy cakes are such a clever idea! I love that you tested out the individual foil containers and got four cakes from one batch – that’s perfect for putting together little Halloween gift boxes for friends and neighbors. The green color peeking through is such a smart touch for the mummy theme, and I appreciate that you kept the decorating simple since these are meant to be easy treats. I’m definitely going to try this with my own cake recipes!
Everyone LOVED the snowman cakes for Christmas.
Any thoughts on making some with a Thanksgiving theme? Like a turkey ?
So, so cute, I wish I had checked out your site a bit soon but….I now have more than a few ideas for both Thanksgiving. Little cake pan turkeys would be fun and of course, a Santa belly or maybe a snowman would be fun for Christmas.
I need to check in here more often.
That’s super cute and adorable! I would totally buy a personal mummy cake for Halloween if I saw one like that at the store. I can’t wait to see what else you do with those containers.
These are the greatest! How clever.