
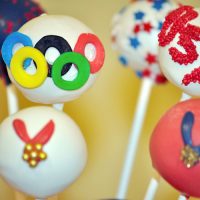
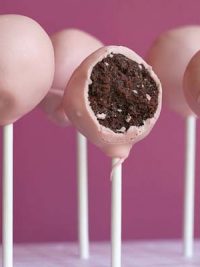
“I just wanted to share with you my latest cupcake pop and bite attempts. I’ve been making bites using the mold, then melting a hole in the bottom and adding the stick. Oh, I even had my husband create a pop display with closet shelving.”
Nice job Trixie!


Hi u make some cute cake pops how much are they were are u actually located of I would like to order u some I really loved them there cute I like the lil baby girls one
Super cute!!
Do you know how I can make Elvis or guitar cakeballs?
Do you know how I can make Elvis cakeballs or guitar cakeballs?
These are so cute :)
I love the attention you give to details!
I admire your patience :)
Those are so adorable!
But I too have a question. Do you just squish the prepared cake ball into the chocolate cup and chill again?
Brandy
Great job Trixie!
Those are adorable! You really have a talent for this!
Julie :)
Update – so for the display stand, husband used a plunge router for the holes and drilled down 1/4″ and the bit was 1/8″.(miter saw not involved for the drilling – just for cutting the board smaller).
Hi All, thanks for the compliments and thanks Bakerella for adding my photo to Pop Stars – I am so tickled. What a great idea to have this gallery, I love seeing all the creative new ways to make cake pops – I’m inspired to bake right now!
To answer the questions (mostly already answered):
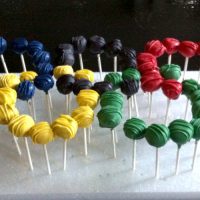
The display stand is a closet shelf from Home Depot / Lowes and is about 2 ft long, 8 in wide? and 3/4″ high . I saw the idea here so can’t take credit for the idea (Thank Bakerella) I believe my husband used a miter saw? and drilled down a set depth for the holes – I can display 48 pops. I also had him cut a board in 3 pieces to transport smaller batches (I’m sure you all know how much labor is involved in making 48 pops!)
Taraneh – I’ll have to get back to you on the size of the holes, but they are just a bit larger than the size of the stick and wiggle around a little. I do use for drying and transport as well as display.
Amandanole – you are so right, it’s much easier/less time consuming to make the cake pops the original way. I like using the mold because it just adds to the cute cupcakey look.
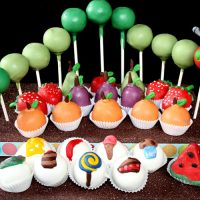
Annabelle – The corrugated look indeed is by using a chocolate cup mold.
Caressa – good idea on the pointy cake ball to make the stick-adding easier, I’m going to try that.
How I make the hole – I use a decidated-to-food-only philips screwdriver that’s the same size as the stick, heated a bit with hot water and kind of melt/drill the tip into the bottom.
Thanks!
These are adorable!!! I will have to try this sometime!
These look awesome!
CUTE!
Mmmm! These look lovely! xxx
I always make the cupcake bites instead of the pops because I thought it was cuter. I’ve always wondered how I would add a stick to it! Thanks Caressa and Tamara for the tips! I will definitely try that!
And to Trixie, how did you melt the bottom? With a lighter? I wish my hubby can make me a cake pop display! i’m more of the handyman than him! hehe!
I made these last week, and used the candy mold for the bottom. I filled the molds 1/3 to 1/2 full, and immediately put the cake ball (maybe 1″) into the melted chocolate. I let them sit about 5 minutes, then popped them out. The tricky part was making the hole – I used an ice pick (dipping it first in very hot water would have probably helped). I just gently pushed and twisted until the hole was made. Then I dipped the end of the pop stick, inserted it, set them upside down in a mini cupcake pan, and chilled them before doing the rest of the dipping/decorating.
I’d love to hear more tips on how others do this!
These are how I make mine—one trick I’ve found to get the stick in the bottom is to make the cake ball a little pointy on the bottom (the part that goes down in the mold) so that it touches the bottom of the mold. That way when you pop it out of the plastic, it’s softer than the thick chocolate on the outside part. Then you just dip a stick in chocolate and insert into the cake bite bottom and let cool so it adheres. Hope that helps!
These are adorable!! I love creating with food. I’ve made the cake balls and they have been a big hit. I would love to try the cake pops, but I too have wondered how the stick is put into the hard chocolate or how they stay in just the cake ball for that matter. Please do share the secret. :O)
It is a mold and I think they are so much eaiser than doing the cupcake pops the other way, but I would love to know how to get the stick in the hard chocolate???
Hi Trixie..I was wondering how big of a shelf you used and how big are the holes..also did you use that to dry the pops on or just for transport? Thanks!
Erin- You should make cake pops that look like little tacos! Ole´!
Erin – Thanks. I never even thought of that. Must try.
Annabelle, I believe that is a candy mold she is using that looks like lil peanut butter cups. It already has that edging.
I am making some pops for a fiesta themed fund raiser.. no clue what I’m going to do but maybe I’ll be the next Pop Star LOL!!
how can u make these?? i tried but still they are not priddy like urs!! the details and stuff…
love ur cupcakes! awfully cute <3
Angel & GaGa= AngelGaGa xxx
Just beautiful. I do have a question though. How did you get the “corregated” look to the bottom? Were these made like mini-cupcakes? Please share your tips. Thanks for sharing your talent.
Wow, these look amazing! Congratulations :) I find it really hard with detail sometimes (ok, most times) and it just doesnt come out the way I’d like – these look gorgeous!
Well Done :)