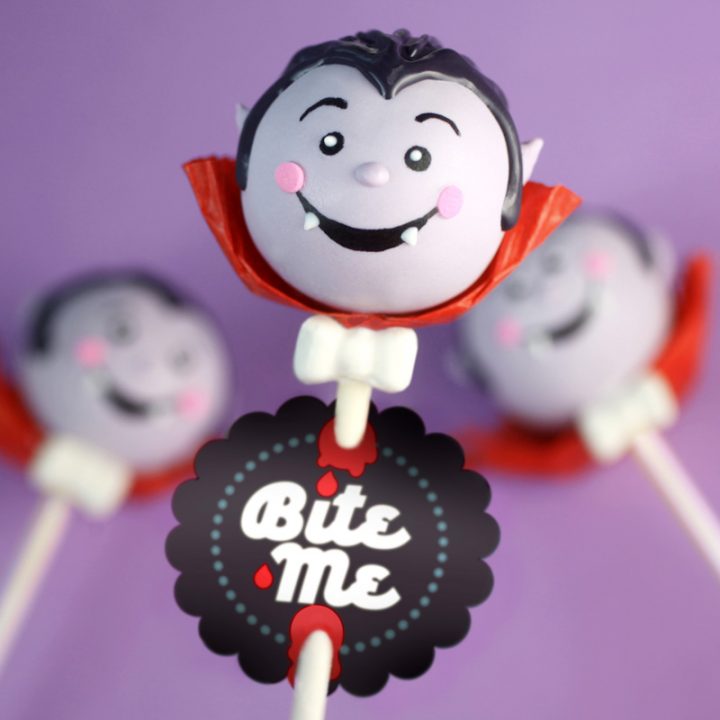
Halloween will be here before you know it and I wanted to share one of the new projects from my Cake Pops Halloween Book in case you want to give them a go. There are 20 spooktacular treats in the book including some of my classic favorites. And these very cute vampires have now joined that group. I want to hug them – they’re so cute. I love their pale purple faces, sweet little fangs, candy bow ties and cupcake wrapper capes.
That’s right! You can use a hole punch on mini cupcake wrappers folded in half and then slide it on a lollipop stick and curve it around the bottom of a vampire head for a cute little cape.
For the bow ties, I used my new Playful Shapes Candy Mold and melted white candy wafers to shape them. Then I attached them to the pop sticks with more candy coating as glue.
Want to dress these dashing fellas up even more? You can use my these printable treat tags to take them over the top.
Here’s an example of a bunch of the tags you can download. I hope you use them for cake pops, cupcakes and other treats this Halloween! Tag them with #CakePopsHalloweenBook on instagram so I can see your spooky sweets!
Melt the light purple candy coating and 24 oz (680 g) of the white candy coating in one of the microwave-safe bowls, following the instructions on the packages. The coating should be about 3 in (7.5 cm) deep for easier dipping. Stir together until the color is a paler purple.
When you are ready to dip, remove a few cake balls at a time from the refrigerator, keeping the rest chilled.
One at a time, dip about 1/2 in (12 mm) of the tip of a lollipop stick into the melted candy coating, and insert the dipped end straight into a cake ball, pushing it no more than halfway through. Dip the cake pop into the melted coating. Gently lift the pop out of the coating and tap off any excess, as described on page 10. Stand the pop firmly in a hole in the Styrofoam block. Repeat with remaining cake balls. Let dry completely.
Meanwhile, melt the remaining white candy coating in the second microwave-safe bowl. Pour some of the melted white coating into the squeeze bottle.
Fill the bow candy mold with the melted white coating. Place the mold in the freezer for a few minutes until the coating sets. Remove from the freezer and gently separate the bows from the mold. Set aside on wax paper. Repeat until you have 48 bows. Reserve a small amount of the white coating in one of the small microwave-safe bowls to dot the eyes, draw the teeth, and attach the bows to the stick. Also reserve a small amount of the pale purple coating in the second small microwave-safe bowl for the ears and nose.
Combine the remaining pale purple candy coating and any remaining white coating. Add black candy coloring and stir. Continue to add coloring until it’s almost black. It will dry darker.
Using a toothpick and starting in the middle of the vampire’s forehead, draw two curves for the hairline that also come down the sides to form sideburns. Fill in the shape with more black candy coating until the hair is complete and let dry. When the hair is dry, use a toothpick dipped in more black candy coating to draw thick strands of hair starting from the center point moving toward the back of the head. Let dry completely in the Styrofoam block.
When dry, use the black edible-ink pen to draw on eyes, a smiling mouth, and eyebrows. Use a toothpick to dot on reserved pale purple candy coating in position for cheeks and attach 2 pink confetti sprinkles. Then use the toothpick to create ears on either side of the vampire’s head. As it starts to set, use the toothpick to pull through the coating so that ears appear pointed.
Dot the pupils with the reserved melted white candy coating. Then dot on coating at either side of the vampire’s smile with a toothpick. Pull the toothpick through the coating to create a sharp point for his teeth. Let dry completely.
For the red collars, fold mini cupcake wrappers almost in half and then punch a hole as close to the crease as you can. Slide a collar onto each lollipop stick and move up around the base of the vampire’s head.
To finish the vampires, apply the leftover white candy coating to the lollipop stick and attach the white candy bows. Hold in place until the bow is set. Let the cake pops dry completely in the Styrofoam block.
Would love to make these cake pops for my daughters since they won’t go trick or treating this year (covid 19 ?). Could you tell me what brand of black edible ink-pen you used?
I love your book, cut can’t find the free Halloween. Printable pop tags. I would love to use them for the Police and Fire Department. They do love these type of things and we can’t thank them enough for their heroism 24-7.
This week we cover “GMOs: Are Genetically Modified Organisms Safe for Humans?”
We’d love for you to review what we’ve put together and share any of your own articles to it — especially to support the side that best supports your views — Please check out the Nia here http://bit.ly/1s3CnFQ and add your posts and articles!
Also, please let me know about any thoughts or suggestions you might have. I look forward to hearing from you.
Of course, if you like what you see, please share it!
My most favorite dish at Thanksgiving meal is Sweet Potato Sufflè
It would be totally awesome if I win because 1) I love pink just as much as you. 2) I’ve always wanted a Kitchen Aide Food Prep machine but we can never afford one
When I first look at your creations, I think to myself that it is impossible to make these look like yours! But then you break it down and I think it’s possible. These little guys are adorable! Thank you for sharing!
This site focuses on fun and easy baking. You’ll find ideas for cake pops (a Bakerella creation), cakes, cupcakes, cookies, and more. You may even find yourself smiling from all the sweetness.


Would love to make these cake pops for my daughters since they won’t go trick or treating this year (covid 19 ?). Could you tell me what brand of black edible ink-pen you used?
I love your book, cut can’t find the free Halloween. Printable pop tags. I would love to use them for the Police and Fire Department. They do love these type of things and we can’t thank them enough for their heroism 24-7.
Hey, these are lovely cakes.. awesome
Designer birthday cakes pune
thanks!!
Niaterra news LOVES Bakerella
This week we cover “GMOs: Are Genetically Modified Organisms Safe for Humans?”
We’d love for you to review what we’ve put together and share any of your own articles to it — especially to support the side that best supports your views — Please check out the Nia here http://bit.ly/1s3CnFQ and add your posts and articles!
Also, please let me know about any thoughts or suggestions you might have. I look forward to hearing from you.
Of course, if you like what you see, please share it!
My most favorite dish at Thanksgiving meal is Sweet Potato Sufflè
It would be totally awesome if I win because 1) I love pink just as much as you. 2) I’ve always wanted a Kitchen Aide Food Prep machine but we can never afford one
Happy Thanksgiving to you and everyone else
They’re adorable!!!! (gushes)
These are so stinking adorable! I love everything you make :)
These are too cute!
Precious and cheerful! :D
These are so cute! Your attention to detail blows my mind!
These are soooo adorable!
*squeals and starts clapping hands like a demented seal*
STOP. IT. Those are WAY too cute!
You continue to wow us with your cake pop creations! Thank you for sharing yet another amazing idea and instructional.
These are so cool! Very creative and your instructions are really easy to follow :)
http://www.racheltrieslife.com
Super cute!
When I first look at your creations, I think to myself that it is impossible to make these look like yours! But then you break it down and I think it’s possible. These little guys are adorable! Thank you for sharing!
Totally Cute! I’ll definitely try these, thanks Bakerella!
Make them with red velvet XD so cute :D
Absolutely cute. Halloween is coming! :)
i will try recipe and let you know the results
Cute!. and thank you for the treat tags. can’t wait to use them.
these are absolutely the cutest!!!
these are adorable!