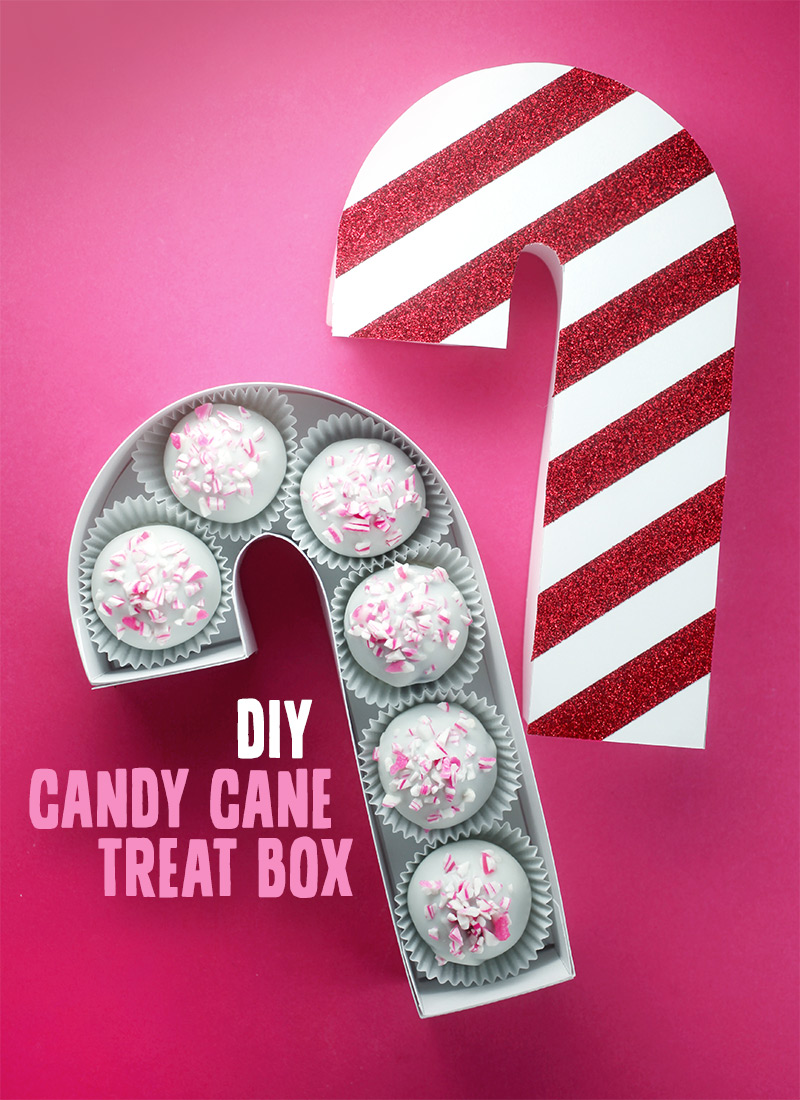
Looking for a handmade holiday gift this season? Well, I just happen to have the sweetest little gift box to share with you. I’m partnering with Scotch™ Brand in celebration of their Most Gifted Wrapper™ Contest that started November 1st. I created this adorable candy cane treat box using some of the company’s products to help them celebrate the contest.

The box design was inspired by Scotch® Expressions Tape. I love the glitter tape for the holidays and in red, I couldn’t help but want to do something fun using the tape as perfectly placed candy cane stripes. It adds an extra touch that’s super easy to use on paper products, especially since you can initially reposition it as needed. I also used Scotch® Heavy Duty Packaging Tape to help construct the box since it sticks securely.
Materials + Tools:
Candy Cane Box Template (pdf)
Candy Cane Box Template 2 (pdf) << this one has darker lines if you need it
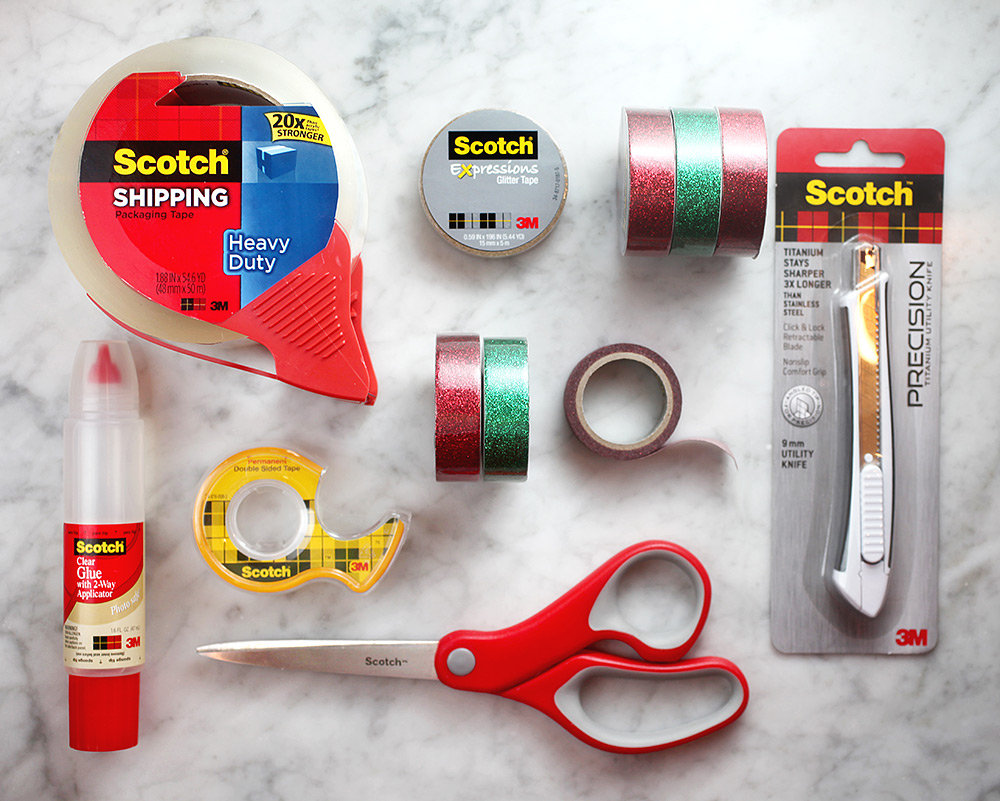
Scotch® Heavy Duty Shipping Packaging Tape
Scotch® Expressions Glitter Tape (I used red, but it also comes in other fun colors)
Scotch® Double Sided Tape
Scotch® Clear Glue
Scotch™ Titanium Utility Knife
Scotch™ Multi-Purpose Scissors
11-in x 17-in heavyweight paper
Cutting Mat
Ruler
1/8” Foam Core
Peppermint flavored treats…YAY!
Okay, who’s ready to get crafty?!
Print CANDY CANE BOX templates out at 100% on heavyweight 11-in X 17-in paper. (note: I used an 11-in X 17-in pad of bristol board available at craft stores.) Your local office supply store can print out the templates if you don’t have access to a large enough printer.
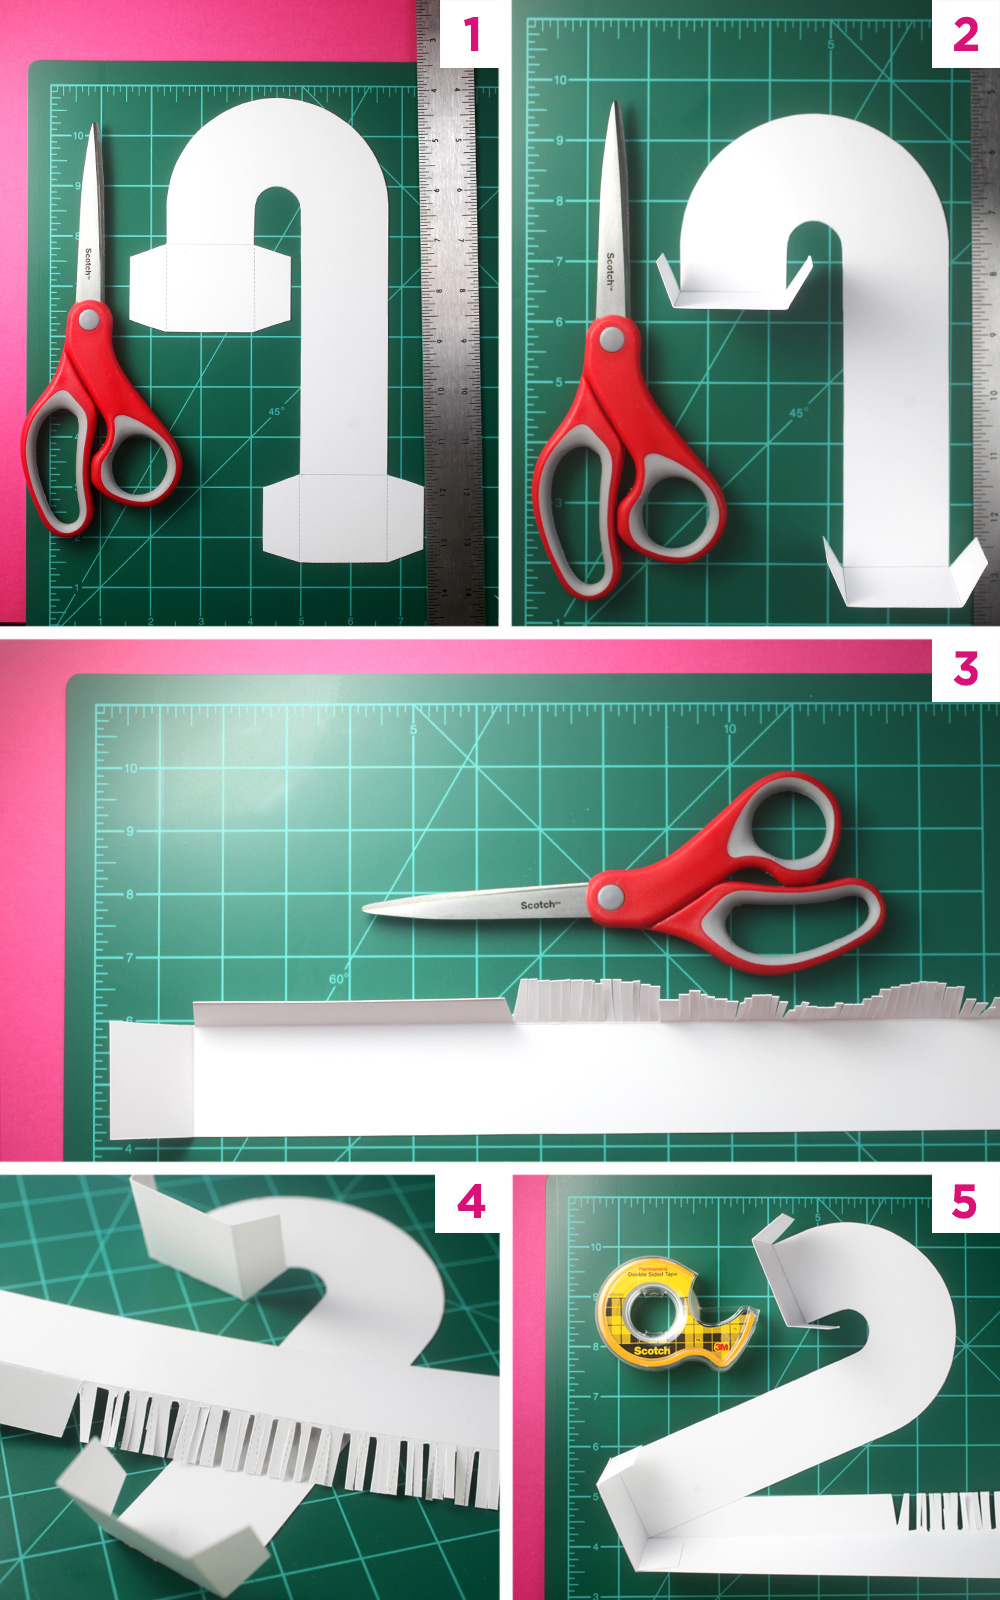
1. Cut out CANDY CANE BOX – BOTTOM structure shape from the template.
2. Very lightly score the square ends and tabs along the dotted lines with Scotch™ Titanium Utility Knife and fold up. You should gently guide your knife along the lines to allow enough give in the paper to fold the edges over without breaking in half.
3. Cut out CANDY CANE BOX – SIDES FOR BOTTOM. The long strip is for the right side of the candy cane and the short strip is for the left side. Very lightly score along the edge where the square end and tabs meet the rectangular shape. Fold the paper so that the printed side is face down under the bottom of box.
4. On the section of template where the small tabs are printed, cut fringe strips, close to but not touching the scored fold. Cut and remove alternating fringe pieces. This will allow the rectangular strip to curve around the candy cane shaped bottom and form the side.
5. Attach the bottom square of the strip to the bottom square of the candy cane shape with Scotch® Double Sided Tape. This is a simple way to hold the paper together and keep the tape hidden from touch and sight. Attach the tab on the candy cane bottom as well.
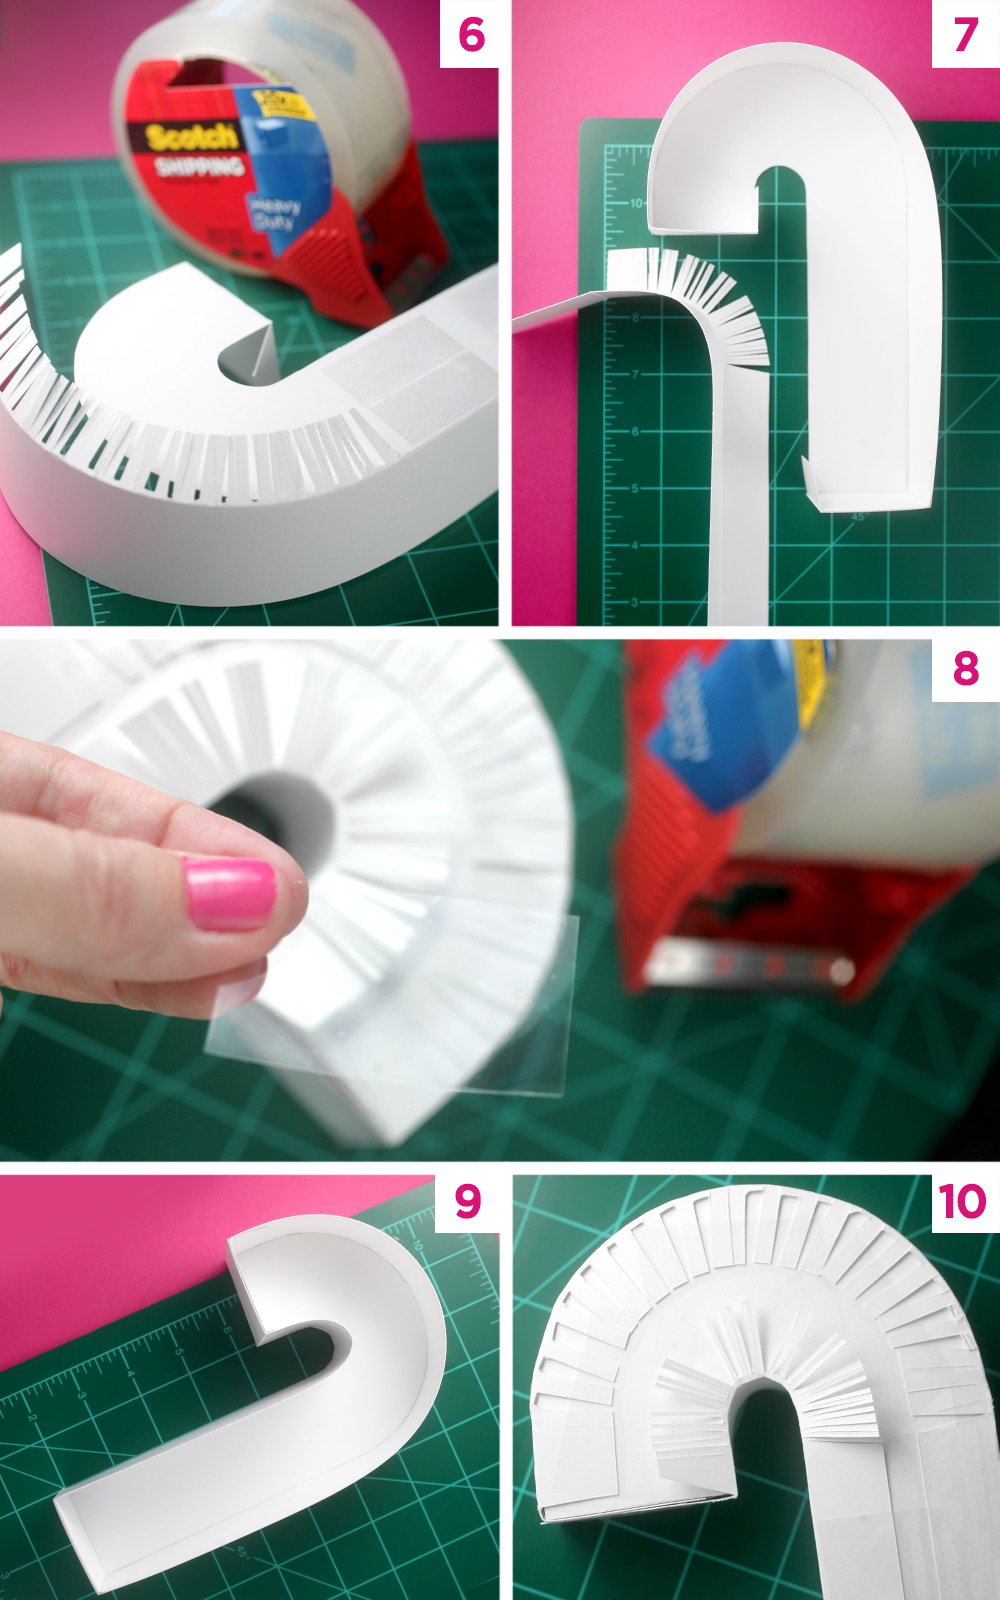
6. Wrap the strip around the candy cane shape and tape the bottom tabs down with large pieces of Scotch® Heavy Duty Packaging Tape. Tape fringe strips down as well.
7. Now follow the same for the left side of the candy cane box. The inside curve of the candy cane is tighter than the outside curve, so cut the fringe strips much closer together, removing pieces in between.
8. Tape down the fringe strips to keep the bottom of the box closed and strong.
9. Now you have a completed candy cane box bottom!
10. Cut out templates for CANDY CANE BOX – LID structure and CANDY CANE BOX – SIDES FOR LID and follow the same method of assembly as above. Instead of folding the tabs underneath the candy cane shape, you will fold them on the side of the box, lid facing up.
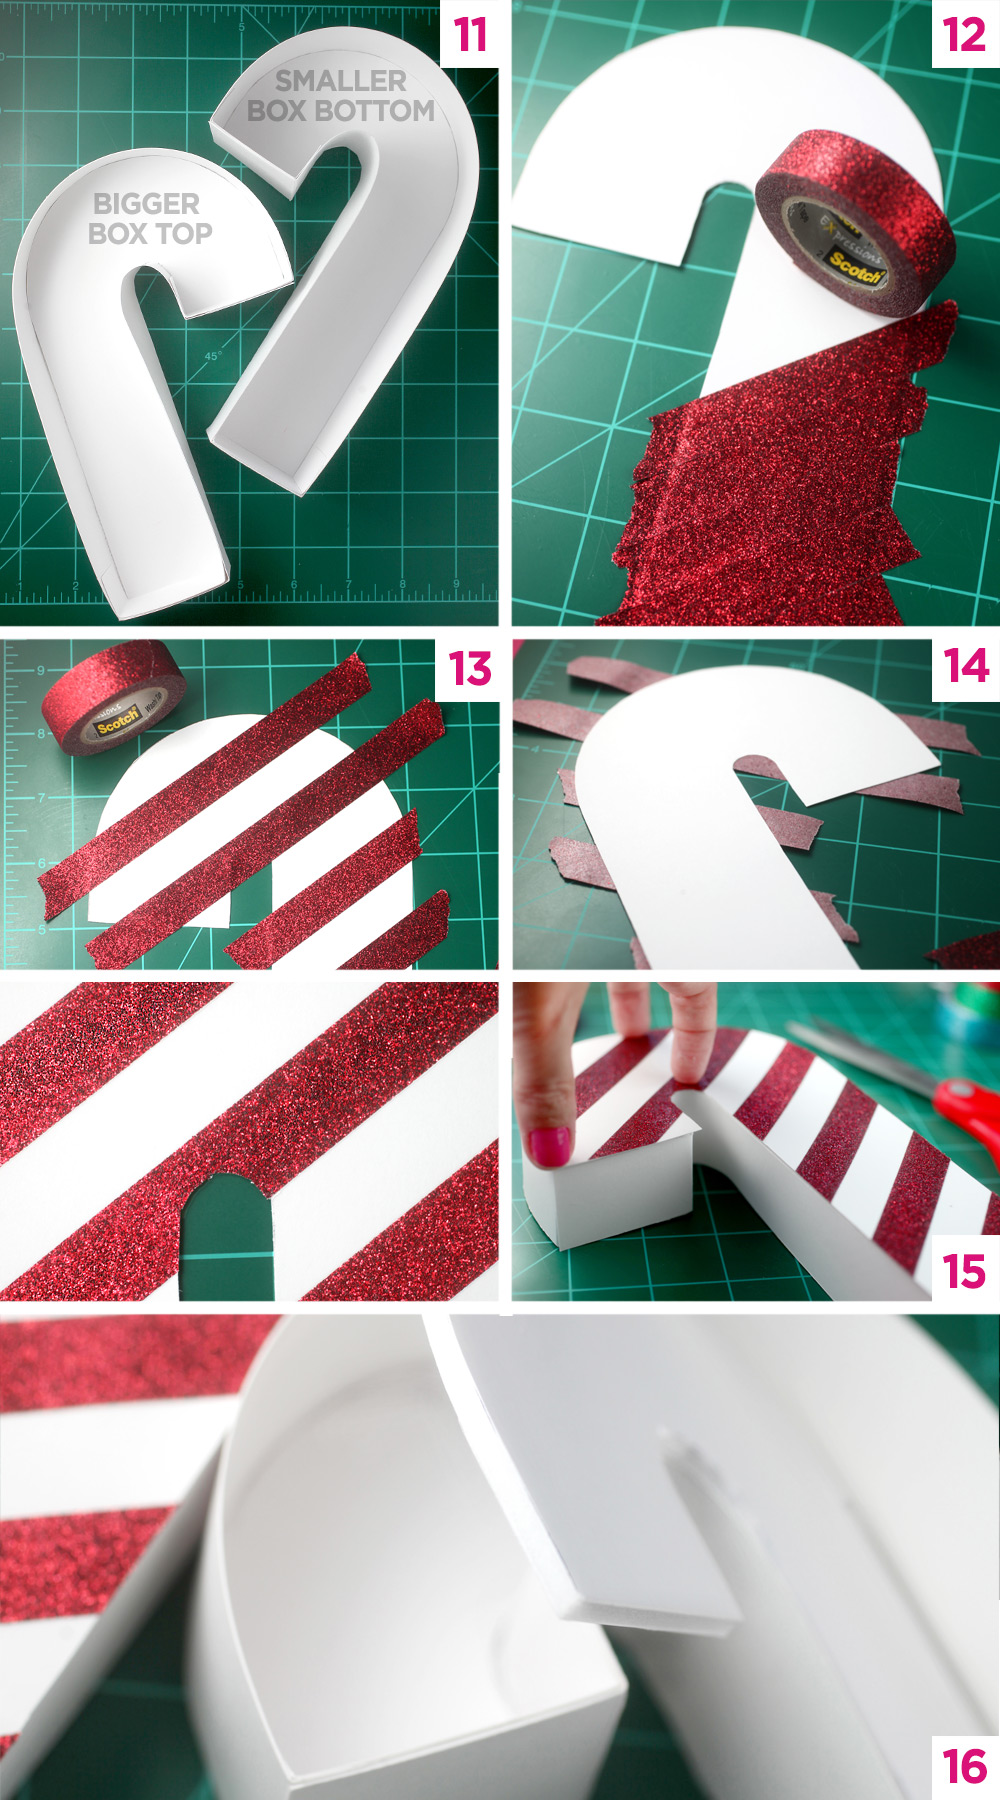
11. Note that the templates for top and bottom are two different sizes! The lid of the box will be slightly larger and not as deep as the base, so you can easily slide and remove.
12. Now that you have the bottom and lid, it’s time for the finishing touch. Cut out the CANDY CANE BOX – TOPPER. This shape is slightly larger than the lid so you can overlap the top. Use Scotch® Expressions Tape to decorate.
13. Place diagonal pieces of tape over the candy cane shape. Use the width of the tape as the spacer for evenly placed stripes.
14. Turn the candy cane over and trim off excess tape.
15. Glue the CANDY CANE BOX TOPPER on the box lid to cover all the taped tabs and keep them hidden. Place gentle pressure until it’s dry — a heavy book works great. Trim out another CANDY CANE BOX – BOTTOM without tabs to glue underneath to hide the taped tabs underneath the box. Be sure to let the bottom and lid dry completely.
16. Now you have a finished box with lid that you can keep small, lightweight objects in. To use as a treat box, trim another CANDY CANE BOX – LID (without tabs) and CANDY CANE BOX – BOTTOM out of 1/8-inch foam core to place inside the lid and inside the bottom for structure and to support the weight of tiny treats. When packaging treats, wrap them securely in individual plastic treat bags or place treats in wax paper candy cups with another layer of wax paper on top.

Complete your candy cane box with chocolate peppermint cake balls inside to show someone special that you care.
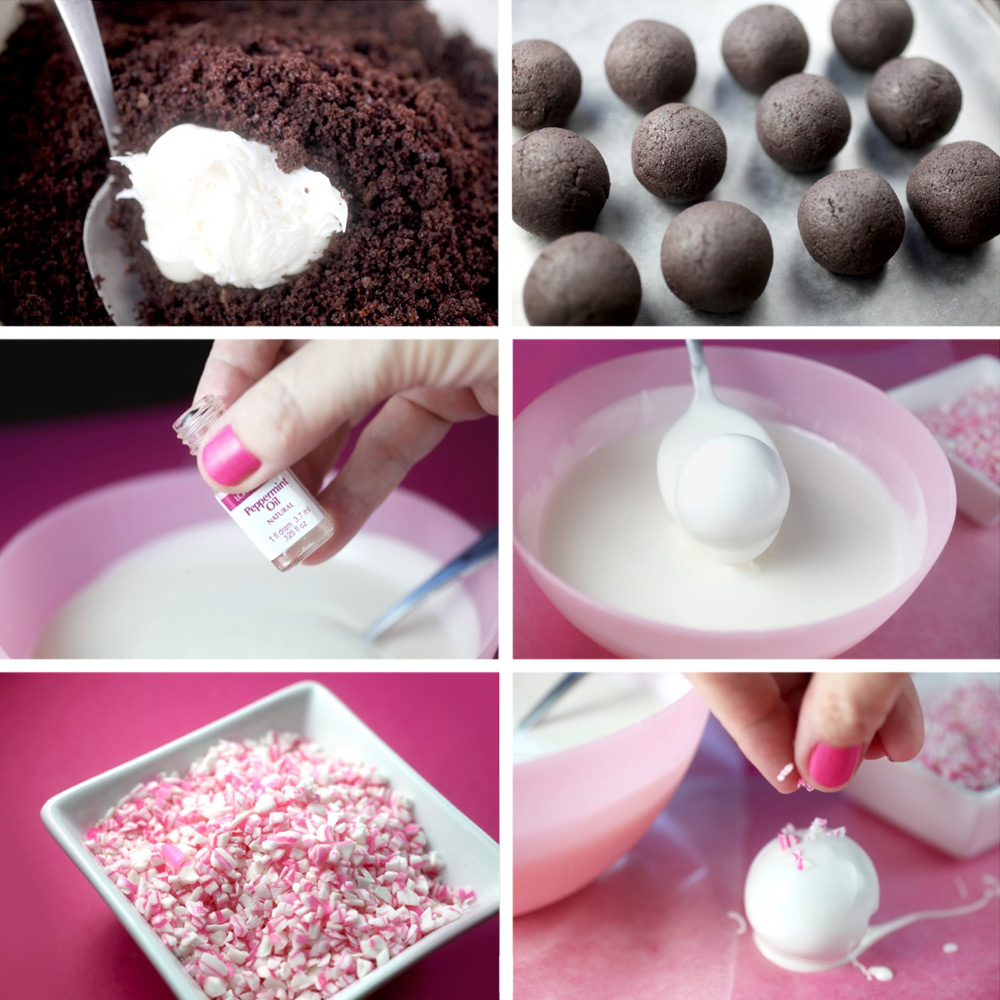
You can use my Basic Cake Pop instructions found here. Instead of using lollipop sticks to dip these sweet balls of cake and frosting, simply use a spoon to submerge the rolled and uncoated cake balls into melted candy coating flavored with peppermint oil. Let any excess coating fall off and gently slide cake ball on wax paper. Sprinkle with crushed peppermint candy and let dry.
If too much candy coating starts to pool at the base of the cake ball, use a toothpick to draw a separation line around the base of the ball. Once the candy coating has hardened, you can break it apart and separate the excess.

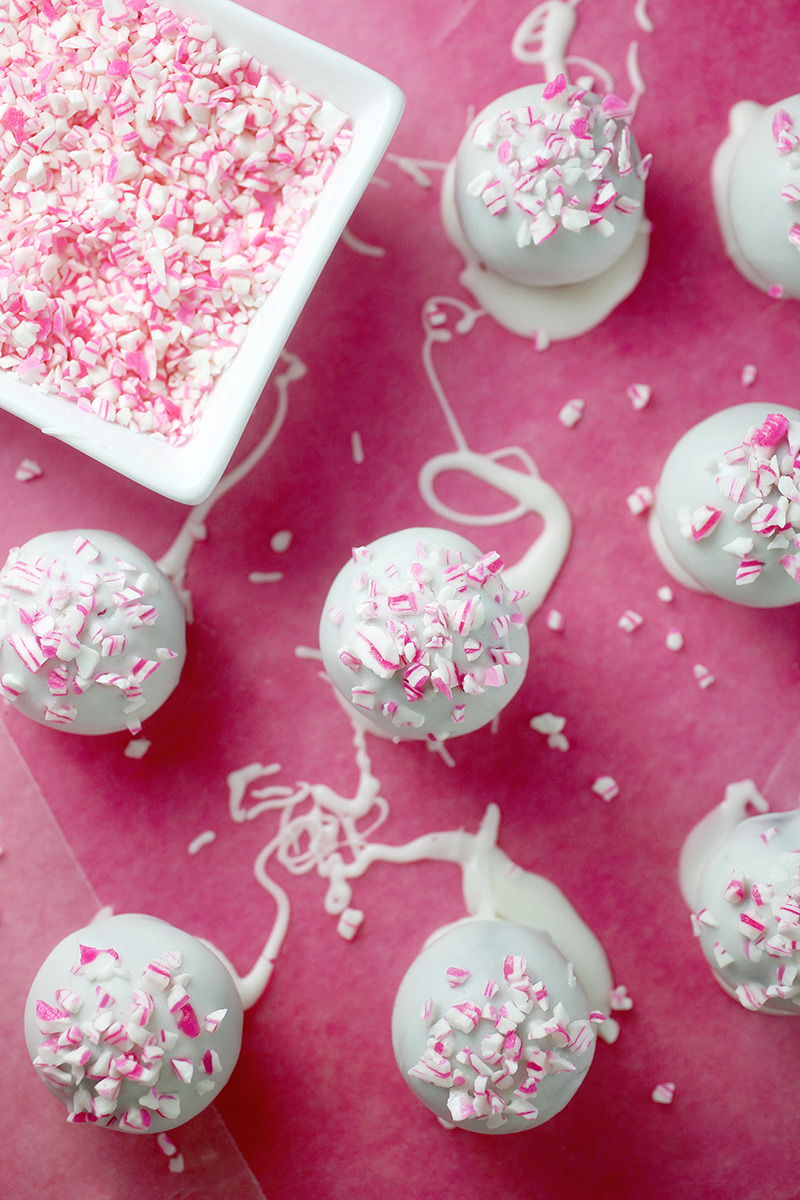
Place the cake balls in wax paper candy cups with another layer of wax paper on top or in individual treat bags and you’re ready to put a lid on it.
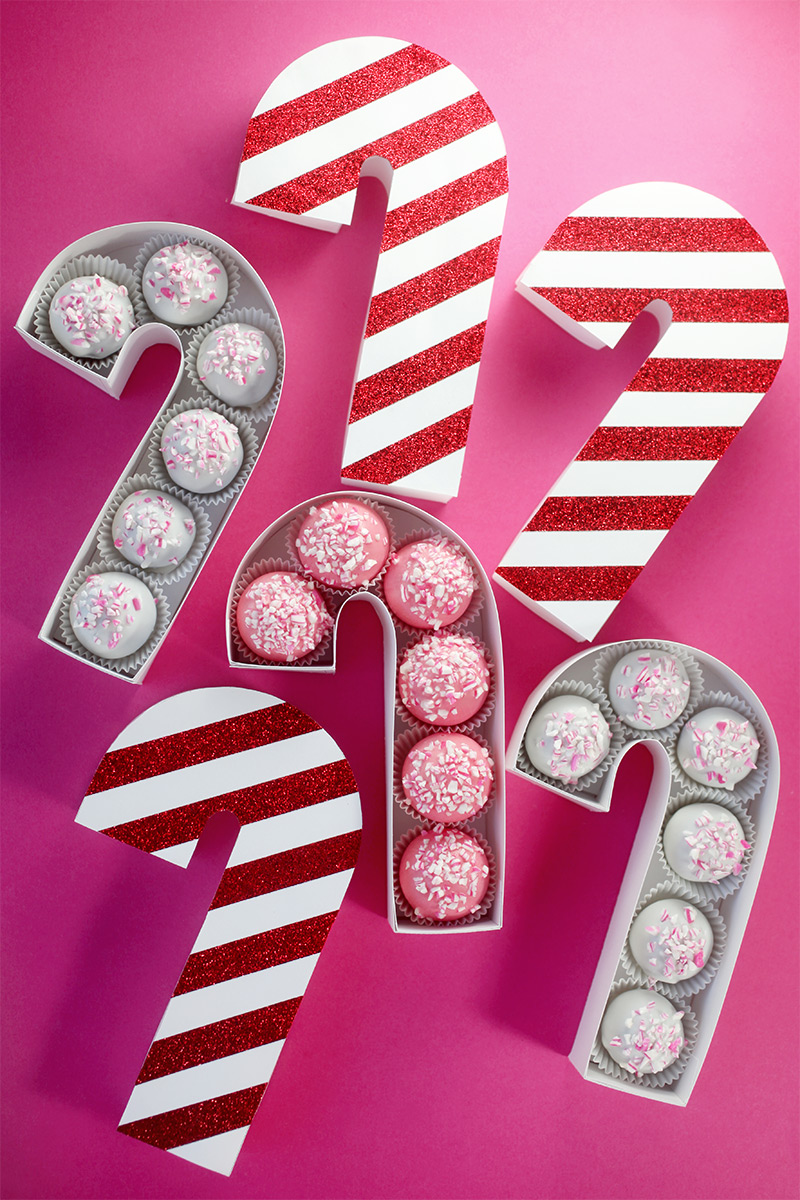
So sweet and super cute!
Enter the Scotch® Most Gifted Wrapper™ Contest for the opportunity to win up to $10,000 in prizes! Enter at: MostGiftedWrapper.com between November 1st and December 1st. LEGAL RESIDENTS OF THE U.S. and D.C. (excluding AZ, CO, NE, MD, NJ, ND, TN and VT), who are 18 (19 in AL and 21 in MS) and older at the time of entry. Ends 12/1/16. To enter and for Official Rules (including prize descriptions), visit mostgiftedwrapper.com. Void where prohibited.
This post is in partnership with Scotch™ Brand.


Awesome!!!!!
Oh my God! thanks really cool post
Can i use this on regular size cupcakes?
I love the idea of making these for Christmas gifts. I have ONE QUESTION…….I don’t see anywhere in either recipes how much peppermint oil you add to your white chocolate coating. Can you please tell me how much to use with 2 cups of white chocolate bark?
thanks!
HELP! It’s so cute but I tried to make this but when I printed the template the lines were so light I could barely see them and cut off some of the tabs. Is there a way to make the lines darker when printing? Thanks!
Hey Diane – I just added a link to a second version with darker lines
https://www.bakerella.com/images/2016/12/CandyCaneBoxTemplates-darklines.pdf
and I’ll email it to you as well.
Also, I printed these out on smooth bristol board like this:
http://www.hobbylobby.com/Art-Supplies/Canvas-Surfaces/Mixed-Media/Strathmore-11-x-17-300-Series-Bristol-Smooth-Pad/p/6207
Let me know if you have questions. Have fun!
that seemed very cool i love it creative today bakerella!
AMAZING!! Absolutely love this post :-)
Rebecca
xx
http://www.peppermintdolly.com
CUTE!!!!!!!!!!!!!!!!!!!!!!!!!!!!!!!!!!!!!!!!!!!!!!!!!!!!!!!!!!!!!!!!!!!!!!!!!!!!!!!!!!!!!!!!!!!!!!!!!!!!!!!!!!!!!!!!!!!!!!!!!!!!!!!!!!!!!!!
Aww some sweet cheeriness, just what was needed :D
These are darling! xx
I knew you would like these!
Beautiful!
Wow. That’s so cool. I love the idea of making candy cane boxes.
Omg! Not only did you share a great recipe to create but the packaging as well! Thank you Angie for always sharing your great ideas with us! Anything peppermint is my favorite, especially this time of year! Thank you!
I can’t download the pdf’s… :( can you send them to me, by email please?
Thank you
Cohavit88@yahoo.com
How cute! Baked goods look so much better in cute packages. Thanks for sharing!
Totally agree!!!
Omg!!! This idea is the best and the truffles sound so perfect for the season!!!
And the peppermint flavoring makes them even better.
That looks like so much fun! I actually have an entire pinterest board dedicated to “foodie gifts” so I’m quite liking the way this looks. I want to receive one of those for christmas ;)
Foodie gifts are the best!
Nice Idea. Looking so beautiful