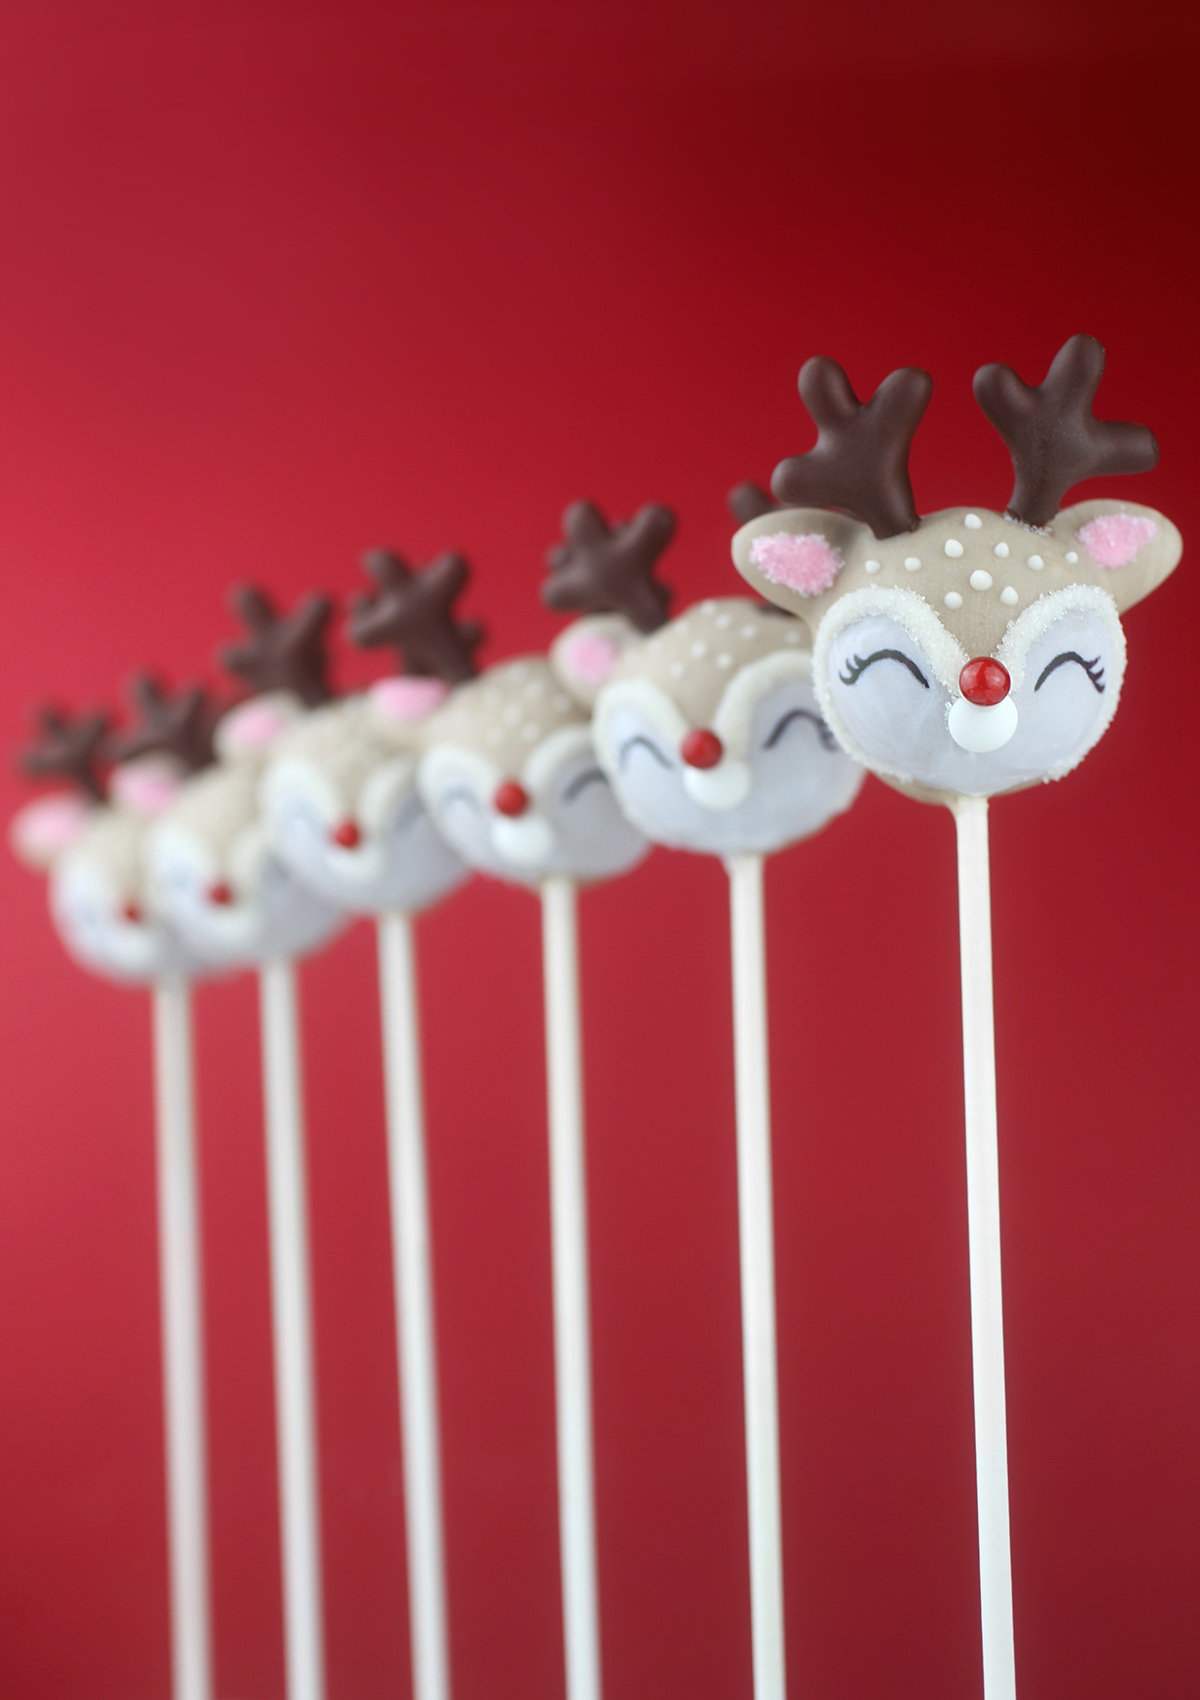
What a difference a decade makes. It’s fun to see where I started and how much better my cake pops look now after making so many of them over the years. These little reindeers are an example of hard work and a lot of learning on the job.
Here are the first reindeers I ever made if you want to see a comparison of what I am talking about.
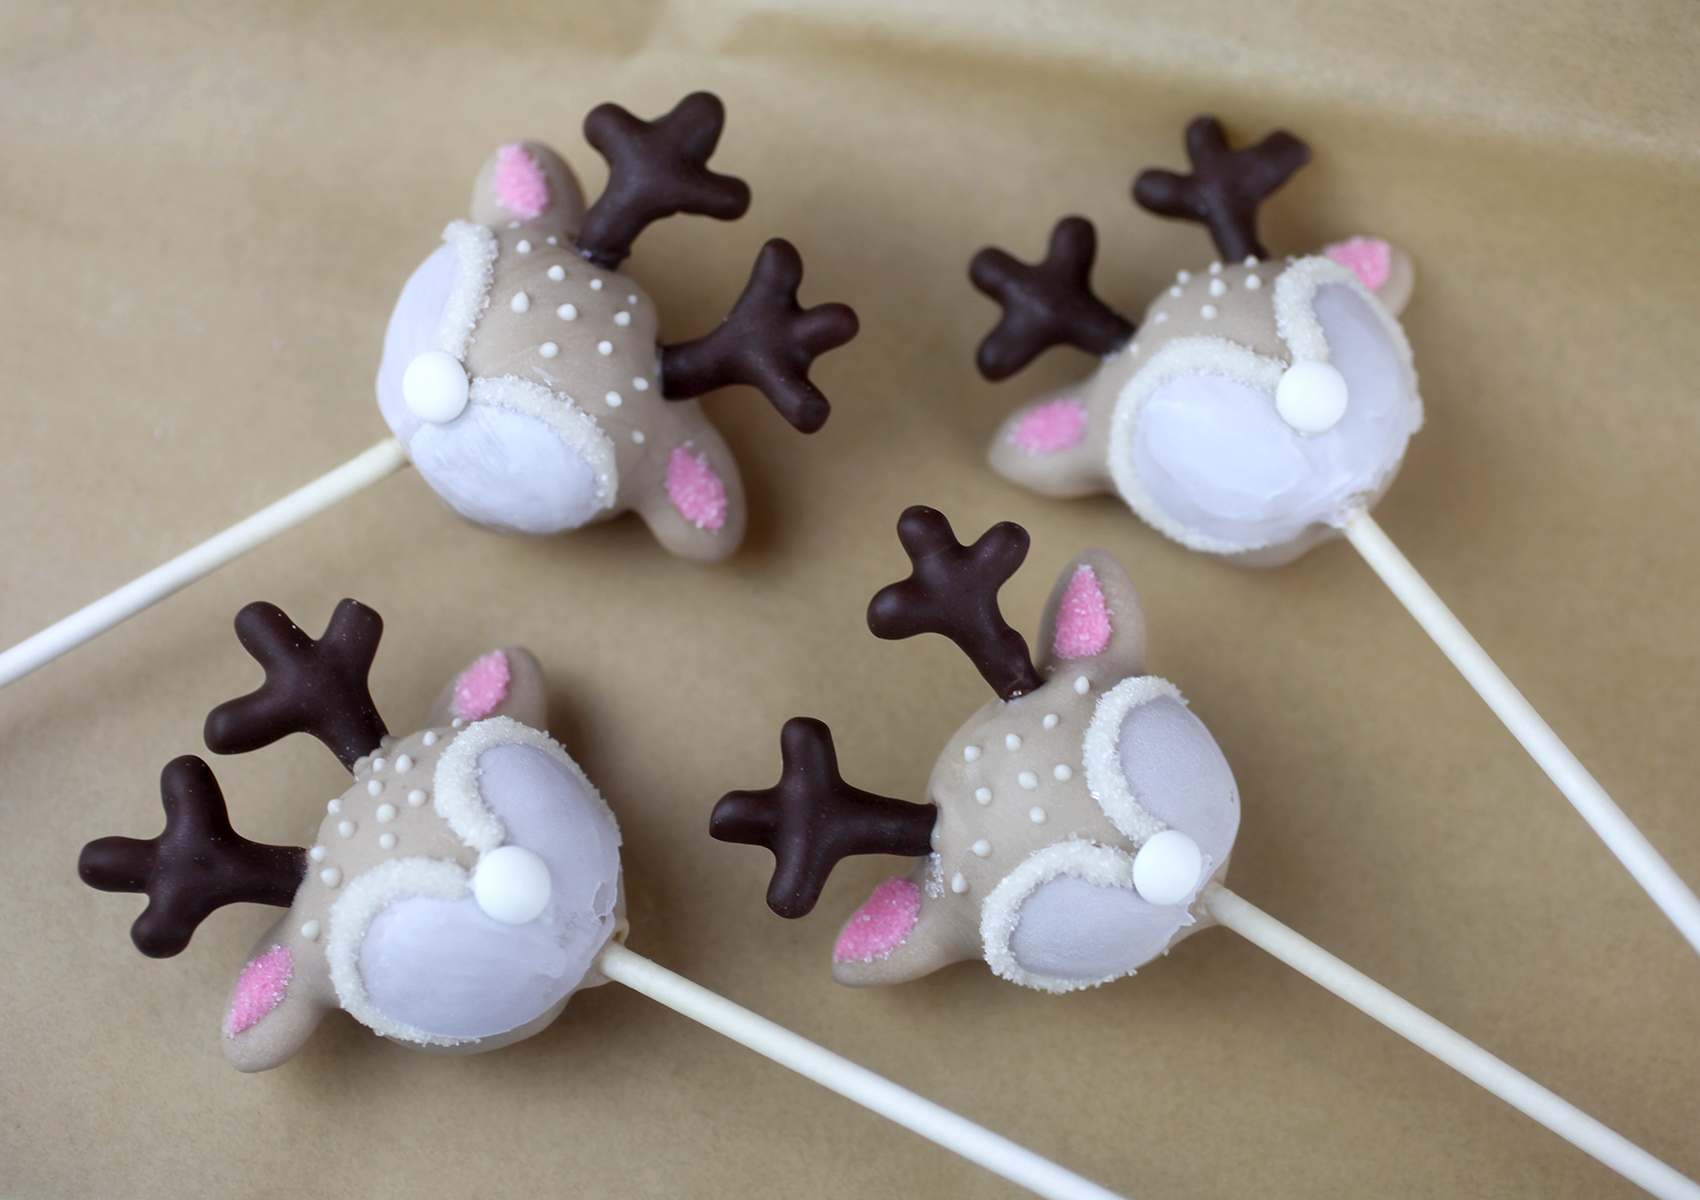
The ones in this post are definitely a lot more detailed, but they are just an example of what’s possible, you can certainly decorate them down so to speak, but I like to make them a little extra for you guys to see and hopefully inspire even more ideas for you.
For these, I’m going to start by talking all about antlers. You can make them ahead of time and have them ready for when you want to make the pops.
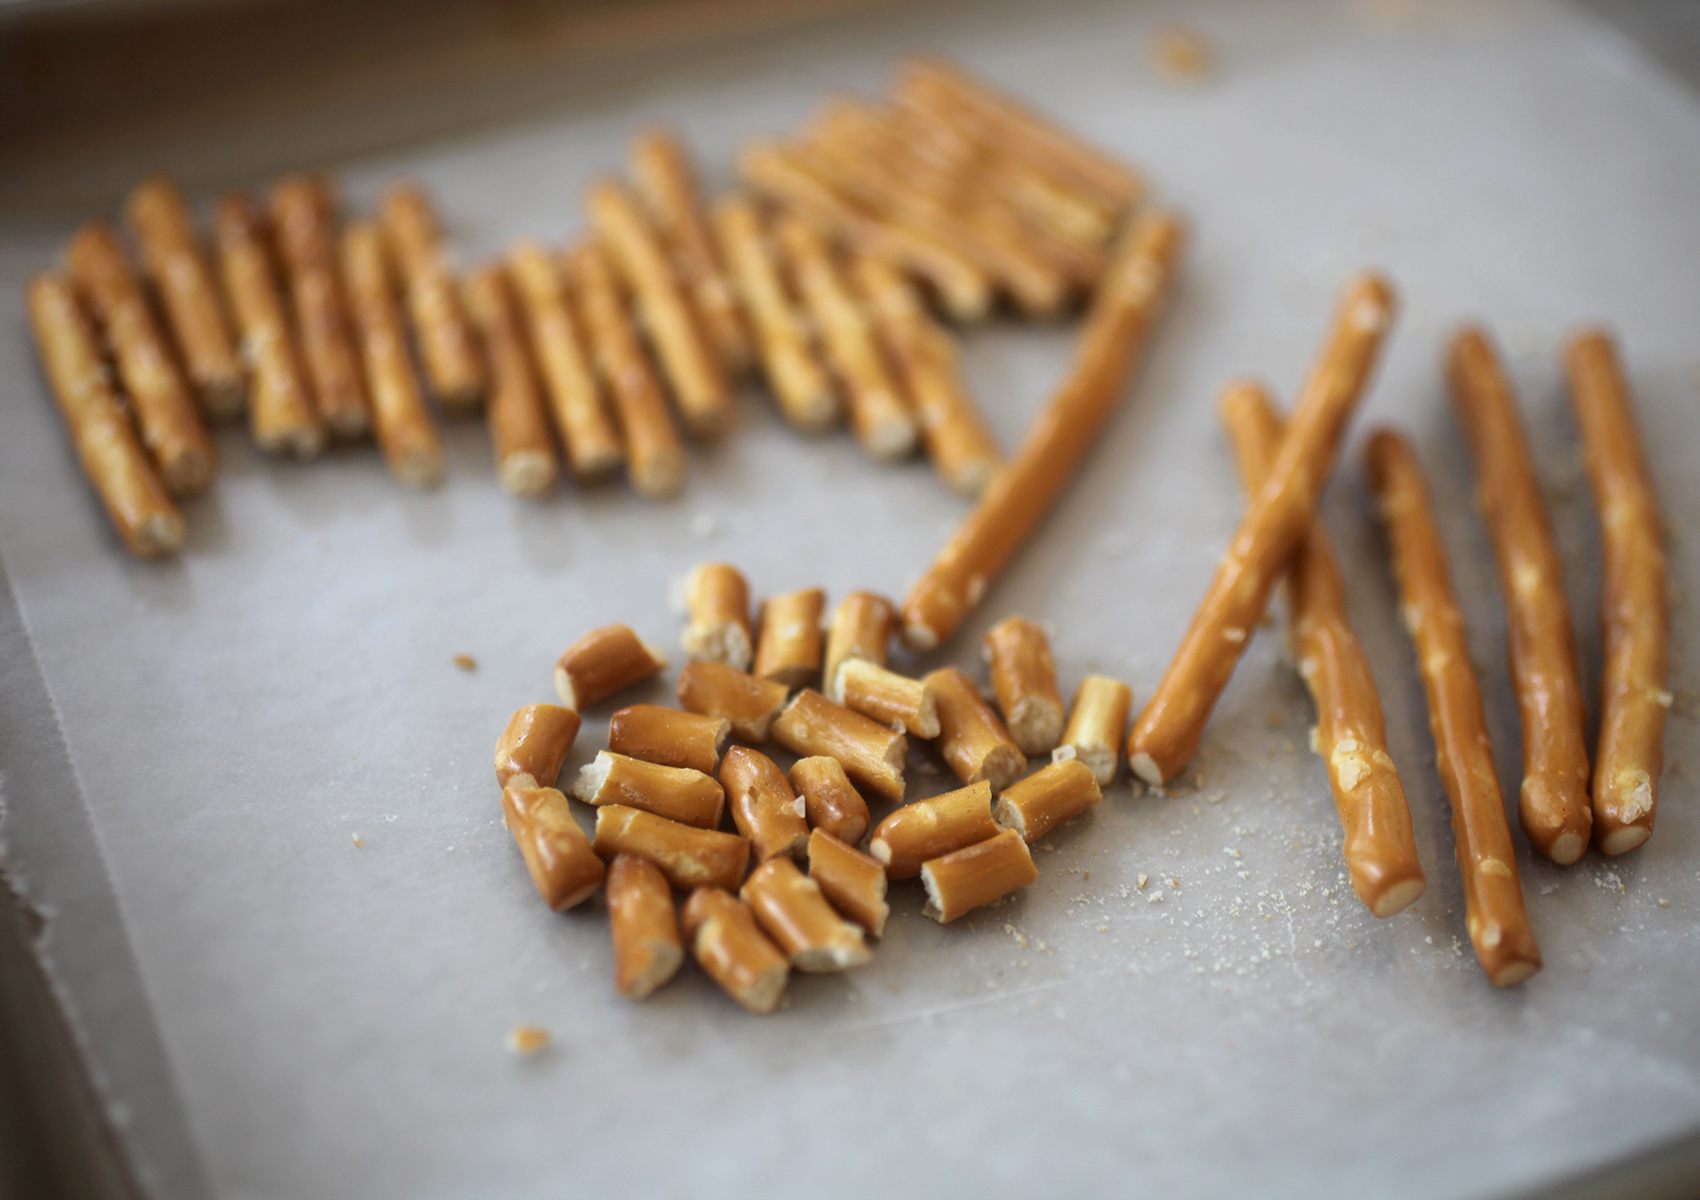
I wanted the antlers for these sweet little deers to look very specific and the only way to really do that was to build them. So, I broke apart pretzel sticks into two smaller sizes … about 1 inch and a 1/4 inch give or take.
(NOTE: You can definitely make these with regular broken pretzel twists for a more casual look and a lot less effort, too.)
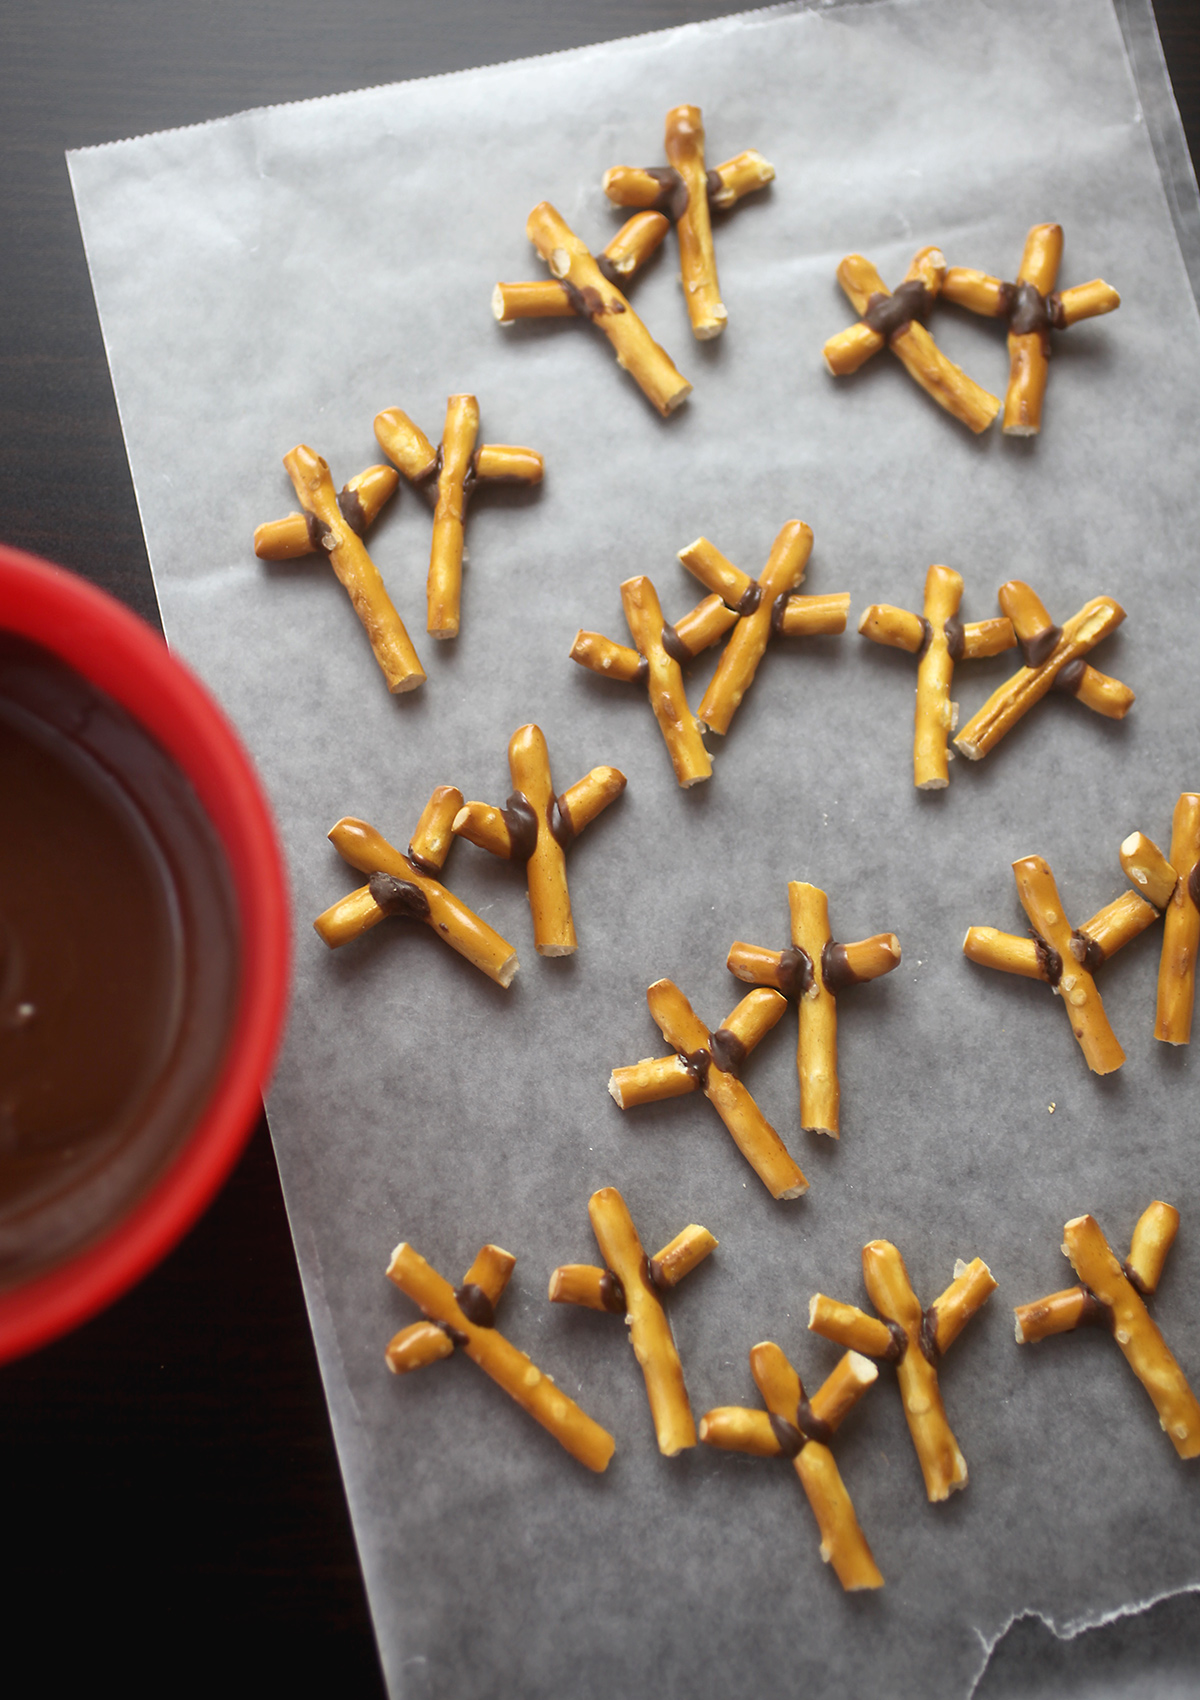
Once the pretzel pieces are broken into two smaller sizes, I used melted candy coating to attach the tiny pieces to the larger ones. This is where it got a little tricky and where you just have to regroup, learn and figure things out as you go.
My plan was to dip them in melted chocolate coating right after this stage, but the melted coating basically melted the chocolate holding the pretzel appendages together and they fell apart immediately. Big, big bummer after building all the little antler parts.
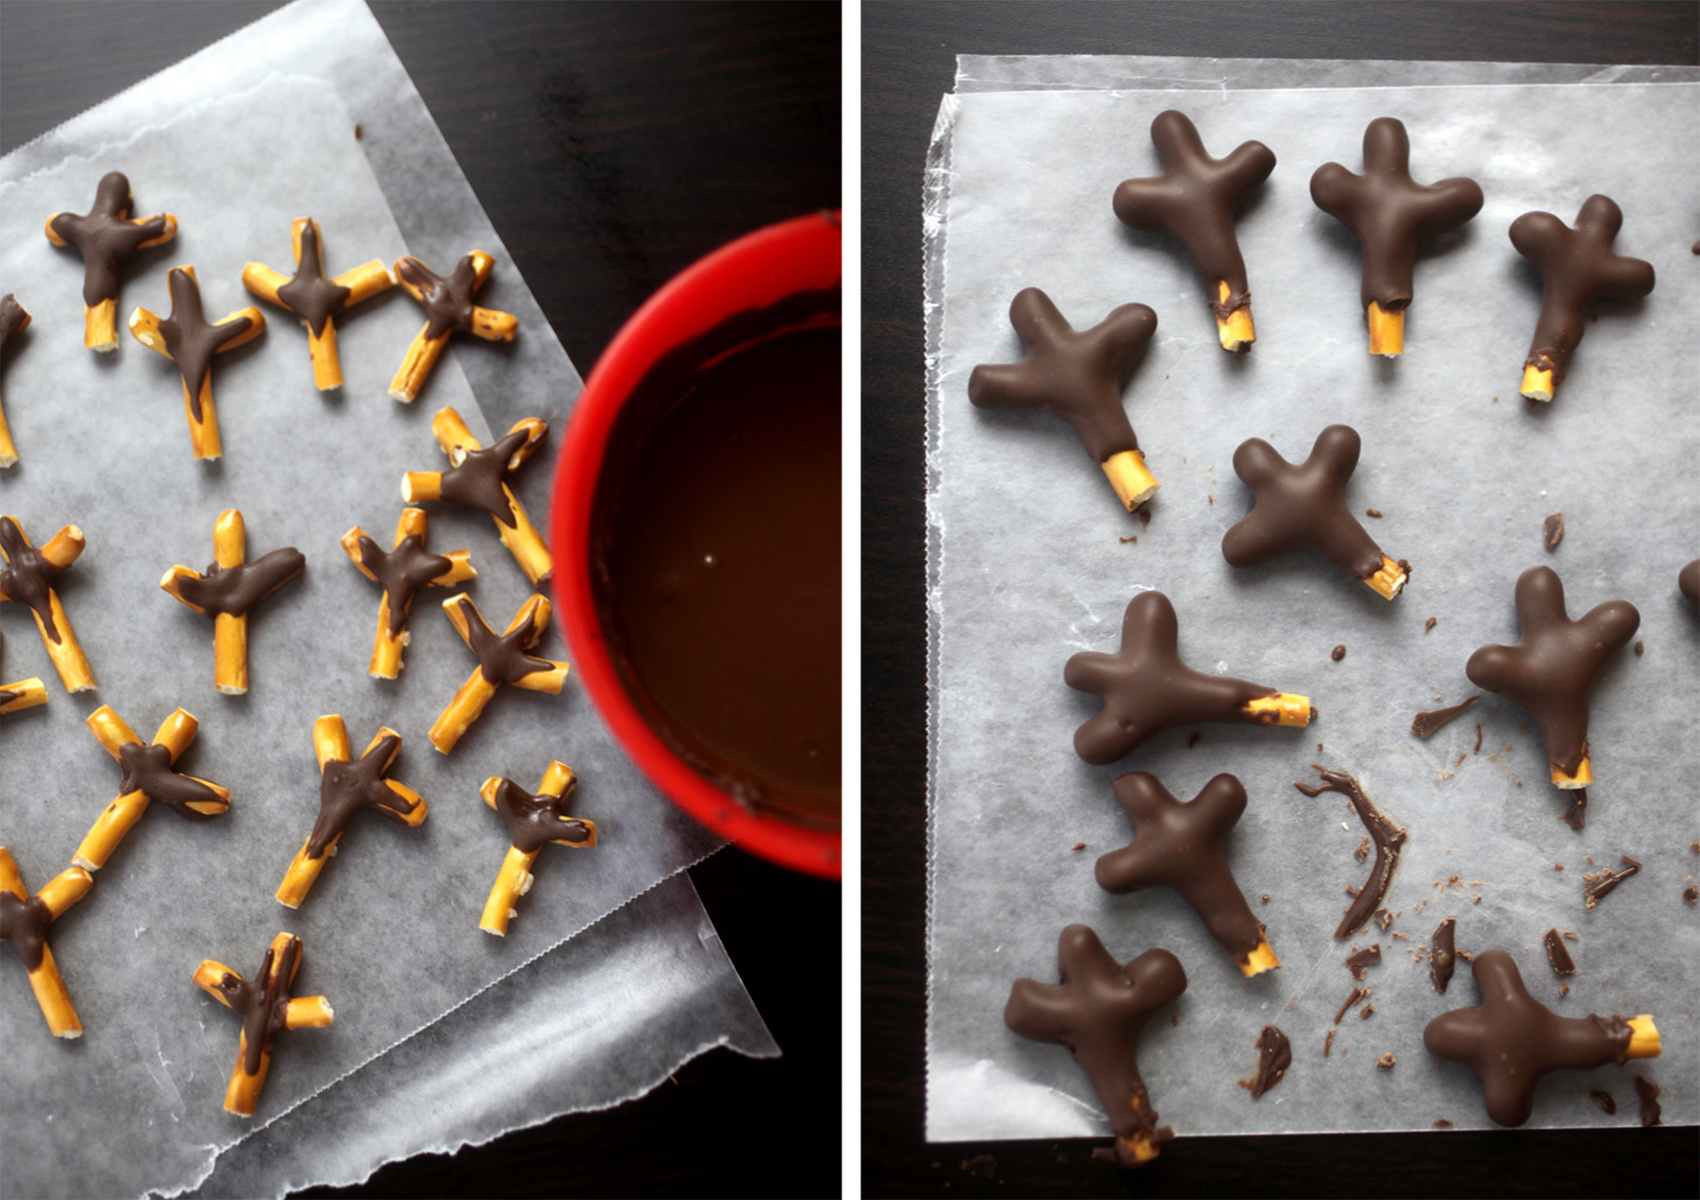
So to try and fix it, I added more melted coating across the three pieces of pretzel (See above left photo). Use your finger or the end of a lollipop stick dipped in the coating to apply. My hope was that the coating would act like a connecter piece and add more support when dipping. And it did! I also … and this is important… froze them for several minutes before dipping.
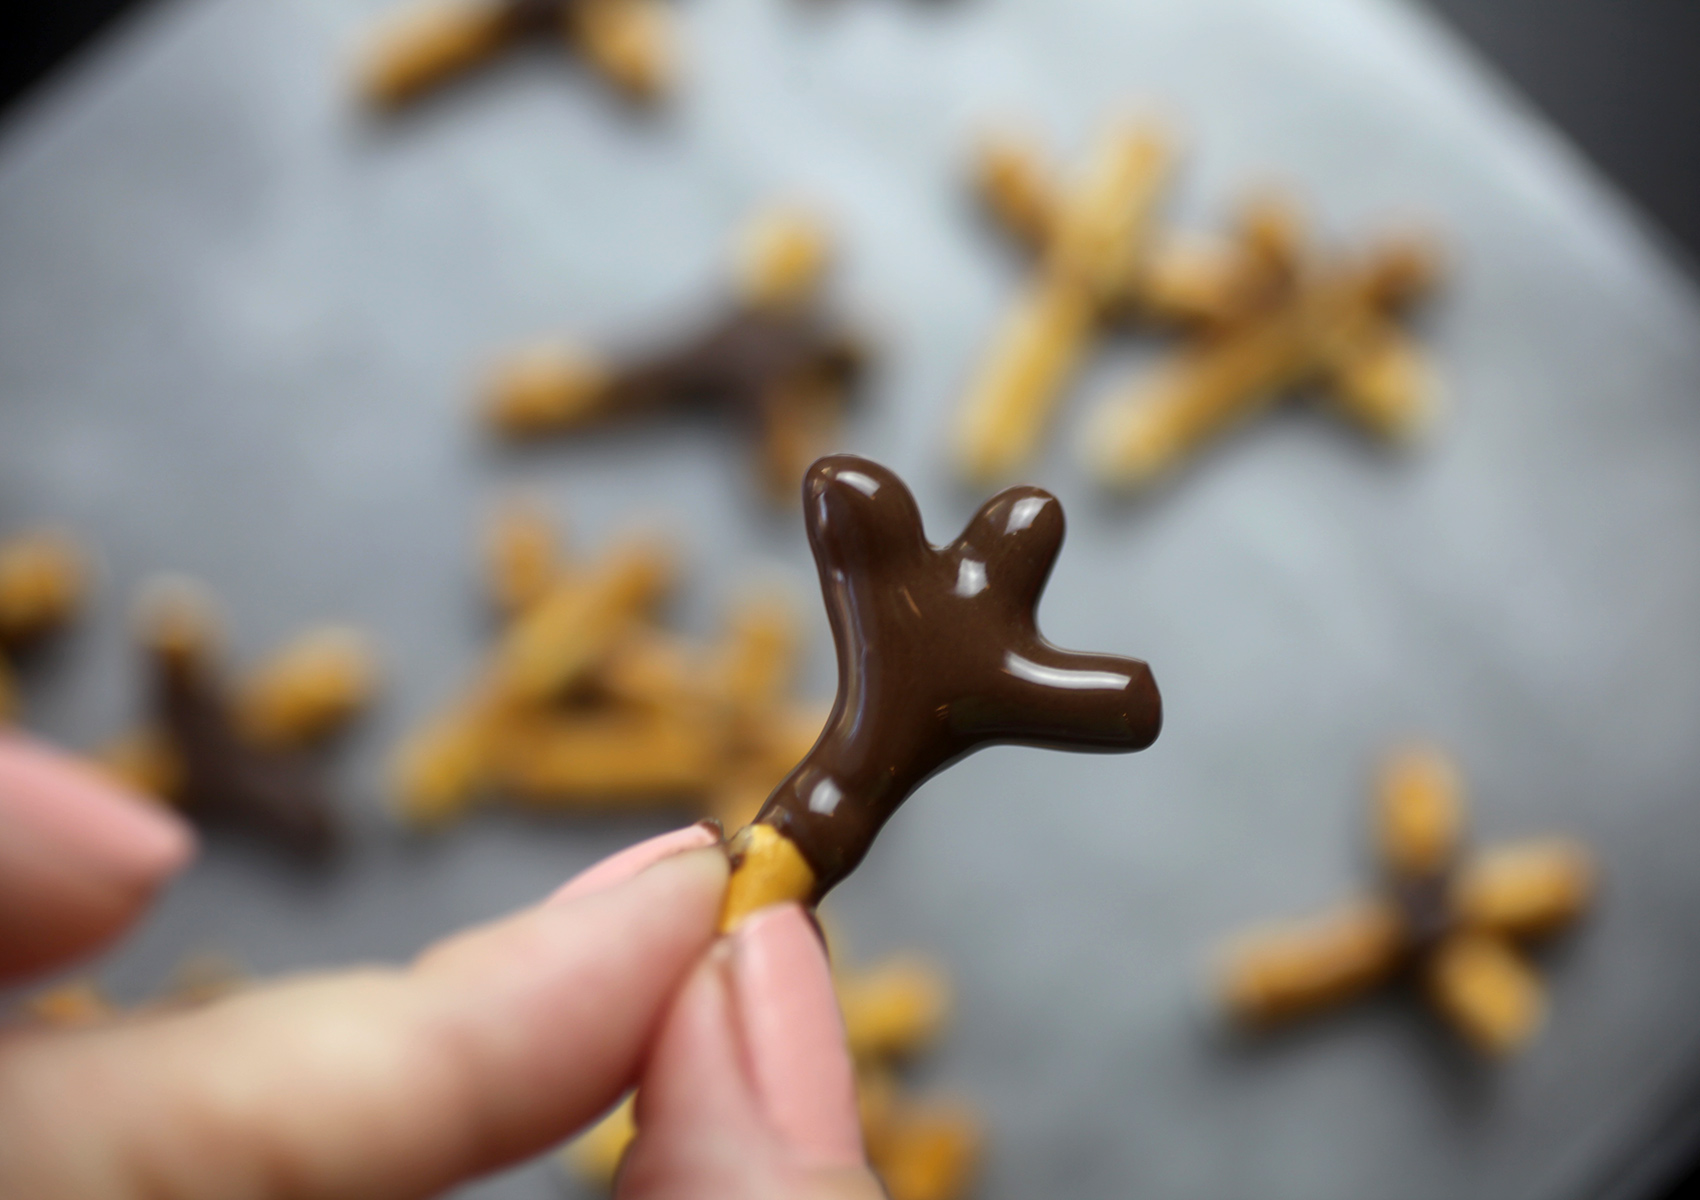
Voila! Having them frozen and with more chocolate support before dipping was the answer. Submerge them in the melted candy coating with just the bottom bit of the pretzel exposed. You’ll probably get chocolate on your fingers… just wipe it off in between each dip.
Hold them to dry or the coating will pool if you lay them flat. You can speed this up by sticking them in the freezer for a few seconds while holding. I know, I know… annoying, but I was determined to make these little antlers. Once dry, you can store them until ready to use.
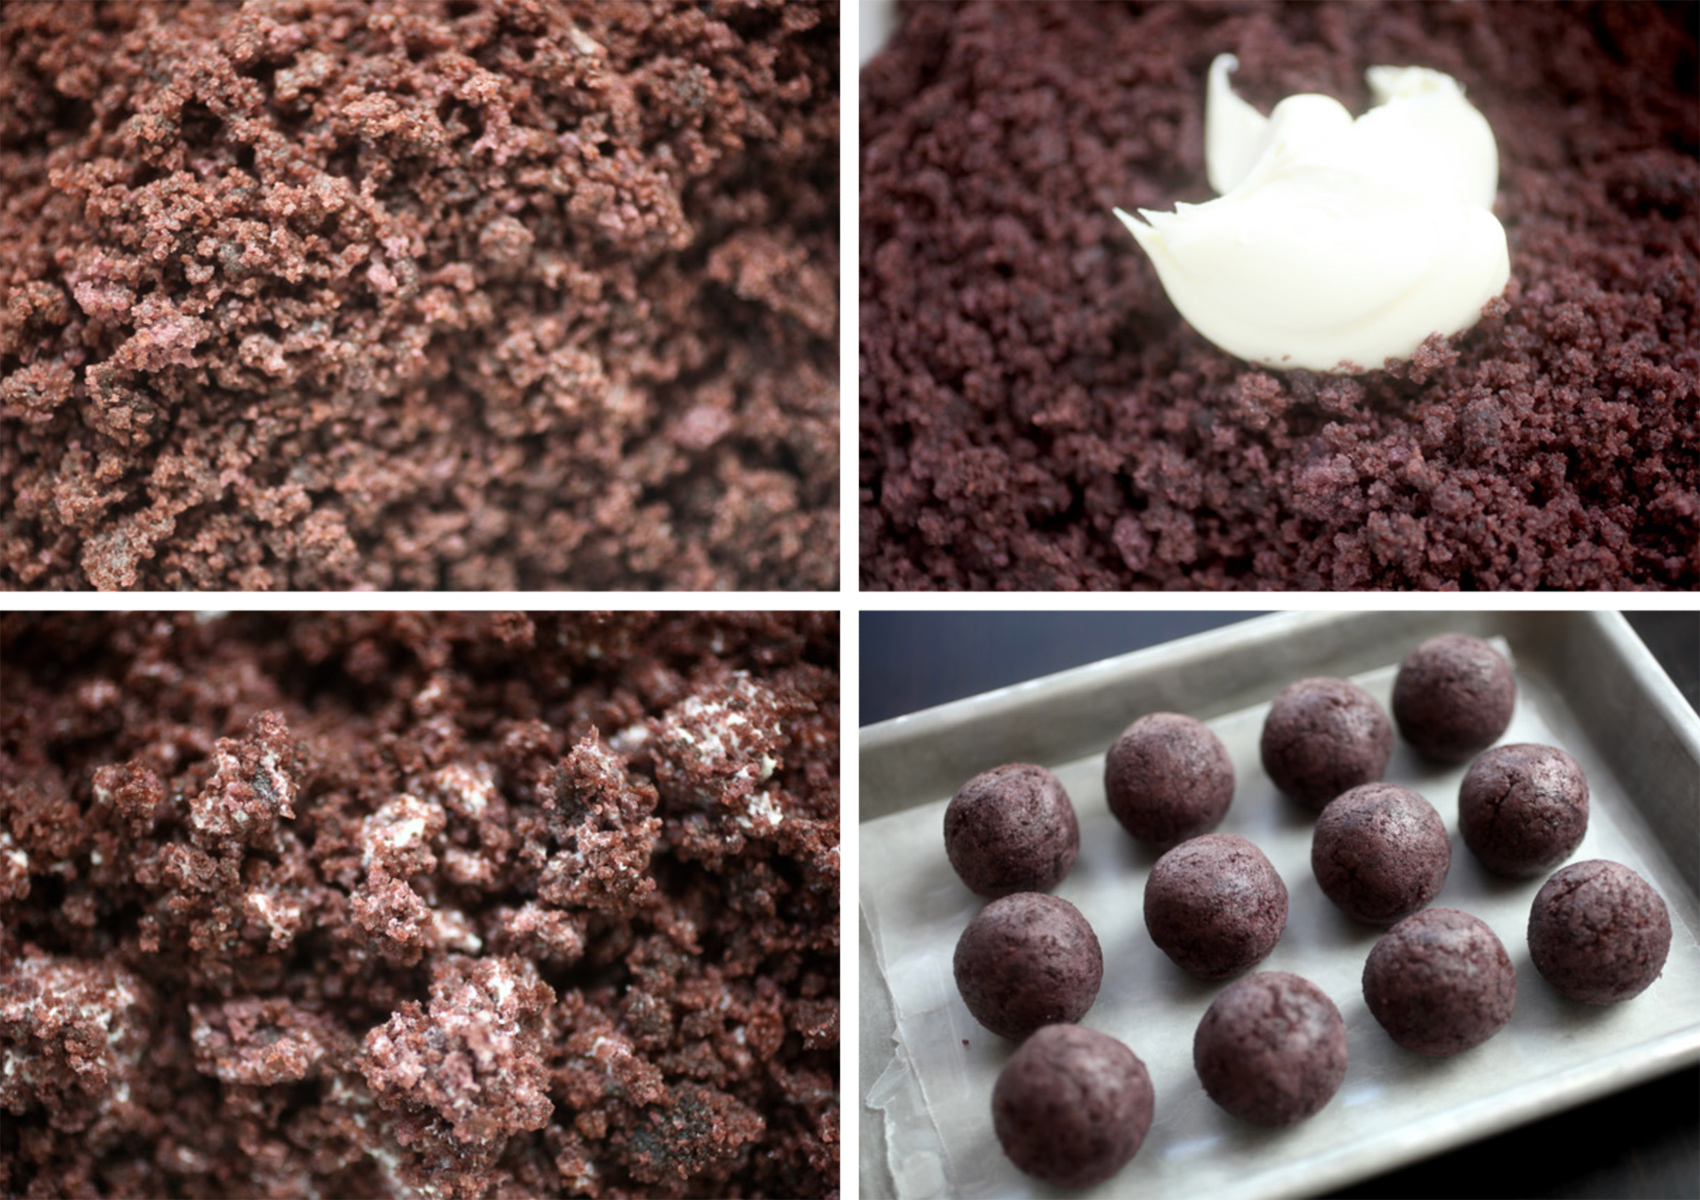
Okay, now for the pops. Here are my basic cake pop instructions. Follow them with your favorite cake flavor and then use the rest of the decorating instructions below.
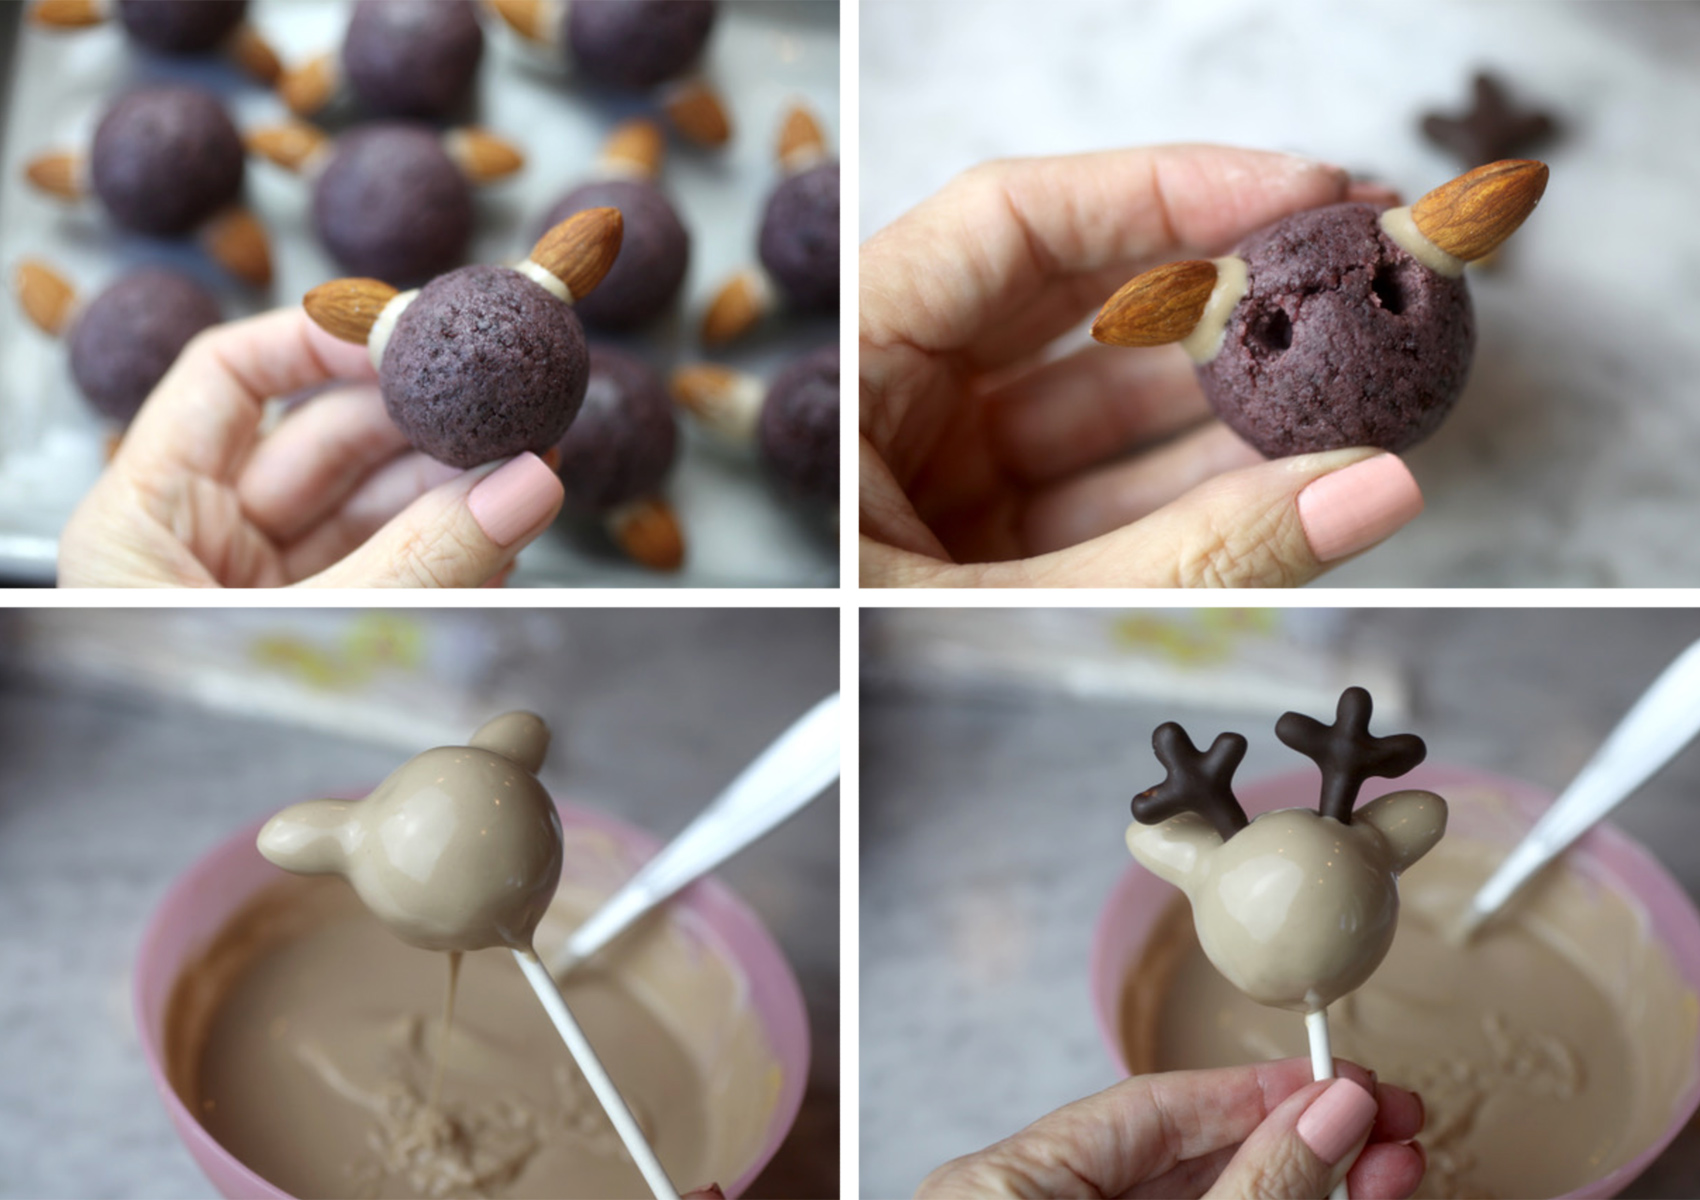
You’ll need rolled cake ball shapes, almonds and melted candy coating tinted a light brown. (Just use vanilla candy coating and add a little chocolate candy coating to mix and lighten the color when melting.)
Place two almonds with the rounded side down in position for ears and use the melted candy coating as glue to attach them. Let dry in position.
Use a lollipop stick to press holes into the cake ball where you want the antlers to go. Do this before chilling and dipping. If you try to attach them without the indention after dipping, it makes it harder to keep the cake ball shape in tact. It will try to separate some.
Once ears are attached and indentions made, go ahead and chill the cake balls in the fridge for about 15 minutes or until firm.
Insert a lollipop stick into the bottom of a chilled and shaped cake pop and dip into melted and fluid candy coating. Remove and let any excess fall off. Immediately insert the prepared antlers in position and place in a cake pop stand to dry.
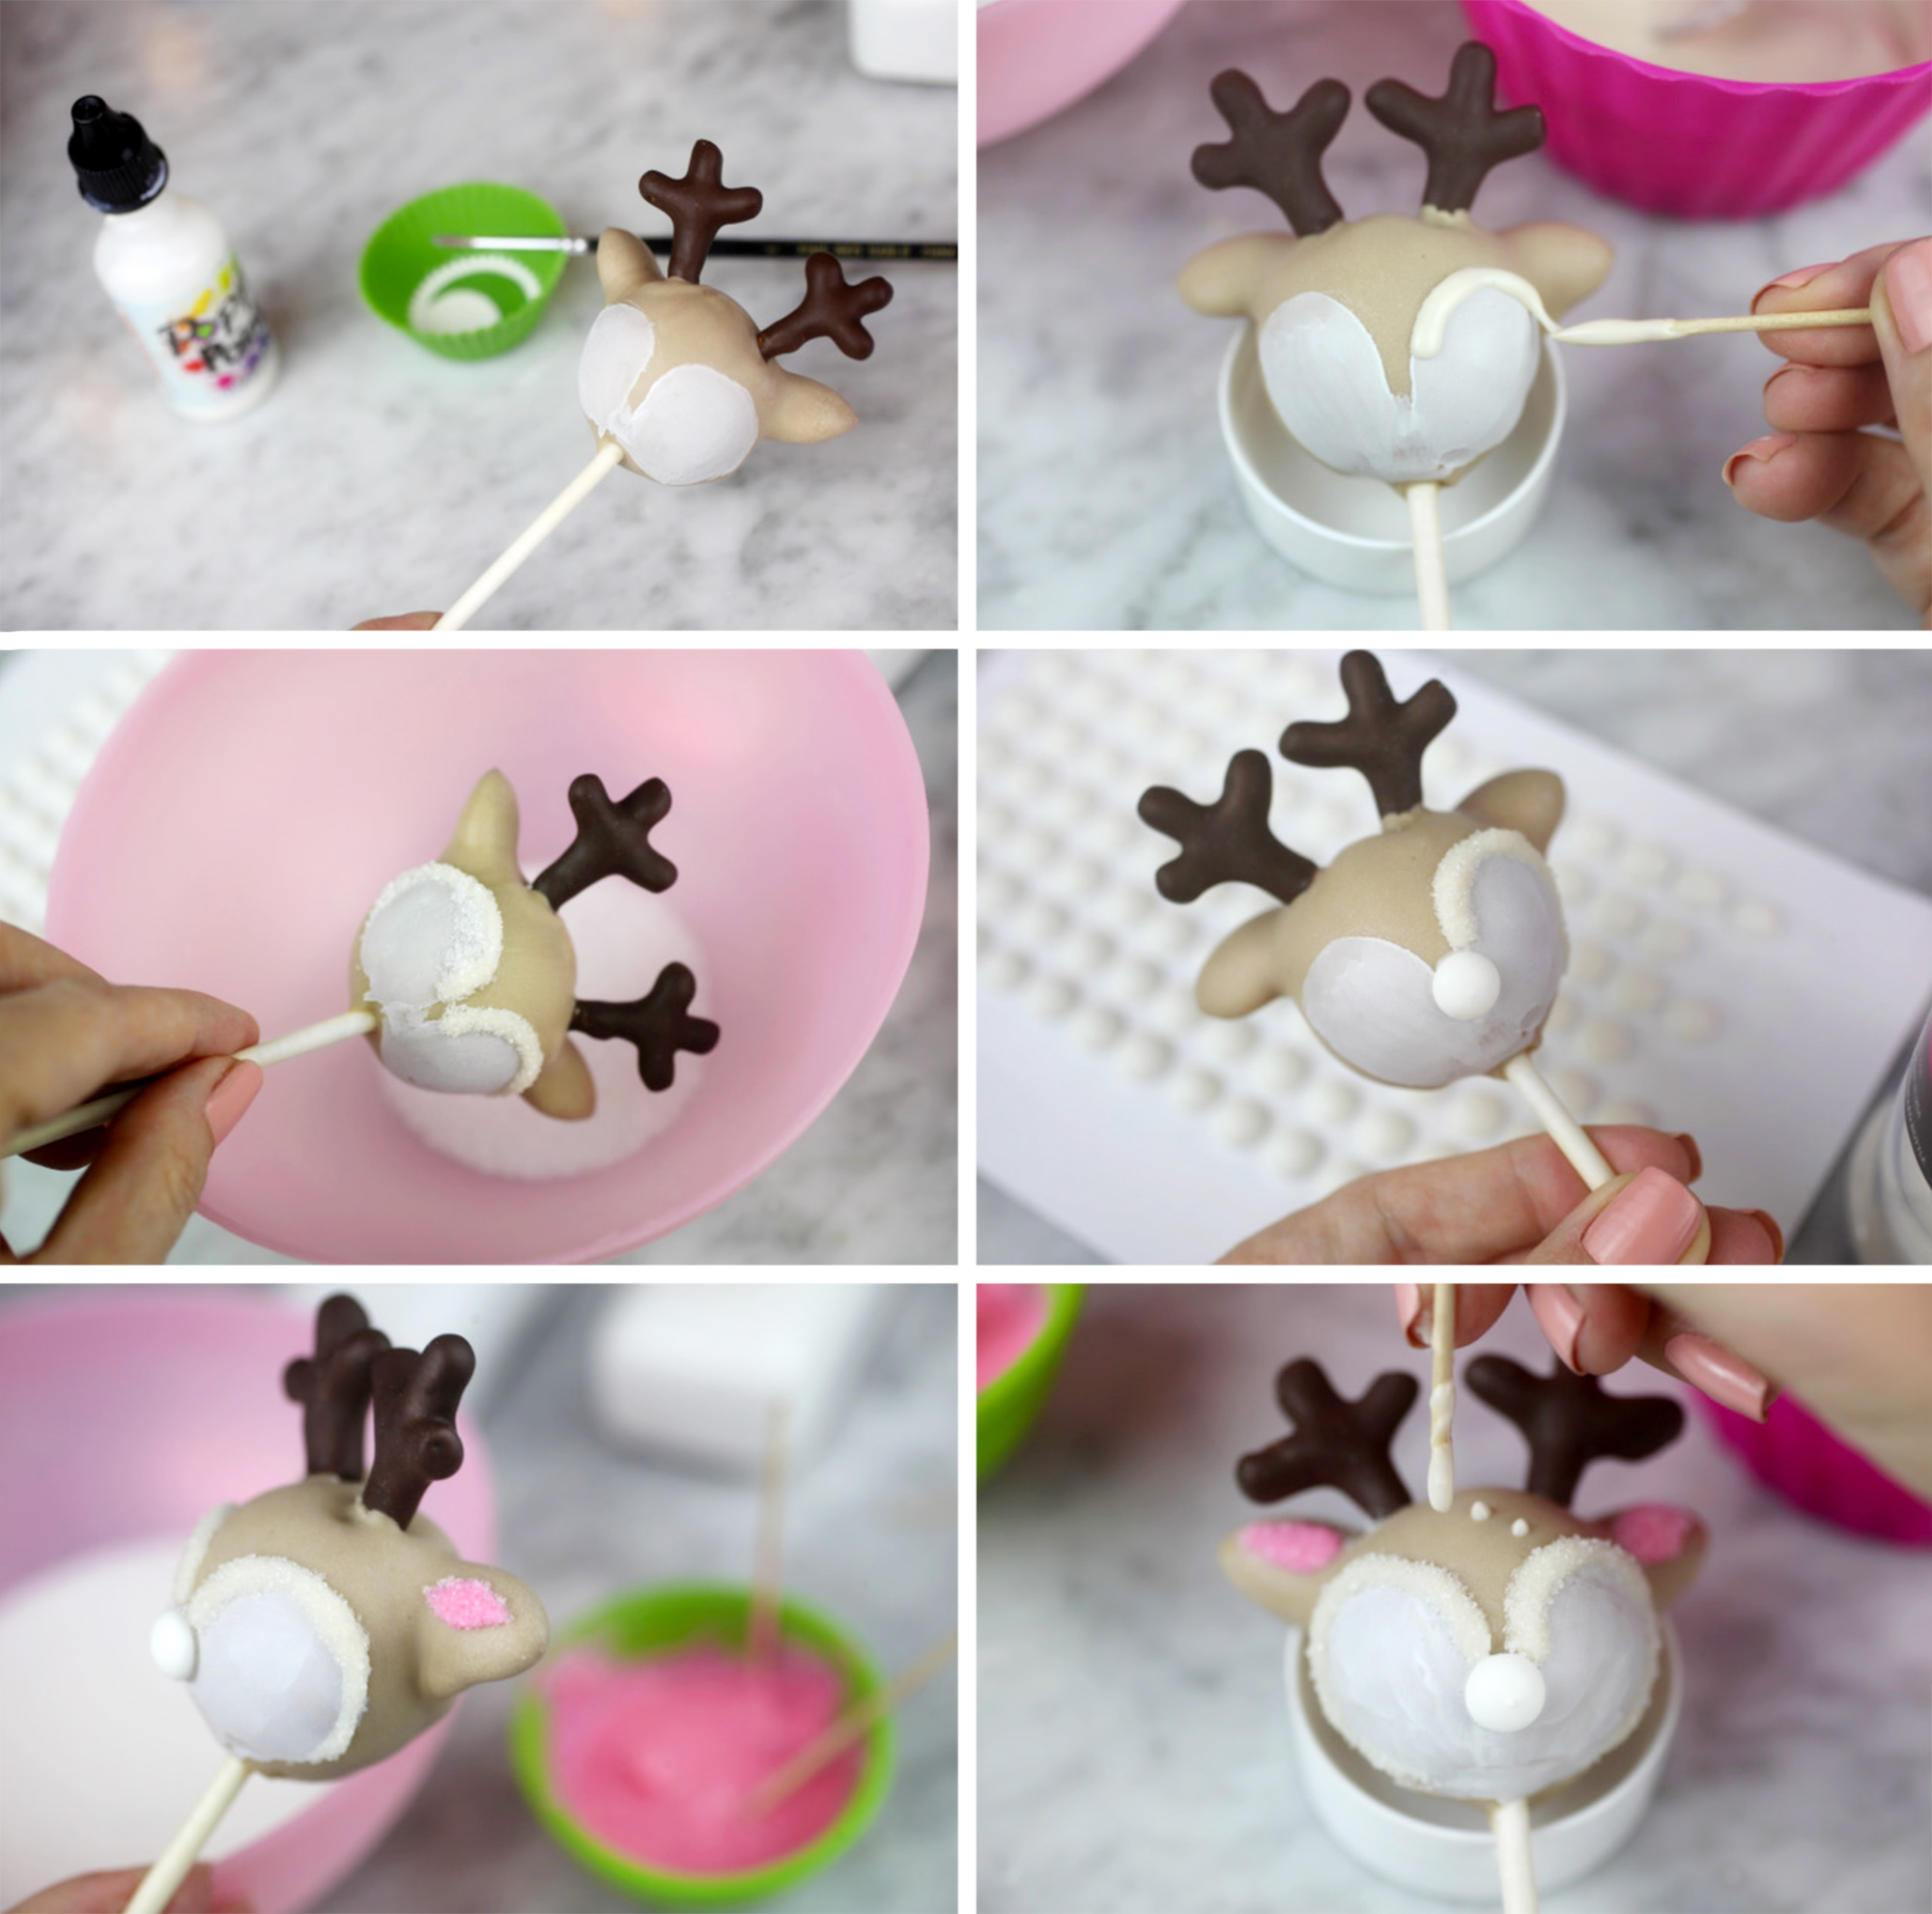
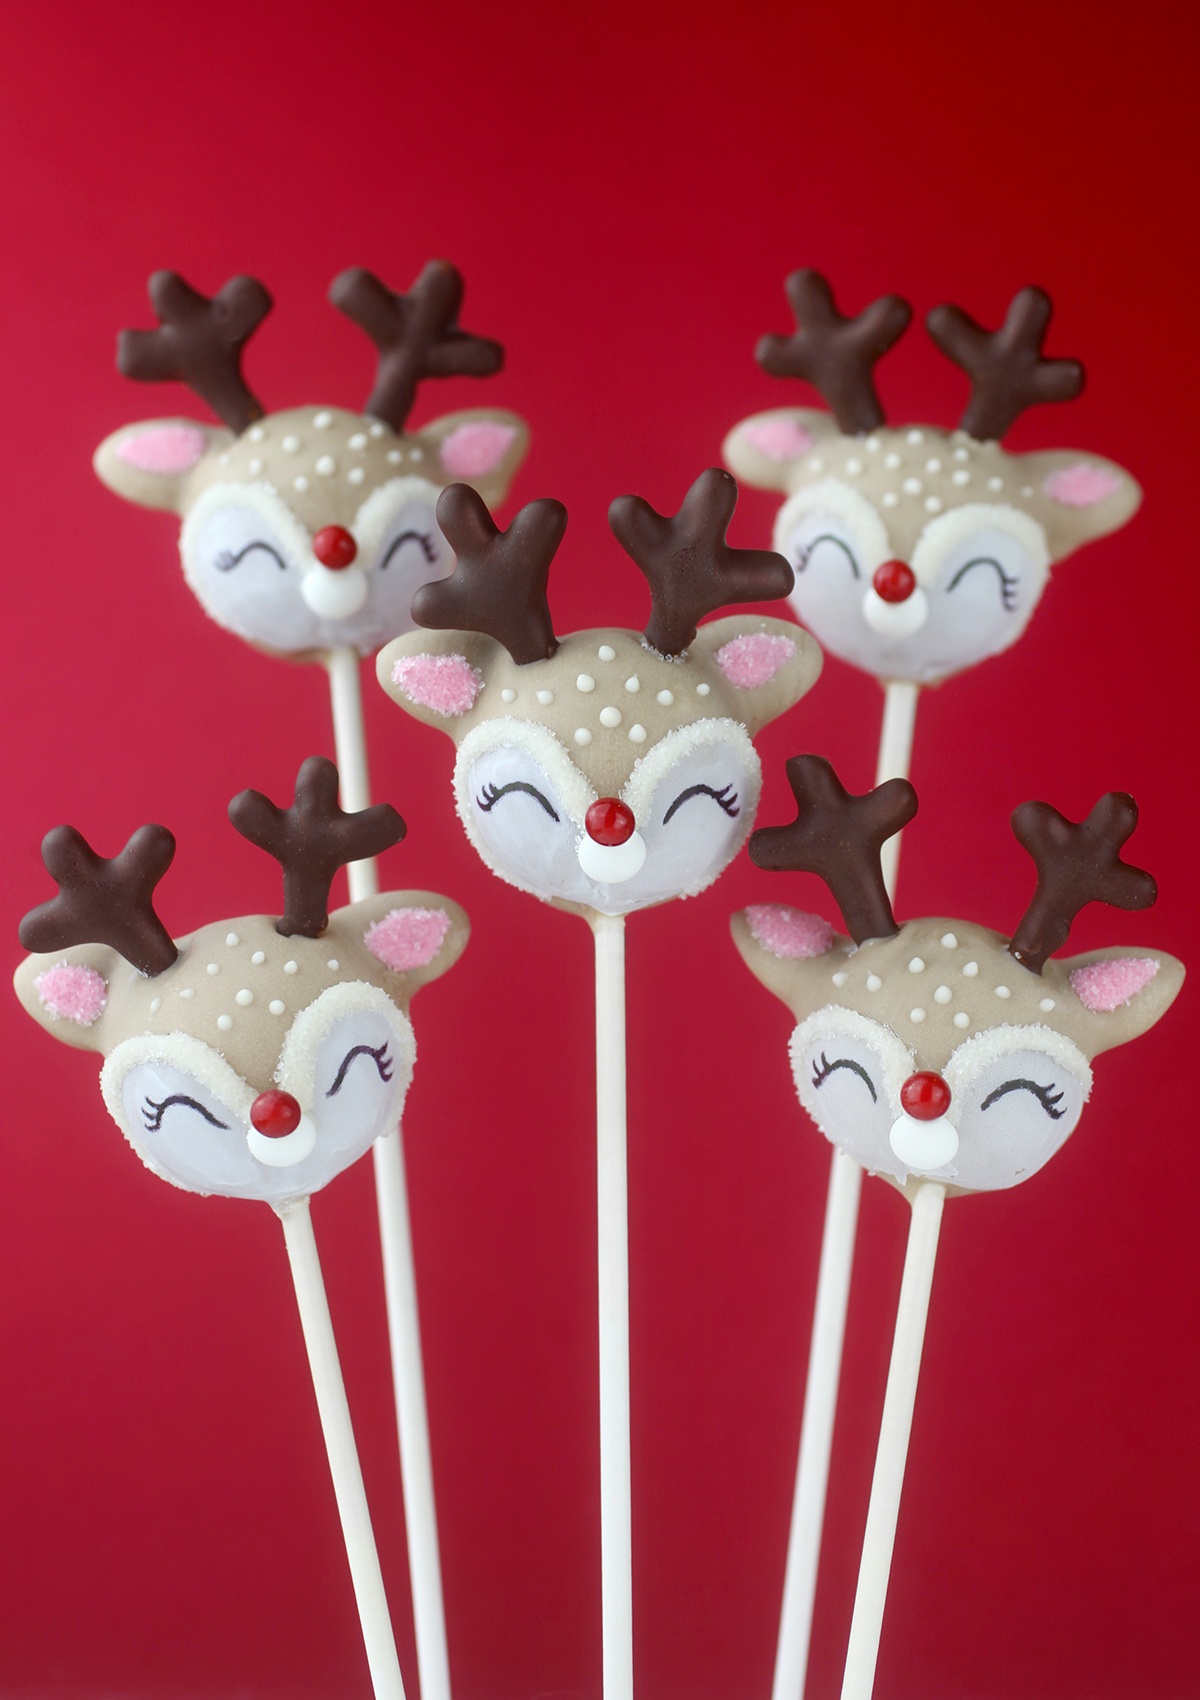
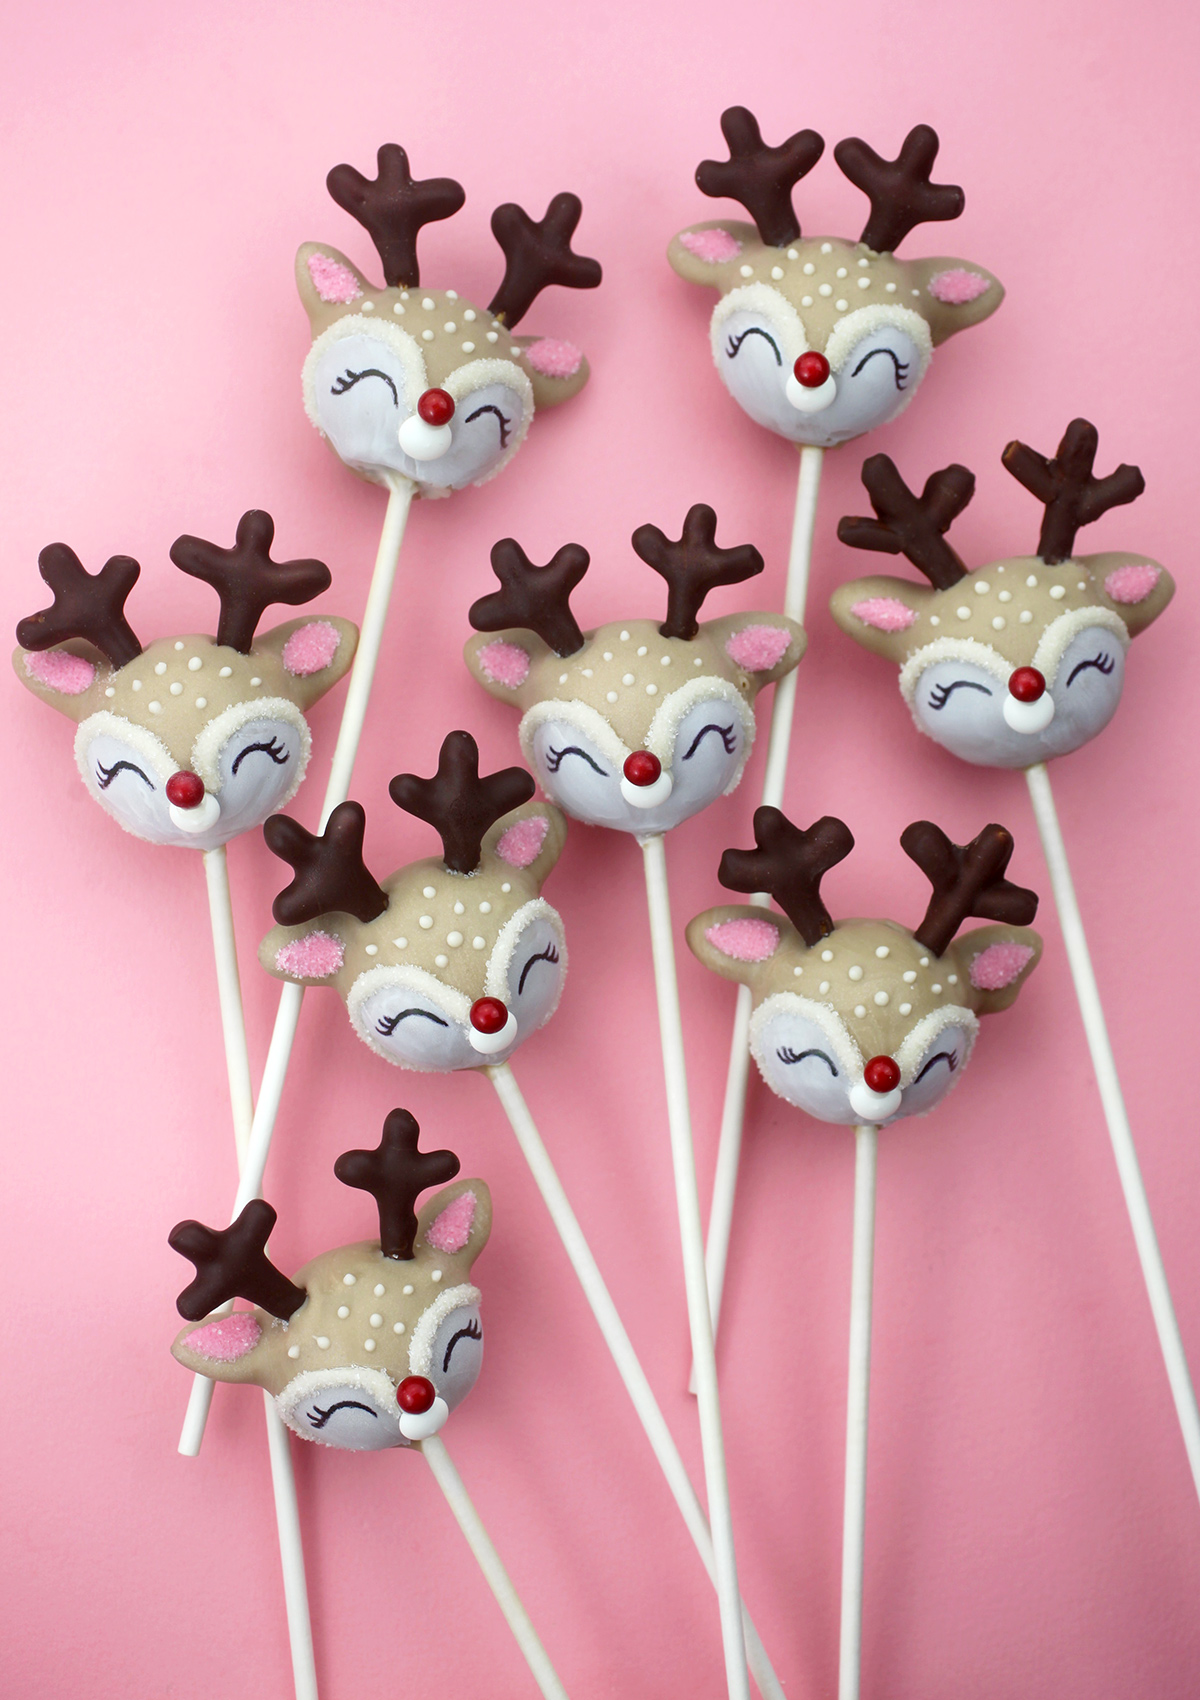
Now for the faces.
- I used white edible poppy paint to create two round shapes on the front of the pop using a brush.
- When dry, I emphasized the curves by applying melted candy coating using a toothpick.
- Sprinkle white sanding sugar on top and over a bowl for a furry look before the coating sets.
- Use melted coating as glue to attach a white candy eye in position for the snout and let dry. The ones I used are blank, but you can easily find them with black eyes in stores.
- Apply pink candy coating to emphasize the ears and sprinkle with more sanding sugar before it dries.
- Use more of the candy coating to dot on spots around the forehead using a toothpick.
Wow, they are really starting to come together. Just a few more details.
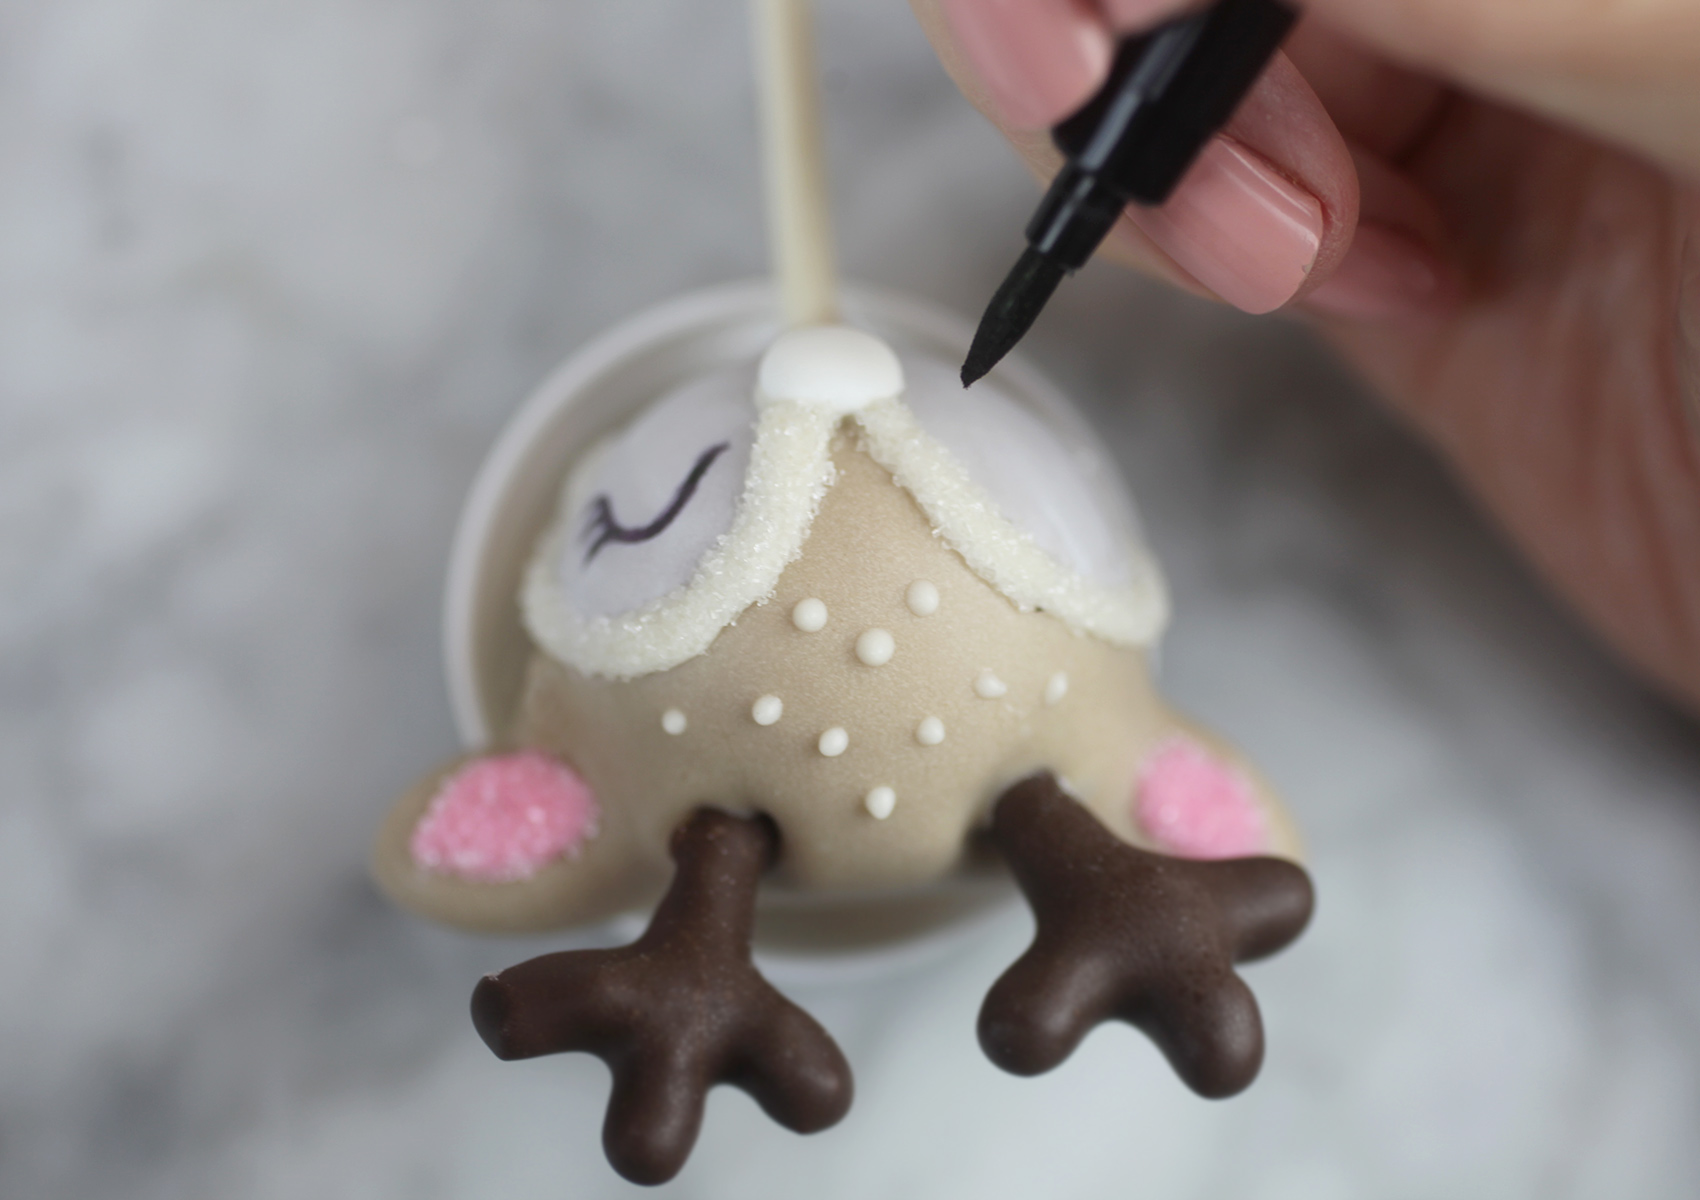
Add sweet lashy lids with a black edible-ink writing pen.
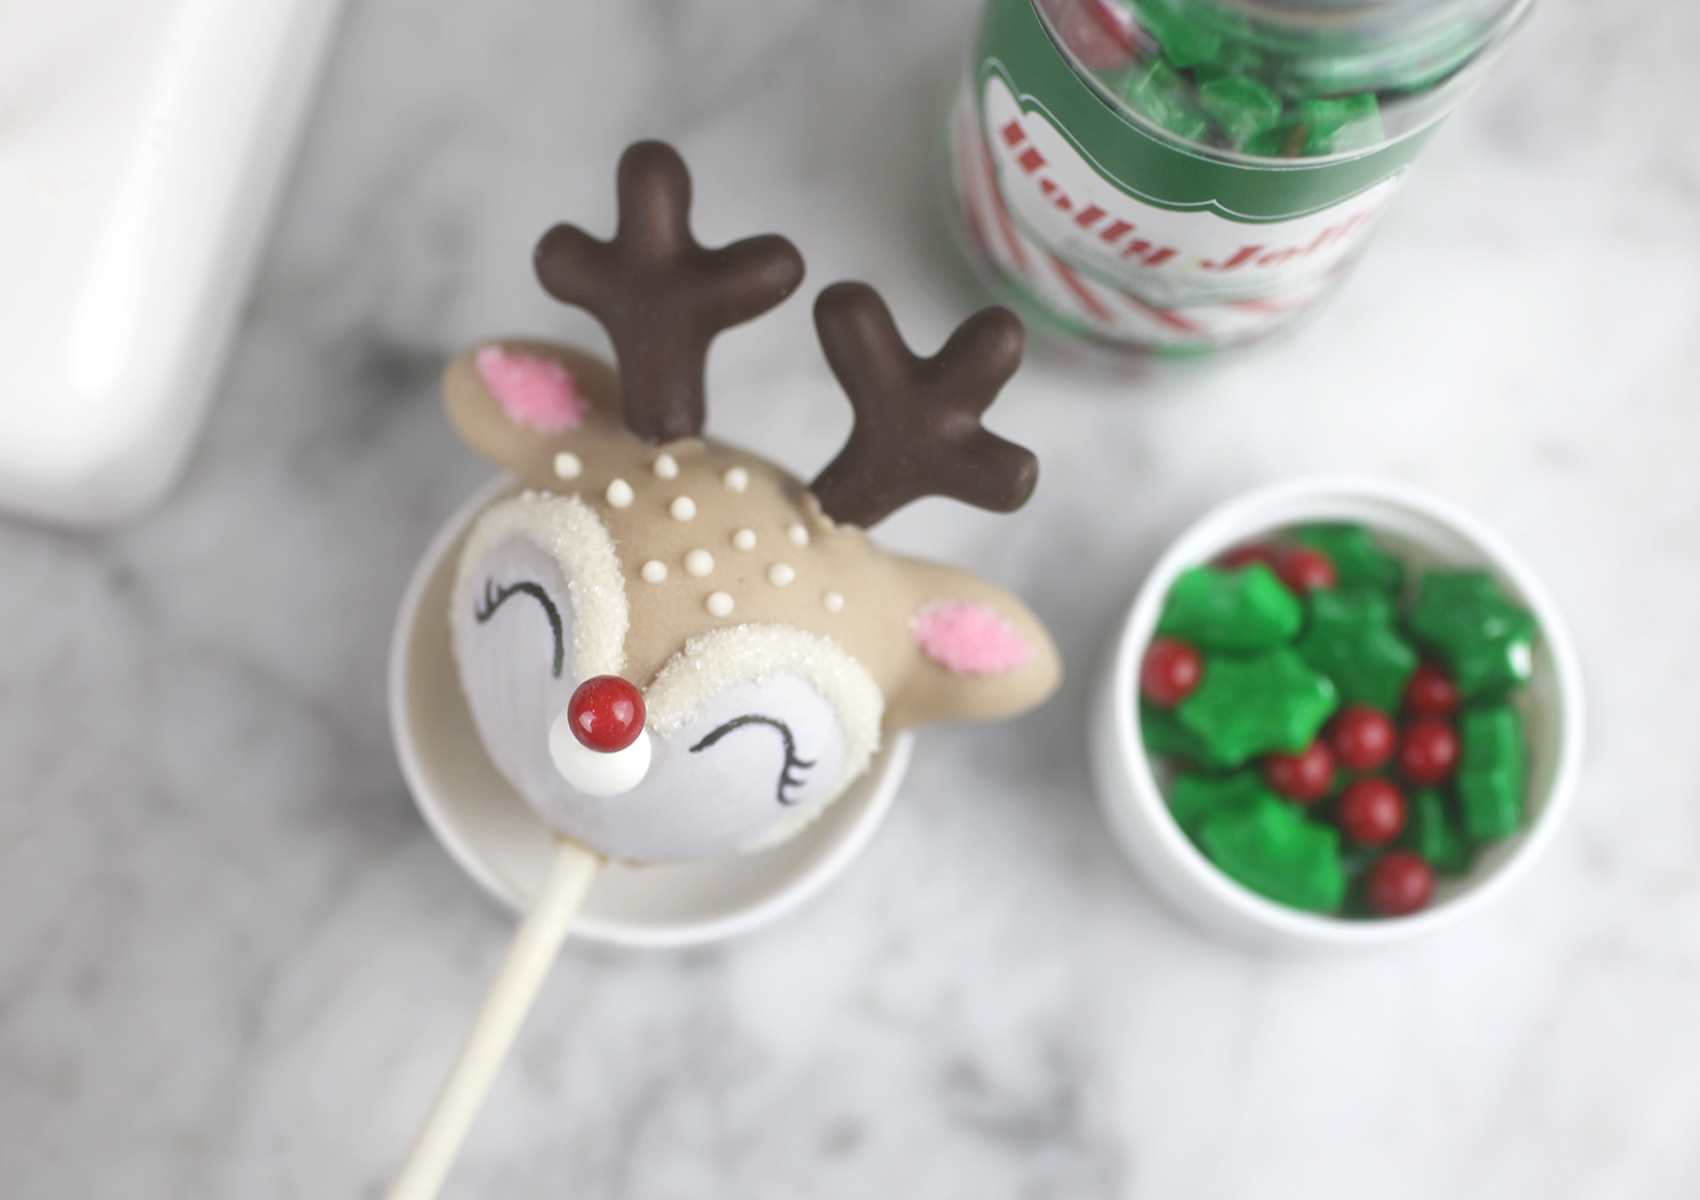
And of course, we need little red noses. I used these seasonal holly and berry sprinkles, but red sugar pearls would probably work, too. Attach them to the snouts with a dot of melted white candy coating as glue.
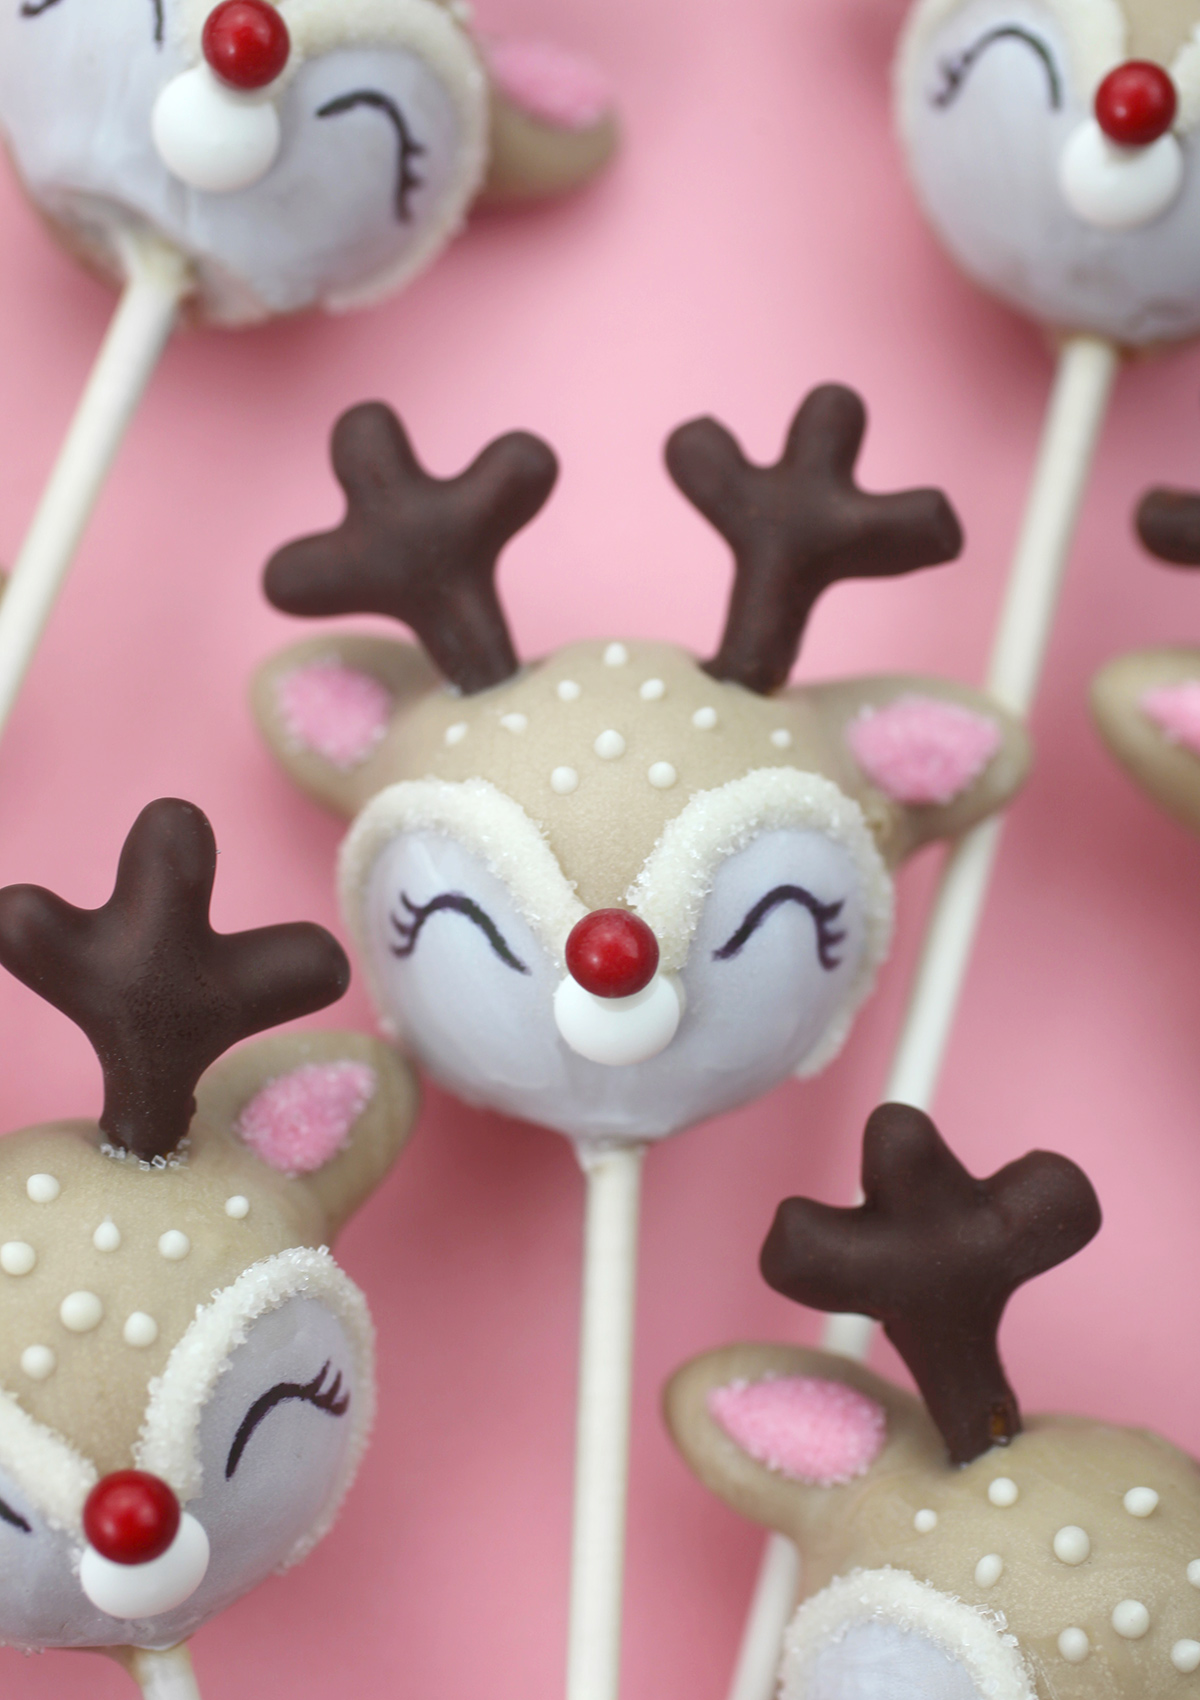
Oh deer, look how cute!
Here was my inspiration for these adorable little guys. A crochet account that I stumbled on through instagram with the cutest cuddly crocheted critters.
Hope these little guys brighten your day! Enjoy.


Thanks for this post. That’s what I was looking for, what an info present here at this website, thank you admin!
Thanks for this wonderful recipe here. Thanks a lot. haan
Thats soo cute! I am sure the kids will love them
I am more of the ten year ago reindeer maker – ha!
Those look very cute. I am sure they will be a hit with the kids. Happy Holidays and hope you have a very Merry Christmas.
These are ridiculously cute! I mean, OMG cute. I mean, wow, I hope mine come out nearly as good. Thanks for the great instructions for these reindeer cake pops!
You have made a lot of cute over the years, but these have got to be the cutest!! So sweet!
These put a big smile on my face. Thank you for your beautiful blog. Have a wonderful holiday season and Merry Christmas!
You are so talented and always make me smile!
These are adorable. They look so sweet.
These are adorable but I would never have the patience nor talent to pull them off! Keep inspiring us to try.
So cute and feminine looking!
How adorable!!! You did it again Angie!
These are so cute! My kids would absolutely love making these!
Paige
http://thehappyflammily.com